
Contents
![]() Use the Distributed Router operator to route
tuples to other nodes in the same cluster. This operator is unusual among other
Palette view operators because you use it at
authoring time to specify an operation that can only occur
at runtime between two or more
nodes.
Use the Distributed Router operator to route
tuples to other nodes in the same cluster. This operator is unusual among other
Palette view operators because you use it at
authoring time to specify an operation that can only occur
at runtime between two or more
nodes.
The Distributed Router operator (hereafter, the Router operator) is analogous in StreamBase 10 to the legacy StreamBase-to-StreamBase adapters in StreamBase 7. Those adapters used client API container connections that required knowing the StreamBase URI of the target container. The Router operator uses the StreamBase Runtime architecture to locate other named nodes in a cluster by means of its discovery mechanism.
You typically use the Router operator in an EventFlow fragment that you expect to run in two or more instances. That is, the same fragment is installed in two or more nodes, and those nodes are running simultaneously. Tuples passing through one instance of the fragment in node A can be routed to another instance of the same fragment in node B.
Routed tuples are not sent to one of the input streams (or other tuple source) of the destination node to make their way downstream. Instead, they enter the destination node's EventFlow stream right at the point they are needed. That is, tuples are routed to the same-named Router operator in the destination nodes.
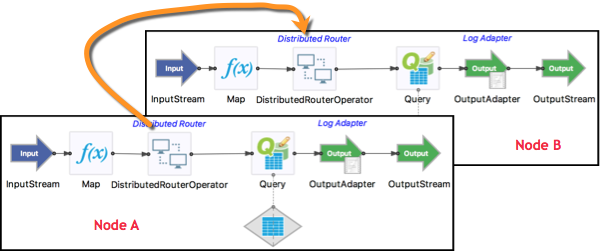
For example, in a two-node cluster with nodes A and B, let's say a Router operator is placed just before a Query operator that writes to a Query Table, and an incoming tuple enters the Input Stream in node A. The routing policy of the Router operator in node A determines whether that tuple is:
-
Passed through to the Query operator in node A, or
-
Routed to the matching Router operator in node B, and from there to node B's Query operator, or
-
Both
The Router operator is an advanced component that requires a solid understanding of the concepts and terminology of the StreamBase Runtime. Before using the Router operator, ensure that you to study the following resources:
-
The entire Concepts Guide.
-
The High Availability in Depth page of the Architecture Guide, especially its definitions of the terms:
-
The difference between static and dynamic data distribution policies
The Router operator itself does not have a control in which you specify the names of destination nodes. Node names are generally assigned or generated at node installation time, and are not known at authoring time. This creates a chicken-or-egg problem for running and testing EventFlow fragments that contain a Router operator.
The solution to this problem depends on the Router Policy setting:
- Broadcast
-
With this policy, any tuple that passes through one node that includes a Router operator is automatically sent to all other nodes in the same cluster that are running an EventFlow fragment with the same-named Router operator. Thus, there is no need for the Router operator to know any destination node names at authoring time. All eligible nodes are discovered at runtime.
- Custom Node
-
With this policy, you specify the fully qualified name of a destination node in a field of one of the fragment's Input Streams at runtime. This removes the requirement to know any destination node names at authoring time.
- Round Robin and Hash
-
For the Round Robin and Hash policies, you must specify the name of an availability zone in the Router operator's properties. You create that zone in a HOCON configuration file of type
com.tibco.ep.dtm.configuration.node. Configuration files of this type, traditionally namednode.conf, are generally part of a StreamBase Application project, and not part of an EventFlow fragment's project.The
node.conffile, in turn, relies on another configuration file of typecom.tibco.ep.dtm.configuration.application, traditionally namedapp.conf. This configuration defines the data distribution policy needed by the availability zone definition innode.conf. - Custom Partition
-
With this policy, you specify the name of the target partition in a field in one of the fragment's Input Streams at runtime. Partitions are defined in a
node.conffile, as with the Router policies above. As before, thenode.conffile requires a companionapp.conffile. - Custom Round Robin
-
This is the same as Round Robin except the availability zone name is taken from a field from the input tuple (instead of configured).
- Custom Hash
-
This is the same as Hash except the availability zone name is taken from a field from the input tuple (instead of configured).
This section provides two barebones HOCON configuration files that you can use when experimenting with the Router operator and its Round Robin, Hash, and Custom Partition policies. Your actual configuration files are likely to require more information than provided here. The use and placement of these example files is discussed in the epadmin and Studio sections below.
Save the following configuration as
node.conf. See the node HOCON type documentation
to understand and extend this sample.
name = "node"
version = "0.0.1-SNAPSHOT"
type = "com.tibco.ep.dtm.configuration.node"

configuration
{
  NodeDeploy = {
    nodes = {
      "A.sbuser" =
        {
          availabilityZoneMemberships = {
            staticzone = {
              staticPartitionBindings : {
                P1 = { type = "ACTIVE" }
                P2 = { type = "REPLICA" }
              }
            }
          }
        }
      "B.sbuser" =
        {
          availabilityZoneMemberships = {
            staticzone = {
              staticPartitionBindings : {
                P2 = { type = "ACTIVE" }
                P1 = { type = "REPLICA" }
              }
            }
          }
        }
    }
    availabilityZones = {
      staticzone = {
        dataDistributionPolicy = "static"
          staticPartitionPolicy {
            staticPartitions = {
              P1 = {}
              P2 = {}
          }
        }
      }
    }
  }
}
Notice that:
-
This configuration explicitly names two nodes,
A, andB, in thesbuser -
The
sbusersbuser -
As an alternative, you can specify the node names as substitution variables with default values. For example:
nodes = { ${NODE_NAME:-A}.sbuser= { ...In this case, specify a substitution value for NODE_NAME when you install nodes from this fragment, either with epadmin or in Studio.
-
For the
Anode, partitionP1is defined asACTIVE, withP2as theREPLICApartition. -
But for the
Bnode, the partitions are defined in the reverse, withP2as theACTIVEpartition.
Save the following configuration as app.conf.
See the application HOCON type
documentation to understand and extend this sample.
name = "app"
version = "0.0.1-SNAPSHOT"
type = "com.tibco.ep.dtm.configuration.application"
configuration = {
  ApplicationDefinition = {
    dataDistributionPolicies = {
      static = {
        type = "STATIC"
      }
    }
  }
}To run Router-containing EventFlow fragments on the command line, use the standard six steps described in Deploy with epadmin in the Concepts Overview, but with the following adjustments based on the Router Policy setting of your Router operator.
- Broadcast
-
For this policy, there is no need for configuration files, although you are welcome to use them. Install one node with any node name:
epadmin install node nodename=A.sbuserapplication=...Then install a second node with the same command line, except for the node name:
epadmin install node nodename=B.sbuserapplication=...Start both nodes, then send input tuples using the sbc command, or using a command such as:
epadmin servicename=A.sbuser enqueue stream input=- path=default.InputStream
Then enter tuples at the command prompt. (The
input=-keyword specifies reading input from standard input.) - Custom Node
-
For this policy, use the same procedure as for Broadcast, but make sure your fragment's Input Stream has a field on which to specify the destination node name with cluster name, and make sure that the field name is listed in the Router operator's Properties view. For the example
node.conf, you would specifyA.orsbuserB.in this field.sbuser - Round Robin and Hash
-
For these policies, save
node.confandapp.confconfiguration files in thesrc/main/configurationsfolder of your StreamBase Application project (not the EventFlow fragment's project). Use the files as shown in Example Configuration Files, or your own similar files. Then create your application archive normally.If your
node.conffile specifies explicit node names, you must use those names in your epadmin install node commands. If yournode.confspecifies a substitution variable for the node name, then be sure to specify the substitutions= keyword on your epadmin node install command line. - Custom Partition
-
For this policy, save
node.confandapp.confconfiguration files as described for Round Robin and Hash, and install your nodes with explicit or substituted node names as described above.The difference with this policy is to make sure your fragment's Input Stream has a field on which to specify the target partition, and make sure that the field name is listed in the Router operator's Properties view. For the example
node.conf, you would specify P1 or P2 in this field.
When you run EventFlow fragments in Studio, Studio does all the work of installing and starting a node to contain your fragment. You can easily start two or more instances of the same fragment and can select one running fragment for input in the Manual Input view.
Your ability to follow the routing of tuples into different Studio-managed nodes depends on the design of your EventFlow fragment. However, nothing in Studio prevents you from running two or more Router-containing fragments and then following the progress of tuples into separate nodes.
Some Router Policy settings have more setup steps than others:
- Broadcast
-
This Router Policy is the easiest to run in Studio. You can run a fragment using Studio's default settings for node and cluster name, then start another instance of the same fragment right away. As long as the cluster name matches, you can send tuples to any fragment instance and can follow the assignment of tuples to nodes.
- Custom Node
-
As with the Broadcast policy, this policy can be run with Studio's default settings for node and cluster names. The difference is to make sure your fragment's Input Stream has a field on which to specify the destination node name with cluster name, and make sure that field name is listed in the Router operator's Properties view. For the example
node.conf, you would specifyA.orsbuserB.in this field.sbuser - Round Robin and Hash
-
These Router Policy settings require special steps to successfully run in Studio.
-
These settings require
node.confandapp.conffiles, as described in Specifying Destination Node Names above. However, those files are normally part of the StreamBase Application's configuration, not the fragment's configuration. Use the following workaround:-
Place your
node.confandapp.confconfiguration files in thesrc/test/configurationsfolder of your fragment's project. -
Run your fragment normally one time. This run fails because the Router operator cannot locate its node configuration. However, running and failing does create a default Run Configuration that you can now edit.
-
Invoke > from Studio's top-level menus to open the Create, manage, and run configurations dialog. Select the Run Configuration generated for the fragment you just attempted to run.
-
In the Configuration Files section at the bottom of the Main tab, select the checkboxes for
app.confandnode.conf.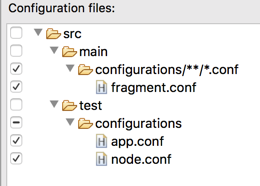
-
-
The node names launched by this Run Configuration must match the names specified in the
node.conffile. You can either:-
Edit the
node.confto specify Studio's default node names. -
Edit the Run Configuration to specify the
AandBnode names in thenode.conf.
To choose the latter option, edit the Run Configuration. In the Node > Name field, replace the default name with
A$(SeqNum).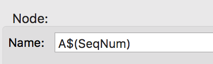
The
$(SeqNum)portion of the name is required. However, that portion resolves to an empty space for the first node launched with theAname.Append
_Ato the name of this Run Configuration in the Name field at the top of the Main tab. Click at the bottom of the tab, but do not click yet.Duplicate this Run Configuration using the controls at the top of the contents panel on the left. Edit the second copy to:
-
Append
_Bto the configuration's name instead of_A. -
Change the
AtoBin the Node > Name field.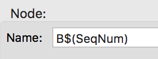
You now have two Run Configurations with the same name except for their
_Aand_Bsuffixes. Start these Run Configurations one at a time.Depending on your node configuration, you may have to start node B before node A. In general, start the REPLICA node before the ACTIVE node.
-
You can now send tuples in the Manual Input view to either running fragment, and can follow their distribution between the two nodes.
-
- Custom Partition
-
For this Router Policy, you must configure the
node.conf,app.conf, and node name settings in two Run Configurations as described above for the Round Robin and Hash policies.The difference with this policy is to make sure your fragment's Input Stream has a field on which to specify the target partition, and make sure that field name is listed in the Router operator's Properties view. For the example
node.conf, you would specify P1 or P2 in this field.
Name: Use this required field to specify or change the name of this instance of this component. The name must be unique within the current EventFlow module. The name can contain alphanumeric characters, underscores, and escaped special characters. Special characters can be escaped as described in Identifier Naming Rules. The first character must be alphabetic or an underscore.
Operator: A read-only field that shows the formal name of the operator.
Class name: Shows the fully qualified class name that implements the functionality of this operator. If you need to reference this class name elsewhere in your application, you can right-click this field and select Copy from the context menu to place the full class name in the system clipboard.
Start options: This field provides a link to the Cluster Aware tab, where you configure the conditions under which this operator starts.
Enable Error Output Port: Select this checkbox to add an Error Port to this component. In the EventFlow canvas, the Error Port shows as a red output port, always the last port for the component. See Using Error Ports to learn about Error Ports.
Description: Optionally, enter text to briefly describe the purpose and function of the component. In the EventFlow Editor canvas, you can see the description by pressing Ctrl while the component's tooltip is displayed.
Configure the following settings using the Operator Properties tab.
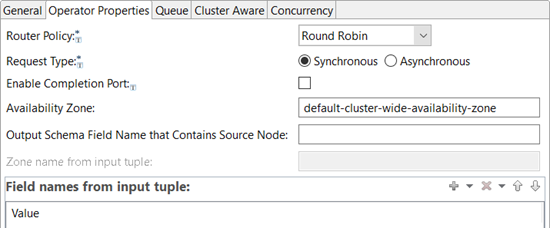 |
- Router Policy
-
Use the dropdown control to select one of the following policies for this Router operator instance.
- Round Robin
-
This policy forwards each incoming tuple to the next partition in the specified availability zone, alternating in sequence among all defined partitions. For a simple two-partition, two-node configuration, incoming tuples are alternately routed between the active nodes for each partition. This policy requires an availability zone defined in configuration files. Tuples are only sent to partitions active on primary nodes in an availability zone. Tuples are never sent to partitions active on backup nodes.
- Hash
-
This policy routes to a high availability zone based on specific fields in the input data that you specify in the Properties view. The high availability zone defines the partitions that are considered when the value is hashed. Once the Router operator maps the value to a specific partition, the data is routed to the active node for that partition. This policy requires an availability zone defined in configuration files. Tuples are only sent to partitions active on primary nodes in an availability zone; tuples are never sent to partitions active on backup nodes.
- Broadcast
-
This policy routes incoming tuples to all nodes in the cluster, including the sending instance. For synchronous sends, each node is sent the data, and any application exception returned is processed before moving onto the next node. If a node crashes during the send, it is ignored. This policy does not need an availability zone defined in configuration files.
- Custom Node
-
This policy routes each incoming tuple to the node whose name is specified in one of the fields of the incoming tuple. This policy does not need an availability zone defined in configuration files.
- Custom Partition
-
This policy routes each incoming tuple to the partition whose name is specified in one of the fields of the incoming tuple. This policy requires partitions defined in configuration files.
- Custom Round Robin
-
This is the same as Round Robin except the availability zone name is taken from a field from the input tuple (instead of configured).
- Custom Hash
-
This is the same as Hash except the availability zone name is taken from a field from the input tuple (instead of configured).
Note
When Custom Round Robin or Custom Hash is selected, at Runtime, the Router operator creates one high availability router per availability zone on startup. On the inbound tuple, the Router operator selects the right high availability router to use based on the availability zone. Because of this, semantics such as round robin are per availability zone. For example, custom round robin routing would look something like:
-
tuple contains zone = z1. Node A is selected (first partition is active on A).
-
tuple contains zone = z1. Node B is selected (second partition is active on B).
-
tuple contains zone = z2. Node A is selected (first partition is active on A).
-
tuple contains zone = z1. Node C is selected (third partition is active on C).
-
- Request Type
-
This control specifies what type of transaction is used when sending tuples to destination nodes.
-
Synchronous: (default). Synchronous routing is run in the context of the current transaction, extended to destination nodes. See Local and Distributed Transactions for more on distributed transactions.
-
Asynchronous: this option starts a new transaction on the destination node.
-
- Enable Completion Port
-
Select this checkbox to create an output port for this Router operator instance. If created, each successfully routed tuple is sent to this port. Use this option for logging or auditing purposes.
- Availability Zone
-
Specifies the name of an availability zone defined in configuration files related to the current project, as described for epadmin and Studio launches above. For the Round Robin, and Hash routing policies, this field is required.
For convenience, the Router operator supplies a default availability zone called default-cluster-wide-availability-zone, which does not require a HOCON configuration file (unless you expressly override this default within a configuration file). See here for the default availability zone's settings.
- Output Schema Field Name that Contains Source Node
-
Specify the name of a string field that will be added to the Router operator's output tuple to contain the name of the current node, the node that is sending tuples to other nodes.
- Zone name from input tuple
-
Defines what field the input tuple that the availability zone comes from when you select the Custom Round Robin or Custom Hash router policy.
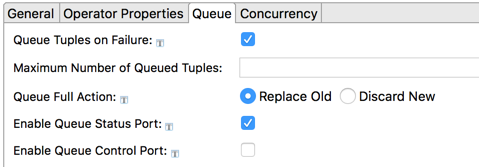
Use the Queue tab to enable and configure optional FIFO queuing of routed tuples.
 |
With queueing disabled (the default condition), routed tuples that encounter an error in reaching the destination node are handled as follows:
-
For the Broadcast and Custom Node routing policies, an exception is returned.
-
For the Round Robin, Hash, and Custom Partition routing policies, the tuple route attempt automatically fails over to a backup node, if one is configured. If the partition state cannot be determined, an exception is returned.
You can instead use this tab to specify automatic queueing of routed tuples whenever a receiving node is unavailable, or when one or more tuples have already been queued.
- Queue Tuples on Failure
-
Select this checkbox to enable tuple queueing. This activates the other controls on this tab.
- Maximum Number of Queued Tuples
-
Specify an integer that sets the maximum number of tuples to be queued. If this field is zero or empty (the default), the queue has no limit.
- Queue Full Action
-
Specifies the action to take if a maximum queue size is specified in the control above, and that the maximum number of tuples is reached. The options are:
-
Replace old tuples in the queue with newer incoming tuples. (Default)
-
Discard new tuples.
-
- Enable Queue Status Port
-
If selected, an output port is added to this Router operator instance. If the port is enabled, a status tuple is emitted on this port for every tuple queued. The schema of this status tuple is:
Field Name Data Type Description Status string Contains one of: QUEUE_FULL,QUEUE_DRAINED, orQUEUE_FLUSHED.Target string Contains the name of the node or partition for which this queue was created. Tuple tuple -
If Status is
QUEUE_FULL, this tuple field contains the discarded tuple data. -
If Status is
QUEUE_FLUSHED, this tuple field contains the discarded tuple data for each flushed tuple. -
If Status is
QUEUE_DRAINED, this tuple field is null.
-
- Enable Queue Control Port
-
If selected, an input port is added to this Router operator instance. Connect an Input Stream with the following schema:
Field Name Data Type Description Command string Contains a queue control command. Currently, the supported command is QUEUE_FLUSH.Target string Contains the name of the queued node to which this command is directed.
Use the settings in this tab to enable this operator or adapter for runtime start and stop conditions in a multi-node cluster. During initial development of the fragment that contains this operator or adapter, and for maximum compatibility with releases before 10.5.0, leave the Cluster start policy control in its default setting, Start with module.
Cluster awareness is an advanced topic that requires an understanding of StreamBase Runtime architecture features, including clusters, quorums, availability zones, and partitions. See Cluster Awareness Tab Settings on the Using Cluster Awareness page for instructions on configuring this tab.
It is possible to specify StreamBase concurrency options for the Distributed Router operator. The options, especially for Dispatch Styles, may appear to be redundant, but are not.
It is a best practice not to experiment with any settings in this tab until you have a known working and thoroughly tested EventFlow module with its Router operators working as designed. To add concurrency options on top of the Router operator's tuple distribution actions, remember that:
-
The Router operator's distribution action works entirely outside of its enclosing EventFlow module, as an action between nodes.
-
Concurrency options can add parallel region processing and/or multiple instance processing entirely within the current EventFlow module.
Use the Concurrency tab to specify parallel regions for this instance of this component, or multiplicity options, or both. The Concurrency tab settings are described in Concurrency Options, and dispatch styles are described in Dispatch Styles.
Caution
Concurrency settings are not suitable for every application, and using these settings requires a thorough analysis of your application. For details, see Execution Order and Concurrency, which includes important guidelines for using the concurrency options.