
To document your EventFlow modules, you can add Notes. Notes can attach to the EventFlow canvas, to individual components, to two or more components selected together, or to Groups. It is even possible to attach a Note to another Note.
The only purpose of Notes is to provide documentation directly in your EventFlow diagram. A Note icon on your EventFlow canvas has no effect on your application's logic flow. It only provides information for the developer.
To add a Note:
-
Select where you want the Note to attach. Click anywhere in the EventFlow canvas to create a free-standing Note attached to the EventFlow diagram. To attach a note to a component or a group of components, you can:
-
Select a single component.
-
Select two or more components.
-
Select a Group.
-
-
Right-click and select from the context menu or use the keyboard shortcut, a single slash (/).
-
For component-associated Notes , the Note icon has an arc connection to the that component.
-
For free-standing Notes, the Note icon appears as an unconnected component.
-
-
To add text to a Note, you can either:
-
Double-click the Note and edit its text directly on the canvas.
-
Select the Note, then open the Properties view. Edit the fields in the General tab:
- Name
-
Enter a name for the Note. The name is shown when you hover the mouse over the Note on the canvas and hold down the Ctrl key.
Names are automatically assigned to Notes if you do not provide one.
- Description
-
Enter your text in the Description field. The field preserves line breaks, and can render the following HTML tags:
<b>,<p>, and<br>.
-
-
To connect a note to a component, click the small yellow plus sign (
+) in its upper left corner and drag to the component. You can connect a note to any number of components. -
To remove a connection between a note and a component, select the connection and press Delete.
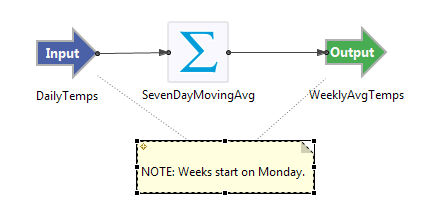
The following picture shows a note (selected for editing) attached to two components.
On Windows, you can also drag text from another drag-enabled Windows application to the EventFlow canvas, which creates a Note containing that text.
To see the contents of a Note in the EventFlow canvas, hover your cursor over its icon. The Note text is displayed in a tooltip box.
The text you place in Notes is saved with the EventFlow application, but does not affect the logic of your application. Note
text can be seen as one or more <gui.note> elements when you view your EventFlow application in source form.
When you delete a component that has an attached Note, the Note remains on the canvas and becomes a free-standing Note.
Change the default background color of all Notes using the Color and Fonts Preferences page. Invoke >, then >>. Open the folder, select , and click .
You can also use Color and Fonts Preferences to change the default font and font size for notes. The factory default is the font used to display text in the editor view. To make notes display in a different font, go to > and select >>>>, and click . This setting is global, affecting all notes in every project that the editor displays.
To change the color of an individual Note, Click the Background Color button on the selected Note's General tab in its Properties view.