
An EventFlow Fragment Unit Test is a Java file based on the org.junit and com.streambase.sb.unittest packages. To use the EventFlow Fragment Unit Test feature, you must be able to write Java code, and you should be familiar
with Java JUnit in general. Use the EventFlow Fragment Unit Test feature with the following steps:
-
Generating Unit Test Code. Run the StreamBase Unit Test wizard to generate starting point Java test code for your project.
-
Editing EventFlow Fragment Unit Tests. Edit and complete the generated test code.
-
Running EventFlow Fragment Unit Tests in Studio. Run the completed Unit test file in Studio.
See EventFlow Fragment Unit Test Tutorial for a step by step tutorial that walks through each step of generating an EventFlow Fragment Unit test for one of the StreamBase samples.
See Using the EventFlow Fragment Unit TimeService for a discussion of advancing time programmatically in EventFlow Fragment Unit tests.
To create a new EventFlow Fragment Unit Test:
-
Prepare the target project folder by adding libraries to its Java Build Path, as described in the previous section.
-
In the Project Explorer, first select the module unit you want to test. Select an EventFlow module, or a deployment file that specifies the module of interest.
-
Open the New StreamBase Unit Test Class wizard using any of the following methods:
-
Select >>.
-
Click the New StreamBase Unit Test (
 ) button in the tool bar.
-
Click the New StreamBase Unit Test (
) button under the Input Streams and Output Streams views in the SB Test/Debug perspective.
-
Click the dropdown arrow next to the New tool bar button (
 ), and select StreamBase Unit Test (JUnit) from the dropdown menu.
-
Right-click anywhere in the Project Explorer, and select > from the context menu.
-
With the cursor in any Studio view, press Ctrl+N to open the New dialog. Select StreamBase Unit Test (JUnit) and click .
-
With the cursor in any Studio view, press Alt+Shift+N to open the > menu at the cursor location. Select StreamBase Unit Test (JUnit) and press Enter.
-
-
Fill in the fields of the New StreamBase Unit Test Class dialog:
Source folder If you entered the dialog by first selecting any file in a Project Explorer project, the src/test/javafolder of that project is entered for you. Otherwise, use to navigate to thesrc/test/javafolder of the project folder of interest.Package Enter a Java package name that conforms to your site's standards. You can leave this field blank to use the default Java package, but Studio warns against this practice. If the current workspace folder already has one or more Java package directories in place, use Ctrl+Space to select among them from the content completion dialog. Name Enter a name for your Java test class, using standard Java class naming rules. Module under test By default, the name of the most recently run application is entered for you.
-
When done, press .
-
Studio inspects the specified module or deployment file named and generates a StreamBase JUnit Java test file. The new file is opened for editing in Studio.
The generated Java test file is a starting point only, with incomplete sections. You must customize the file by adding the exact tuple content you want to send to the module's input streams, and the exact tuple content you expect to see on the module's output streams. See Editing EventFlow Fragment Unit Tests for a discussing of the required and optional edits for your JUnit test file.
Run an EventFlow Fragment Unit Test like any other Java code in Studio: with the EventFlow Fragment Unit Test file selected,
click the black triangle to the right of the ![]() Run button in the Studio tool bar. Select >. You can also open the Run Configurations dialog to create and edit a launch configuration for your test file.
Run button in the Studio tool bar. Select >. You can also open the Run Configurations dialog to create and edit a launch configuration for your test file.
Note
When running a StreamBase JUnit Test, be sure to select >, which first starts StreamBase server, not as a , which does not.
The EventFlow Fragment Unit Test mechanism performs the following actions:
-
Starts StreamBase Server in the background.
-
Directs StreamBase Server to load and run the application module to be tested.
-
Sends one or more tuples to input streams as specified in the test file.
-
Monitors the specified output streams of the module for output tuples.
-
Compares the output tuples to the expected output as specified in the test.
-
Shuts down StreamBase Server.
-
Reports success or failure.
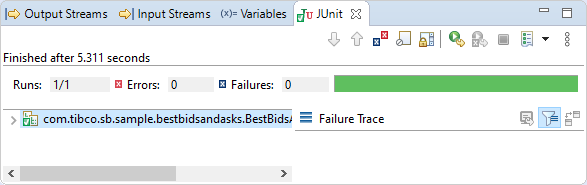
Success or failure is shown in the Console and JUnit views, which share the bottom pane of the SB Authoring perspective. In the JUnit view, a successful run shows with a long green bar and statistics, like the following example:
 |
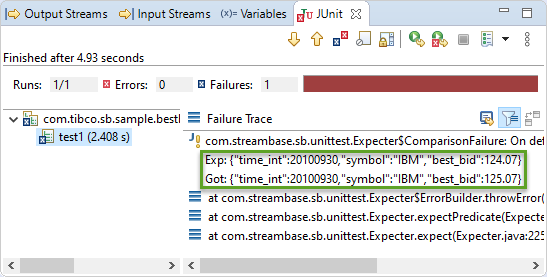
A failing run shows a stack trace that includes the tuples that failed to match the expected output:
 |