An embedded adapter is a StreamBase component, inserted in the flow of a StreamBase application, that calls a custom Java method. It runs in the same StreamBase Server process that is hosting and processing your StreamBase application's requests. Embedded adapters start and stop automatically with the StreamBase application, which simplifies many administration tasks, and can eliminate the client-server communication overhead seen with external adapters.
Embedded adapters extend the following packages in the StreamBase Java Client library:
-
com.streambase.sb.adapter.InputAdapter -
com.streambase.sb.adapter.OutputAdapter
Embedded adapters inherit some behavior from operators, and both InputAdapter and OutputAdapter are subclasses of com.streambase.sb.operator.Operator.
Designing, developing, and deploying embedded adapters in StreamBase Studio is similar to working with Java operators. Generally, you follow this process:
-
Understand the StreamBase embedded adapter life cycle.
-
Create the required Java class for your adapter. We strongly recommend using the StreamBase Embedded Adapter wizard to generate the base Java code, as described in the following topic:
-
Edit the Java source generated by the wizard to implement your specific functionality. The code includes
// TODOmarkers that indicate sections that need to be completed. The following topic contains information about writing adapter code:Creating Custom Java Embedded Adapters
Pay special attention to the Methods for Studio Presentation section of that page.
-
If you are using third-party JARs or native libraries, you may need to configure StreamBase Studio to correctly load the libraries:
-
Add the adapter to a StreamBase application, as described in this Authoring Guide topic:
You can use the adapter and test it in the StreamBase Studio environment without compiling or packaging it.
-
Deploy the adapter.
If you are creating an adapter that you want to share with others as a global adapter, you must create a manifest, as described in Creating Manifest Files for StreamBase Adapters. Otherwise, no manifest is required.
Deployment is described in Deploying Applications. It involves packaging your adapter into a JAR and exporting it to your file system. When you deploy your application, you will need to edit the
sbd.sbconffile that will run it, defining the<operator-resource-search>element to identify the deployed location of your adapter JAR.
This topic explains how to use the StreamBase Embedded Adapter wizard to generate the base code for a custom embedded adapter.
The StreamBase Java Client library includes the com.streambase.sb.adapter.InputAdapter and com.streambase.sb.adapter.OutputAdapter classes, which you can extend to define custom embedded adapters for your StreamBase applications. Embedded adapters run
in the same StreamBase Server process that is hosting and processing your application's requests. This eliminates the client-server
communication overhead seen when using external adapters. Embedded adapters start and stop automatically with the StreamBase
application, which simplifies many administration tasks.
The Embedded Adapter wizard helps you get started with the StreamBase Client API for Java by stepping you through the adapter
definition process. The Java source file that it generates includes commented TODO sections that you can later edit to add the functionality that implements your adapter.
After you replace these sections with your implementation code, you can use the adapter immediately in applications that you run locally in StreamBase Studio. If you are running your applications on a remote StreamBase Server, you can package your adapter classes as a JAR file and copy it to the remote server, with references to the JAR file in the remote server's configuration file. As an alternative, you can bundle your project including the new adapter into a StreamBase bundle file, and run the bundle on the remote server.
To open the New Embedded Adapter wizard, run → → .
You can also:
-
Select StreamBase Embedded Adapter from the New button's drop-down list in the toolbar (
 ).
).
-
Click the New button in the toolbar, open the StreamBase Java Wizards folder, select StreamBase Embedded Adapter, and click .
Edit the following fields in the wizard's first page:
- Type
-
Select Input Adapter or Output Adapter.
-
Input adapters take information from outside of a StreamBase application and provide it in the form of one or more streams to the application.
-
Output adapters take streams from a StreamBase application and make them available in some form outside of the application.
-
- Source folder
-
Use the button to select the
java-srcfolder of the Studio project in which you want to create an adapter. Specify the path to an existingjava-srcfolder within a project, or to a referenced folder. The default path entered for you is thejava-srcfolder of the current project. - Package
-
Specify the name of a Java package to contain your adapter class, such as
com.example.sb.adapters, or leave the field empty to specify the default Java package. (If you leave the field blank, the wizard shows a warning message that using the default package is not recommended by Java best practices.)If the Source folder already contains a Java package, you can use the button to select it. You can also type part of the package name and press Ctrl+Space to use content assistance to fill in the rest of the name.
- Name
-
Specify a name for the Java class that will implement your adapter. By Java convention, class names begin with an uppercase character. The name in this field becomes both the class name and the basename of the Java source files generated by the wizard.
- Display Name
-
Specify a display name to identify your adapter in StreamBase Studio. This becomes the label of the adapter icon that will be placed in the Project Adapters drawer of the Palette view when the wizard is finished (and you have refreshed the project's typecheck environment). If you leave this field blank, the class name in the Name field is used as the display name.
- Ports
-
-
For input adapters, specify the number of output ports for this adapter.
-
For output adapters, specify the number of input ports for this adapter.
-
- Client API Library
-
If the wizard detects that the Java Client library is not yet on the selected project's build path, it displays an informational message and suggests a solution. Click the link to add the Client library to the build path. See Adding StreamBase Client Library to the Project Build Path for details.
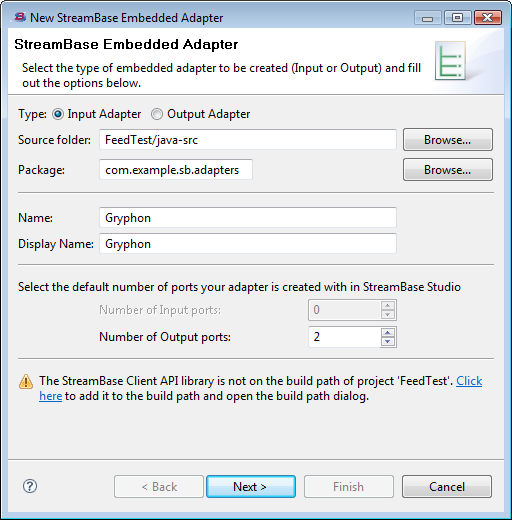
The following image illustrates the wizard's first page, filled in to generate a new input adapter with class name Gryphon:
 |
When ready, click .
The wizard's second page is labeled Input Adapter or Output Adapter, depending on your selection in the Type control on the first page. The input and output adapter pages are almost identical, with some differences in the defaults, as noted in this section.
Edit the following fields in the wizard's Input Adapter or Output Adapter page:
- Adapter Properties
-
Specify one or more properties that can be set or modified by users of your adapter to control its operation. For each property you specify, the wizard generates code to place a control in the Adapter Properties tab of the Properties view for your adapter's icon. See Adding Adapter Properties for details on using this section.
- Use a background thread
-
When enabled, this option generates code that enqueues or dequeues tuples in a thread separate from the module’s main thread.
Default state for input adapters: enabled.
Default state for output adapters: disabled.
- Method stubs to create
-
The wizard generates stub code for the following methods in the class that implements your adapter:
- init()
-
When enabled, this option generates stub code for an
init()method that runs when the adapter is started by its hosting StreamBase Server.Default state for input adapters: enabled and the control dimmed. (That is, the wizard always generates an
init()method for input adapters and you cannot specify otherwise.)Default state for output adapters: enabled.
- resume() and suspend()
-
When enabled, this option generates stub code for
suspend()andresume()methods that allow this adapter to respond to runtime suspend and resume conditions in the StreamBase Server instance that hosts this adapter.Default state for both input and output adapters: disabled.
- shutdown()
-
When enabled, this option generates stub code for a
shutdown()method that allows this adapter to provide processing steps such as closing logs and files when the hosting StreamBase Server begins to shut down.Default state for both input and output adapters: enabled.
- Methods to control enablement of UI widgets
-
When enabled, this option generates stub code for each property you added in the Adapter Properties section, that allows each property to be enabled or disabled depending on conditions you specify in code. Disabled properties are dimmed in the Adapter Properties tab of the Properties view for your adapter's icon. You might use this feature in a set of related properties, to enable one property only if another property in the group is enabled.
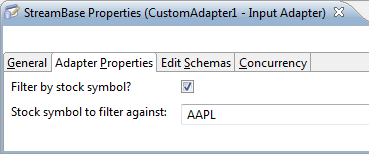
For example, in a set of two properties, one property might provide a check box in which the adapter's user specifies whether or not to filter a stream, while the second property provides a text box in which the user specifies the string to filter against. In this case, you can enable the text box property only if the check box property is enabled first.
Default state for both input and output adapters: enabled. This control is dimmed until you have added at least one property in the Adapter Properties section of this dialog page.
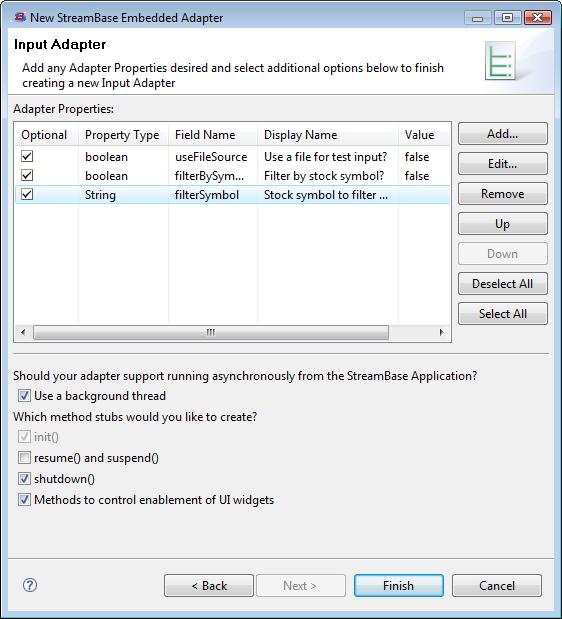
The following image illustrates the wizard's second page, filled in to generate a new input adapter.
 |
An adapter property is a Java property for your adapter. For each property you specify, the wizard generates code to place a control in the Adapter Properties tab of the Properties view for your adapter. After you add implementation code to the generated stub code, the end-user of your adapter can use these controls to modify the operation of your adapter.
Note that certain property types are not available using the wizard. See Java Operator Properties for a list of the property types you may edit into the generated code after the wizard completes.
Each property's data type determines the type of GUI control generated by the wizard for placement in the Adapter Properties tab of the Properties view for your adapter. The following table shows the GUI controls generated for each property type.
| Property's data type | Control generated for the Properties view | Typecheck considerations |
|---|---|---|
| int | Text box that accepts only integer values. | Typechecking rejects non-numeric characters, fractional values, and values larger than the int data type's maximum. Negative values are allowed. |
| long | Text box that accepts only long values. | Typechecking rejects non-numeric characters, fractional values, and values larger than the long data type's maximum. Negative values are allowed. You can append an uppercase L to the value, but it is not required. |
| double | Text box that accepts only double values. | Typechecking rejects non-numeric characters and numbers larger than the double data type's maximum. Integer and long values are coerced to doubles. Negative values are allowed. |
| timestamp | Text box that accepts only timestamp values. | Accepts either absolute or interval timestamps, as defined in timestamp Data Type. For an interval timestamp, typechecking accepts a double value representing a number of seconds. For an absolute timestamp,
typechecking accepts a string in the format yyyy-mm-dd[ hh:mm[:ss[.ffff[-tttt]]]], where the brackets show optional portions of the string. ffff represents a fractional seconds value with a maximum precision of milliseconds. tttt is a value representing a time zone. Typechecking rejects any value not meeting these standards.
|
| boolean | check box. | Can only be selected (= true) or cleared (= false). If the StreamBase Studio Authoring preference is not enabled, check boxes have a icon  to their right to toggle them into a text field where the user can enter an expression or module parameter evaluating to to their right to toggle them into a text field where the user can enter an expression or module parameter evaluating to
true or false.
|
| String | Text box that accepts any valid text. | Typechecking allows any valid character in Studio's current character set. |
| String[] | Table-like edit control. | A string array control shows as a two-column edit table, with non-editable array index values in the first column and editable
String values in the second column. In the Value column's table cells, typechecking allows any valid character in Studio's current character set.
Example: 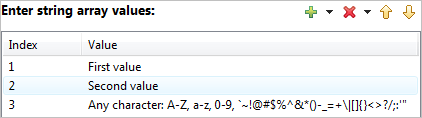 |
| Map<String,String> | Table-like edit control for key-value pairs. | A Map<String, String> control shows as a two-column edit table. You can specify (1) no default values, in which case, the
end-user must fill in both key and value for each line; (2) key values, in which case the end-user must fill in the value
for each key; or (3) both key and value defaults, in which case the end-user is free to edit either column.
Example:
|
| enum | Radio button control or drop-down list. | If you specify two values for an Enum, the wizard generates code for a radio button control. With three or more values, the
wizard generates code for a drop-down list.
Examples: 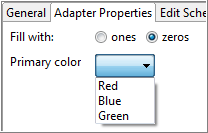 If the StreamBase Studio Authoring preference is not enabled, radio buttons and drop-down lists have a icon |
| ResourceFile | File selection drop-down list. | The ResourceFile type is a special value for which the wizard generates a file selection drop-down list that shows a list of files in the project's current directory. Use the ResourceFile type to allow users of your adapter to select files such as resource, data, or log files to be used by your adapter at runtime. The file to be selected must exist in the Studio project at selection time. |
| Schema | Edit Schemas tab | The Properties view for the new adapter or operator is augmented with a standard Edit Schemas tab as used throughout StreamBase. Use this to specify the schema for the field whose name you specify in the Name field of the New Adapter Property dialog. The Properties view tab generated has the title Edit Schemas if you select the default control in that dialog, or you can specify a different tab title with the custom control. |
| (Expression on port enabled) | Text box that accepts a StreamBase expression that evaluates to one of the simple data types. | See Expression on port for details. |
The buttons along the right side of the Adapter Properties grid have the following uses:
- Add
-
Click to add a property for this adapter, following the guidelines in Adapter Property Dialog Fields.
- Edit
-
Select an existing property and click to amend its values before code generation. Follow the guidelines in Adapter Property Dialog Fields.
- Remove
-
Select an existing property and click to delete it.
- Up, Down
-
Controls are placed on the Adapter Properties tab of the Properties view in the order specified here in the wizard's Adapter Properties control. Select an existing property and use or to rearrange the order of properties before code generation.
- Deselect All
-
Click to clear the Optional check box for all properties in the Adapter Properties table.
- Select All
-
Click to select the Optional check box for all properties in the Adapter Properties table.
The New Adapter Property and Edit Adapter Property dialogs have the same fields for a given property data type. These dialogs take a different form for the Enum and String[] data types.
- Property
-
Select a data type for this property from the drop-down list. Remember that the selection of data type determines the GUI control the wizard generates for placement on the Properties view's Adapter Properties tab. For a table of generated GUI controls by data type, see Property Data Type Determines Generated Control.
- Name
-
Enter a name for a Java variable for the wizard to use to identify this property in the generated code.
- Display Name
-
Enter a string to be used as the label for the control generated for this property. The text you enter here is seen by end-users of your adapter as the label for this control in the Adapter Properties tab of the Properties view. In the following example, the two questions and the label
Stock symbol to filter againstall started life as Display Name entries in this wizard: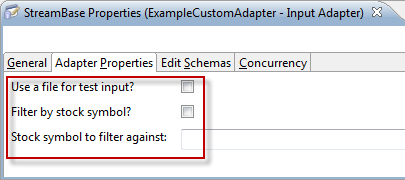
- Default Value
-
Does not appear when the Property field specifies String[] or Enum. Enter or select an optional value to serve as the default-entered value for the GUI control generated for this property. For the numeric data types (int, double, and long) an initial default value of 0 or 0.0 is entered for you. For boolean properties, select between true and false in a drop-down list; false is the initial selection. For String and ResourceFile types, the initial default value is an empty string.
- Optional property
-
Select the check box to make this property optional, or leave it cleared, the default, to make this property required. An optional property generates a GUI control that does not need to be filled in by the end-user. A required property must be filled in before an instance of the generated adapter will pass typechecking. Required properties show with an asterisk on the left side of the GUI control's text box or check box.
You can use the or buttons later to change this value for all properties at once.
- Expression on port
-
Adapter properties are normally expressed as static values that are determined by the adapter's end-user when configuring the adapter's Properties view. As an alternative to specifying static properties, you can use the Expression on port control to specify an adapter property's value dynamically, based on incoming tuple data. The Expression on port control is an advanced feature that requires you to add supporting code to your adapter class that is not generated by this wizard.
The Expression on port control is enabled only when the Property field is set to one of the simple data types (int, long, double, boolean, or String), and is dimmed for other values of the Property field. Use the Expression on port control to specify that the Properties view control generated for this property appears as a text field that accepts a StreamBase expression that resolves to the data type specified in the Property field.
For example, if you select a boolean data type in the Property field, the generated GUI control is normally a check box, as shown in the table in Property Data Type Determines Generated Control above. However, if you also select Expression on port, the generated GUI control instead becomes a text field that takes a StreamBase expression that resolves to a boolean.
In code terms, when you select a simple data type in the Property field, the wizard generates an
SBPropertyDescriptorobject for this property. But when you also select Expression on port, the wizard instead generates anSBExpressionPropertyDescriptorobject for this property. (See the Javadoc for the StreamBase Client Library for details.)You, the adapter developer, do not specify the actual expression to use. You are allowing a place on the adapter's Properties page for the adapter's end-user to specify an expression at adapter setup time.
You must also specify an input port whose tuples are to be used in the course of evaluating the end-user's expression, which can optionally refer to fields in the tuple. Input ports are zero-based, so select 0 from the spin control to specify the adapter's first input port. Select 1 to specify the adapter's second input port, and so on. You can specify any input port, independent of the use your adapter makes of the port. This includes input ports on which you expect streams of incoming data, as well as input ports on which you expect only occasional tuples that manage or alter the operation of the adapter as it runs.
At runtime, the adapter evaluates the end-user's specified expression against each tuple arriving on the specified input port, and the adapter is passed the newly computed value for the property via its setter method. Thus, when your adapter is processing each tuple, it should retrieve the latest value for this property simply, by using the property directly, or via its getter method.
The end-user's expression is evaluated against incoming tuples on input ports only. Since input adapters generated with this wizard do not have input ports by default, this means that the Expression on port feature is only appropriate for:
-
An output adapter you are currently generating with this wizard (which always has one or more input ports).
-
An input adapter you are currently generating with this wizard, for which you plan to add an input port later by editing the generated code. You might do this, for example, to add a control port to an input adapter.
In this case, you can enable the Expression on port control while running the wizard, in anticipation of having an input port later. Then when the wizard generates the code, open the generated
classname.javasetPortHints(0,
n);where
nis the number of output ports you specified on the wizard's first page. Change the 0 to 1 to enable one input port, then provide the code that specifies a schema for this input port.
-
- Place property UI widget in tab
-
By default, all properties you define for your adapter are placed on the same default Adapter Properties tab in the Properties view for your adapter. Use this control to create additional tabs, and to place different properties on different tabs.
For example, when you specify a boolean property, Studio generates a labeled check box. Select custom and fill in the name you want to give for a new tab in the Properties view. Use the case and spelling you want to see in the adapter's Properties view. To add your new boolean check box to a new tab named Debug Settings, select the radio button and type Debug Settings in the text field.
Leave the default radio button selected to place this property in the default Adapter Properties tab.
The following controls only appear on the Add or Edit Adapter Property dialog when the Property field specifies String[] or Enum.
- Add a Value
-
Type a value name and click . Remember that the values you enter here are visible to your adapter's end users. These values become the labels for a radio button control, or the members of a drop-down list, or the default values for an edit table control.
- Entered Values
-
Shows the values entered for the current Enum or String[] property.
- Add Button
-
Type a value in the Add a value field and click .
For an Enum, you must enter at least two values. Two values generates a radio button control. Enter three or more values to generate a drop-down list.
For a string array, enter one or more values, which become the default values for the array. The end-user can edit or replace the values you type here.
- Remove Button
-
Select an existing value and click .
- Up and Down Buttons
-
The order of the values in the Entered Values list becomes the text order in the generated radio button control, drop-down list, or edit table control. Select a value and use or to rearrange the value order before code generation.
This section shows examples of adapter property dialogs in the New Adapter Wizard, and the Properties view pages that result.
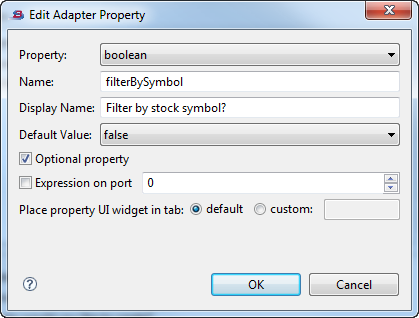
The following Adapter Property dialog creates a property of type boolean:
 |
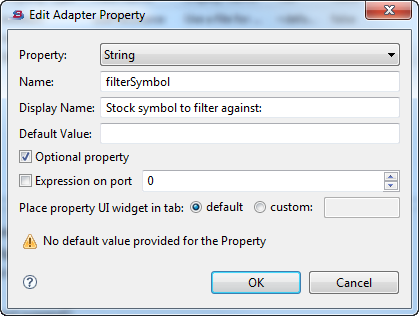
The following dialog creates a property of type String:
 |
The two properties created with the dialogs above are candidates for the Methods to control enablement of UI widget option on the wizard's first page. They appear in the Adapter Properties tab as shown in the following example:
 |
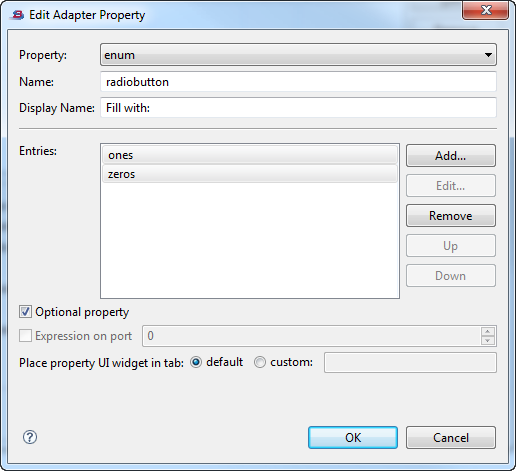
The following dialog creates a property of type Enum. Since two values are specified, the generated result is a radio button control:
 |
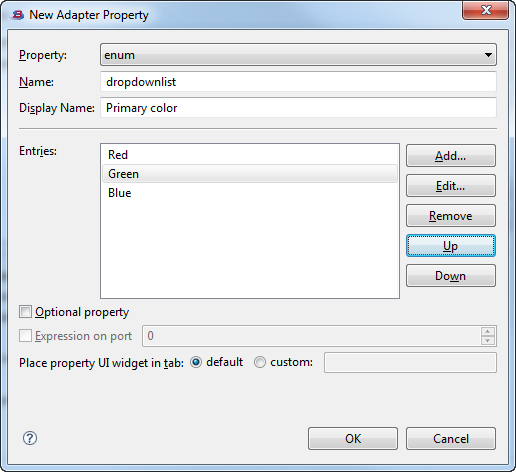
The following dialog creates another Enum property, this time with three values. The generated result is a drop-down list control:
 |
The following fragment of an Adapter Properties tab shows the results generated by the previous two Adapter Property dialogs:
|
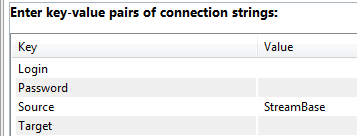
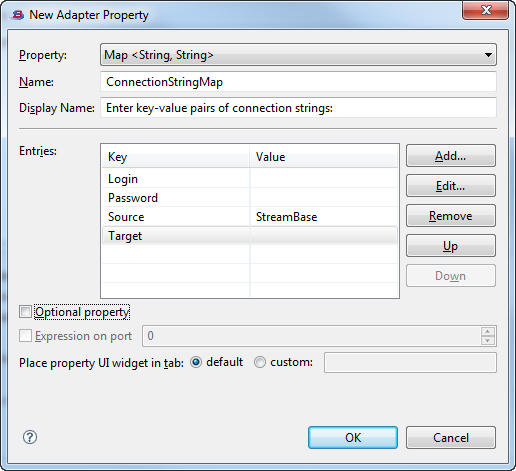
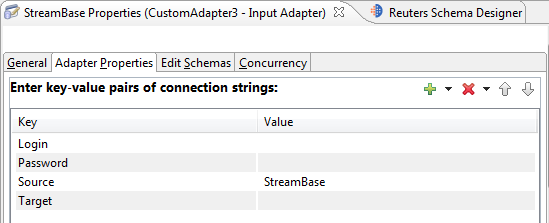
The following dialog creates a property of type Map<String, String>. Notice that three of the keys are entered without default
values, while the Source key provides a default.
 |
The following fragment of an Adapter Properties tab shows the results generated by the above Adapter Property dialog:
 |
After completing the second page of the New StreamBase Adapter wizard, complete the process with these steps:
-
When you are done adding properties on the second page, click .
The wizard generates two Java files: one containing an adapter class, the other, a beaninfo class. You will probably not need to edit the beaninfo class file. However, you must provide implementation code for all places marked
// TODOin the generated adapter class file.The class generated for an input adapter extends
com.streambase.sb.adapter.InputAdapter. Input adapters must callsendOutput(to provide tuples to the application.int,Tuple)The class generated for an output adapter extends
com.streambase.sb.adapter.OutputAdapter. Output adapters must override the methodprocessTuple(to receive tuples from the application.int,Tuple) -
Click to complete the wizard.
-
The wizard generates Java code for your adapter, opens the primary class file for editing, then prompts you to refresh the project's typecheck environment. The first time you run the wizard, it automatically refreshes the typecheck environment so that the new adapter's icon appears right away in the Palette view.
Tip
You must refresh the typecheck environment again every time you make changes to the adapter's Java code. Do this by pressing Ctrl+F5 (or by right-clicking the project's name in the Package Explorer and selecting → from the context menu).
-
An icon for your new adapter now appears in in the Project Adapters section of the Insert an Operator or Adapter dialog. Invoke this dialog by dragging the Adapters, Java Operators icon from the Operators and Adapters drawer of the Palette view to the canvas. Add an instance of your adapter to the canvas by selecting your adapter's icon in the dialog and clicking .
This topic explains how to modify a custom embedded adapter's Java file for use in StreamBase applications.
This topic assumes that you used the StreamBase Java Adapter wizard to generate the initial starter code for your adapter, following the development process recommended in Developing Embedded Adapters.
To understand how embedded adapters are used, we also recommend that you run the Custom Embedded Adapter sample and see the
sample's documentation. To load this sample into StreamBase Studio, use → and select custom-adapter from the [Extending StreamBase] category.
The following sections describe the methods available in the Java Adapter and Operator APIs. For additional details, refer
to the Javadoc for the InputAdapter, OutputAdapter, and Operator classes.
Use the following methods of the Operator class to manage how an instance of your adapter behaves on the EventFlow Editor canvas:
-
Call
Operator.setPortHints(int, int)in your adapter's constructor to set the initial number of ports when your adapter is first placed on the canvas. -
Call
Operator.setDisplayName(String)in your constructor to set a user-friendly name for your adapter. This name is used in the Adapter Name field in the Properties view, and as the details text in the Palette view's Details mode. -
Call
Operator.setShortDisplayName(String)in your constructor to set a short name for your adapter. This name is used as the operator's name in the Palette view and shows above the operator on the EventFlow canvas. -
Call
Operator.setShortDisplayName(String)in your constructor to set a short name for your adapter. This name is used as the adapter's name in the Insert Input/Output Adapter dialogs and shows above the adapter on the EventFlow canvas. -
Override
Operator.getPortCounts()if you change the number of ports based on end-user setting properties. -
Override
Operator.getIconResource(Operator.IconKind)if you want your adapter to appear on the canvas with a custom icon. -
During
Operator.typecheck(), throwOperator.PropertyTypecheckExceptioninstead ofTypecheckExceptionto to allow Studio to flag the specific invalid adapter property and decorate your adapter icon with an overlay to indicate its warning or error state. See thePropertyTypecheckExceptionclass and theOperator.getLocation()method for details. -
See the
UIHintsclass andParameterizableinterface for information on additional control over the display of properties in Studio's Properties view.
For the latest version of this list, see the Special Studio Considerations section of the Javadoc for the Operator class.
Embedded adapters extend the following packages in the StreamBase Java Client library:
-
com.streambase.sb.adapter.InputAdapter -
com.streambase.sb.adapter.OutputAdapter
Adapters inherit some behavior from operators, and both InputAdapter and OutputAdapter are subclasses of com.streambase.sb.operator.Operator.
Like any other StreamBase operator, adapters can have properties that you can customize in StreamBase Studio. You must modify the initial properties generated by the StreamBase Embedded Adapter Wizard.
Each adapter must provide an object that implements the com.streambase.sb.operator.Parameterizable interface. The adapter class may either implement this interface itself or delegate to an accompanying class that implements
this interface. The class that implements Parameterizable must provide the getter and setter methods that reflect the parameters that appear in the StreamBase Studio Properties View
for that adapter. StreamBase finds the Parameterizable object associated with an adapter by calling the getParameters method on an instance of an InputAdapter or an OutputAdapter.
The default implementation of getParameters returns the last Parameterizable set by a call to setParameters. If setParameters has never been called, but the adapter class itself implements Parameterizable, then getParameters simply returns the adapter object. An adapter class can also override getParameters to implement any other desired behavior.
By default, StreamBase uses reflection (via JavaBeans) to derive the available parameters and their types from the getter
and setter methods provided by the Parameterizable object. For example, here is a code fragment of an OutputAdapter class with some properties:
public class Example extends OutputAdapter implements Parameterizable {
    private int         startCount = 1;
    private boolean     clever = true;
    private String []   stockSymbols;
    private String      name;

    public void setStartCount(int i) {startCount = i;}
    public int getStartCount() {return startCount;}
    public void setClever(boolean b) {clever = b;}
    public boolean isClever() {return clever;}
    public void setStockSymbols(String [] ss) {stockSymbols = ss;}
    public String [] getStockSymbols() {return stockSymbols;}
    public void setName(String s) {name=s;}
    public String getName() {return name;}
    public void typecheck() throws TypecheckException {}
    public void processTuple(int inputPort, Tuple t) throws StreamBaseException {}
}
The example OutputAdapter class above declares four properties:
-
startCount -
clever -
stockSymbols -
name
These properties will appear in StreamBase Studio's Properties view. Notice that the getter method for a boolean property can be named either getPropertyName, isPropertyName, or hasPropertyName.
StreamBase currently supports the property types data types shown in the table in Adding Adapter Properties. Most are simple property types that StreamBase derives automatically by looking at the signatures of the getter and setter
methods in the Parameterizable class. These can be specified in the BeanInfo class with SBPropertyDescriptor objects, as in the example above.
Enum properties are string properties that can only take on a specified set of values. ResourceFile properties are similar to Enum properties, but their value must be the name of a resource. In StreamBase Studio, this is enforced by displaying a drop-down list of files available from your project's folder.
Because both Enum and ResourceFile properties are implemented as Strings, their getter and setter methods must return and expect objects of type String, respectively.
Thus, these property types cannot be automatically derived by StreamBase. To use these properties, an adapter must have an
accompanying BeanInfo class that returns the SBPropertyDescriptor subclasses EnumPropertyDescriptor or ResourceFilePropertyDescriptor in its list of PropertyDescriptors.
The BeanInfo class is defined in the java.beans.BeanInfo API documentation. It can be used by the Parameterizable object to:
-
Control what properties are exposed.
-
Add additional metadata about properties, such as which properties are optional.
-
Access special types of properties that cannot be automatically derived via reflection.
If a BeanInfo class is present, only the properties explicitly declared in this class are exposed by StreamBase.
The easiest way to make a BeanInfo class is to extend java.beans.SimpleBeanInfo in a class whose name consists of the name of the Parameterizable class, with BeanInfo appended, residing in the same package as the Parameterizable class. For example, if the Parameterizable class is called MyAdapter, the BeanInfo class should be called MyAdapterBeanInfo.
The following example BeanInfo class makes the Clever property optional:
public class ExampleBeanInfo extends SimpleBeanInfo {
  public PropertyDescriptor [] getPropertyDescriptors() {
    try {
        SBPropertyDescriptor [] p = {
            new SBPropertyDescriptor("StartCount", Example.class),
            new SBPropertyDescriptor("Clever", Example.class).optional(),
            new SBPropertyDescriptor("Name", Example.class)
        };

        return p;
    }
    catch(IntrospectionException e) {
        System.out.println("Exception: " + e);
        e.printStackTrace();
    }
    return null;
  }
}
The optional() method shown in this example marks the descriptor as optional. You should mark as optional any new properties you add to
existing adapters to preserve backward compatibility with existing StreamBase applications developed using the old adapter.
Be sure to provide a default value for each optional property.
Note
To enable a hidden password, use the mask property of SBPropertyDescriptor. If the property is a String type and is set, the adapter's Properties view displays asterisks instead of the characters
typed.
The adapter has the following life cycle when running within the StreamBase Server (sbd) process:
-
Constructor
All adapters must have a public default constructor. The constructor is called when the
InputAdapterorOutputAdapterinstance is created, but before the adapter is connected to the StreamBase application. We recommended that you set the initial input port and output port count in the constructor by callingsetPortHints(inPortCount, outPortCount). The default is no input ports or output ports. The constructor may also set default values for adapter parameters. These values are displayed in StreamBase Studio when a new adapter is dragged to the canvas, and serve as the default values for omitted optional parameters.Do not perform runtime initialization at this stage, as StreamBase Studio can construct instances of the adapter class at design time so that typechecking can occur. In general, you can set any adapter property (for example schemas) in a constructor. However, if you do not want StreamBase Studio to overwrite these properties, do not declare them when designing the component in the Adapter Wizard.
-
Parameters set
StreamBase will call the adapter's setter methods to configure it according to the application.
-
typecheckThe
typecheckmethod is called after the adapter instance is connected in the StreamBase application. The adapter should validate its parameters and throwTypecheckExceptionif any problems are found. The message associated with the thrownTypecheckExceptionis displayed in Studio during authoring, or printed on the console by sbd. Input adapters should set the schema of each output port by calling thesetOutputSchema(portNum, schema)method for each output port. Order these calls by increasing port number. If the adapter needs to change the number of input ports based on parameter values, it should callrequireInputPortCount(portCount)at this point.Call the
getResourceContentsmethod during typecheck, instead of waiting until start or run to call it. This is to ensure that StreamBase Studio can indicate to the user whether it was able to find the resource during authoring, and avoid waiting until sbd fails silently.A custom operator or embedded adapter will generally call a typecheck method and may do so quite frequently. It is therefore important that the method be as clean and efficient as possible. For more information, see Typecheck Method Considerations.
Recall that if your constructor sets adapter properties that Studio also manages (via a beaninfo class), those properties will be overwritten at typecheck time.
-
initThe
init()method is called when the StreamBase application starts. Your adapter is not required to define aninit()method unless you need to register a background thread or perform initialization of a resource such as a JDBC pool. To register a background thread, callregisterRunnable()from your adapter'sinit()method. -
resumeThe
resume()method is called by the StreamBase server before running or resuming the adapter. -
runAt this point, the application begins to run. StreamBase starts threads for any managed runnables registered by earlier calls to
registerRunnable. The behavior of the adapter at this point depends on whether it is anInputAdapteror anOutputAdapter.-
processTuple(output adapters)The
processTuplemethod is called when a tuple is received on an input port. -
Call
sendOutput(input adapters)Input adapters can call
sendOutput(port, tuple)at any time to output a tuple to the specified port.
-
-
resumedThe
resumed()method is called by the StreamBase Server after running or resuming the adapter. At this point, the adapter is fully functional and remains in the run state until shut down or suspended. Individual operators and adapters can be suspended and resumed independently of the container and StreamBase Server in which they run. See the description of suspending and resuming below. -
shutdownThe
shutdown()method is called by the StreamBase Server prior to shutting down the adapter. This is the recommended time to disconnect from external servers. -
postShutdownThe
postShutdown()method is called by the StreamBase Server just after shutting down the adapter. Resources used by the adapter's run() method can be released at this time.
When a running adapter needs to temporarily stop accepting tuples it can be suspended and later its operation can be resumed. The sequence of methods for this process is:
-
suspendThe
suspend()method is called by the StreamBase Server before suspending the adapter. Disconnecting insuspend()and connecting inresume()allows the adapter to control the connection or reset the connection to external servers. The adapter can choose to disconnect from external servers insuspend()to avoid receiving messages while suspended, as these messages cannot be sent downstream while the adapter is suspended. If the adapter were to continue receiving messages while suspended, memory could be exhausted. -
suspendedThe
suspended()method is called by the StreamBase server after suspending the adapter. -
resumeIf the adapter disconnects from external servers using its
suspend()method, it should re-connect withresume(). Theresume()method is called by the StreamBase server before resuming the adapter. -
resumedThe
resumed()method is called by the StreamBase Server after resuming the adapter. Individual operators and adapters can be suspended and resumed independently of the container and StreamBase Server in which they're running.When the entire container is being suspended, the operators and adapters will be suspended individually so that even if the current operator or adapter is still running, other operators or adapters in the container may already be suspended and cannot process tuples.
For additional details, see Processing of Tuples During the Suspension of an Adapter.
Input adapters often need to perform operations asynchronously with the StreamBase application they are running in. For example, an input adapter may need to listen for information on a socket, or read input from a file, without interrupting the rest of the application. Though output adapters are called upon by StreamBase whenever a tuple arrives on an input port, there may be other asynchronous tasks an output adapter may wish to perform, such as periodically flushing a buffer.
To facilitate such requirements, the adapter API provides a mechanism for creating threads that are managed along with the
rest of the StreamBase application. During the init method, an adapter may call registerRunnable(runnable) to register Runnable objects that will be managed in separate threads by StreamBase. When the application starts running, StreamBase will start
all registered Runnables in new threads.
StreamBase-managed threads have the following general structure:
...
  public void run() {
    // Perform thread startup tasks
    while (shouldRun()) {
      // Perform tasks such as calling sendOutput
    }
    // Perform thread shutdown tasks
  }
...
The call to shouldRun ties the thread into StreamBase's thread management in the following ways:
-
Startup - The adapter is not considered started until all its registered threads have made their first call to
shouldRun. -
Shutdown - When the application is shutting down, the adapter's
shutdownmethod will be called first. Once this has returned,shouldRunwill return false, and all threads should exit. Once all threads have exited, the adapter is considered shutdown. -
Suspend - If the adapter is being suspended, the adapter's
suspendmethod will be called first. Once this has returned,shouldRunwill returnfalse, and all registered threads should exit by returning from theirrun()method. Once all threads are blocked inshouldRun, the adapter'ssuspendedmethod will be called. Finally, the adapter will be considered successfully suspended. -
Resume - When the adapter is resumed following suspension, the adapter's
resumemethod will be called. Once this has returned,shouldRunwill return in all threads (returningtrueif this is an ordinary resume, orfalseif a suspended adapter is being shutdown). After all threads have successfully unblocked, the adapter'sresumedmethod will be called.
A Java operator runs in the same process as the StreamBase application that contains it. The same is true of embedded adapters, which are a specific type of Java operator. One advantage of this is that when the StreamBase application starts or stops, any Java operators or embedded adapters in it start and stop along with it. More generally, the application and these components undergo life cycle changes in a synchronized fashion.
With respect to life cycle changes, there may be dependencies among embedded adapters. For example, an input adapter may input data into a StreamBase application. Suppose this data eventually reaches an embedded output adapter. In this case, it would be appropriate for the output adapter to start before the input adapter. That is, the input adapter shouldn't feed data to an output adapter that may have not yet started.
Embedded adapters start, resume and shutdown along with the StreamBase application that contains them. It is also possible to suspend and resume embedded adapters independently of their StreamBase application.
This is accomplished with the same commands that are used to suspend and resume a StreamBase application as a whole. The command sbadmin suspend can be used to suspend an application; similarly, sbadmin resume is used to resume a StreamBase application.
To suspend or resume individual adapters, you can append a list of embedded adapters to the sbadmin suspend or sbadmin resume command. If one or more strings are appended to sbadmin suspend, then the StreamBase application as a whole will not be suspended, rather the individual embedded adapters named by the appended strings will be suspended.
Note that an individual embedded adapter can be suspended or resumed only if the StreamBase application itself is running. An individual embedded adapter can be running only if the application that contains it is also running. Therefore, it is not meaningful to suspend or resume an adapter that is not currently running if the application that contains it is not running.
The sbc status command returns status information about the StreamBase Server.
The sbc status --operators command returns the status of any embedded adapters contained by the server's application. Note that sbc status --operators and sbc status are disjoint commands: sbc status returns information about the server only, not about embedded adapters contained in the server. Similarly, sbc status --operators returns information about contained embedded adapters only, and not any information about the server itself.
In this context, the status of an embedded adapter consists only of its current state. For example, if an embedded adapter
has been started and is currently running, its state will be STARTED. If an embedded adapter has yet to be started, its state will be NONE. If an embedded adapter has been suspended, its state will be either SUSPENDED_AND_DROPPING_TUPLES or SUSPENDED_AND_PROCESSING_TUPLES. Lastly, if an adapter has been shut down its state will be SHUTDOWN.
By default, an embedded adapter starts along with the StreamBase application that contains it. In Studio, in the General tab
for embedded adapters, there is a drop-down menu labeled Start with application that contains the choices and . By default, this box is selected, meaning that the embedded adapter will start with the application. Clearing this check
box causes the adapter to be left in the NONE state when the application starts.
A Java operator that does not start with its application will stay in the NONE state until it is explicitly started with the sbadmin resume adapterName command. Such an adapter will not start even if the application as a whole is resumed. So for example, the application as
a whole may suspend and then resume; this will have no effect on an adapter that has not started with its application.
If an embedded adapter is suspended separately from the application that contains it, tuples might still arrive at the suspended adapter. You can configure the embedded adapter to handle these tuples in two different ways:
-
A suspended adapter can choose to drop tuples that are delivered to it.
-
The adapter can choose to process these tuples.
These two possibilities are represented by static Strings on the class com.streambase.sb.operator.Operator, SUSPENDED_AND_DROPPING_TUPLES and SUSPENDED_AND_PROCESSING_TUPLES, respectively. An embedded adapter is configured to either drop or process tuples by calling the method setSuspendBehavior on its instance. setSuspendBehavior takes an int argument, the value of which must be either SUSPENDED_AND_DROPPING_TUPLES or SUSPENDED_AND_PROCESSING_TUPLES.