Contents
Important
The Lock and Unlock operators and the Lock Set data construct are deprecated and will be removed in a future release. Do not design new applications that use this feature. Contact StreamBase Technical Support if you need help with replacing this feature in an existing application.
This topic explains how the Lock Set data construct interacts with a pair of Lock and Unlock operators, and describes the Lock Set's options on its Properties View.
The Lock Set data construct is a container for the schema of key fields shared by a matched pair of Lock and Unlock operators. The purpose of using a Lock and Unlock operator together is to provide exclusive access for certain tuples to a sequence of operators. This generally comes up when dealing with operators that modify shared data structures, such as Query Tables.
Lock and Unlock operators use key fields and expressions to control access to the critical sections of an application. Lock Sets are used to specify the fields in the key. Pairs of Lock and Unlock operators must have the same Lock Set associated with them.
When a tuple enters a Lock operator, the expressions in the operator are applied against the fields in the tuples. The expressions generate a value X. Only one tuple that corresponds to the value X is allowed past the Lock operator at any one time. All other tuples that evaluate to the value X are buffered. Tuples that evaluate to values other than X are allowed into the locked portion using the same rules. A locked portion of a StreamBase application may have multiple tuples, but the values they evaluate to must be distinct.
The remainder of this topic describes the actions you can take on each tab of the Lock Set data construct's Properties view.
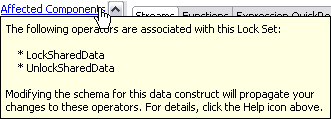
At the top of the Properties view for a Lock Set data construct, there is an Affected Components link. Click this link to display a pop-up window that lists the Lock and Unlock operators in the current module that are associated with the selected Lock Set. Click anywhere outside the pop-up to close the pop-up.
The following example shows an Affected Components pop-up window for the Lock Set in the LockUnlock.sbapp sample, which is one of the operator samples shipped with StreamBase.
 |
Name: Use this required field to specify or change the name of this instance of this component, which must be unique in the current EventFlow module. The name must contain only alphabetic characters, numbers, and underscores, and no hyphens or other special characters. The first character must be alphabetic or an underscore.
Description: Optionally enter text to briefly describe the component's purpose and function. In the EventFlow canvas, you can see the description by pressing Ctrl while the component's tooltip is displayed.
Use this tab to define the Lock Set's schema:
-
Use the control at the top of the Edit Schema tab to choose the schema type:
- Private schema
-
Populate the schema fields using one of these methods:
-
Define the schema's fields manually, using the
 button to add a row for each schema field. You must enter values for the Field Name and Type cells; the Description cell
is optional. For example:
button to add a row for each schema field. You must enter values for the Field Name and Type cells; the Description cell
is optional. For example:
Field Name Type Description symbol string Stock symbol quantity int Number of shares Field names must follow the StreamBase identifier naming rules. The data type must be one of the supported StreamBase data types, including, for tuple fields, the identifier of a named schema and, for override fields, the data type name of a defined capture field.
-
Add and extend a parent schema. Use the
button's Add Parent Schema option to select a parent schema, then optionally add local fields that extend the parent schema. If the parent schema includes
a capture field used as an abstract placeholder, you can override that field with an identically named concrete field. Schemas
must be defined in dependency order. If a schema is used before it is defined, an error results.
-
Copy an existing schema whose fields are appropriate for this component. To reuse an existing schema, click the
 button. (You may be prompted to save the current module before continuing.)
In the Copy Schema dialog, select the schema of interest as described in Copying Schemas. Click when ready, and the selected schema fields are loaded into the schema grid. Remember that this is a local copy and any changes you make here do not affect the original schema that you copied.
The existing schema can be from a system stream, or from any named or unnamed schema defined in the current module or in another application in your workspace. You can also select a CSV text file and populate a schema with its column headers. Studio will attempt to infer data types from the first few rows of values, and you can override the types it identifies. Currently, auto-detection of int, double, boolean, string, timestamp and tuples are supported, but not lists or functions. When indicating tuples, the CSV header must identify subtuples with dot notation, for example as
stock.symbol,stock.price.
Use the , , and buttons to edit and order your schema fields.
-
- Named schema
-
Use the drop-down list to select the name of a named schema previously defined in or imported into this module. The drop-down list is empty unless you have defined or imported at least one named schema for the current module.
When you select a named schema, its fields are loaded into the schema grid, overriding any schema fields already present. Once you import a named schema, the schema grid is dimmed and can no longer be edited. To restore the ability to edit the schema grid, re-select
Private Schemafrom the drop-down list.
-
Optionally, document your schema in the Schema Description field.