In this topic, you will:
-
Provide streams for events to enter and exit the
MyFirstAppapplication. -
Define a schema that specifies what field names and data types your input stream expects.
-
Add one or more operators to process the data.
-
Connect these components to determine how data flows through the application.
Before building your application:
-
In the StreamBase Studio menu, click → . Expand the StreamBase Studio menu and open the Authoring page. Verify that the default setting, Automatically typecheck components, is enabled.
To learn about typechecking, see About Typechecking in this topic.
-
If your application is not already open in an EventFlow Editor, double-click
MyFirstApp.sbappin the Package Explorer to open it. You can have multiple editors open in this area of your perspective, each with its own tab labeled with the file name.Notice the Palette view under the Package Explorer view. Whenever an EventFlow application is open and its canvas is displayed, the palette is loaded with icons that represent the components you will use to design your EventFlow application. The icons are organized in drawers of different component types.
The Palette view is empty when no EventFlow canvas is displayed.

Follow this procedure to develop the MyFirstApp.sbapp application.
-
Add the input stream and define its schema:
-
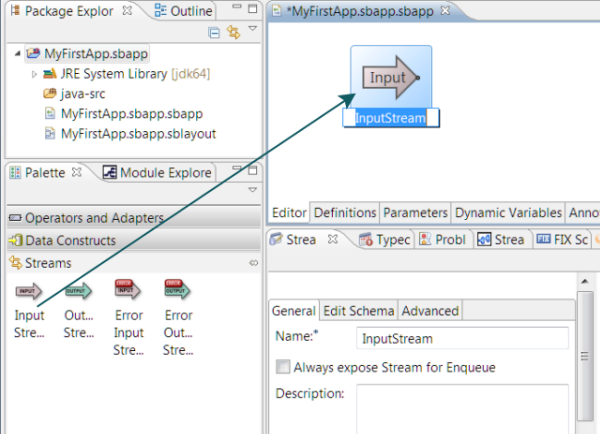
In the Palette view, open the Streams drawer, then drag an Input Stream icon from the palette into your EventFlow canvas:
Notice the blue background of the InputStream icon: this is the selection color. The name of the component is in dark blue when you select that label.
-
When you select any component in an EventFlow Editor, StreamBase Studio opens its Properties view. In the following example, the Properties view is below the canvas.
-
Type over the name InputStream to label it TradesIn. (You can also do this by Typing TradesIn in the Name field of the General tab, change the name of the input stream to
TradesIn.)Tip
Get in the habit of naming components at the time you create them. While StreamBase Studio always chooses names for new components that do not conflict with others, rename them at creation time to more accurately indicate their function or role in your application.
-
Your TradesIn input stream needs a schema. In the Properties view, click the Edit Schema tab to provide one.
Click the
 button twice to add a row for each field in the schema. Enter these values in the rows:
Field Name Type Description symbol string Stock symbol quantity int Number of shares (The descriptions are optional.)
-
Apply your changes: click a blank area on the canvas, or click the
 Apply and Typecheck button near the top-right area of the Properties View. This forces Studio to typecheck your application now, instead of waiting
for it to happen automatically. Note that typechecking does not save the application. You can write the application file to
disk at any time with → or Ctrl+S or by clicking the Save button in the main toolbar.
Apply and Typecheck button near the top-right area of the Properties View. This forces Studio to typecheck your application now, instead of waiting
for it to happen automatically. Note that typechecking does not save the application. You can write the application file to
disk at any time with → or Ctrl+S or by clicking the Save button in the main toolbar.
-
-
Add and configure a Filter operator:
-
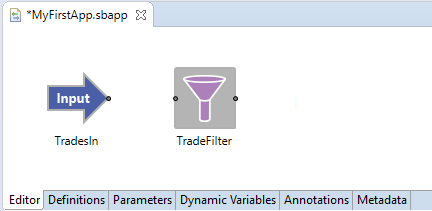
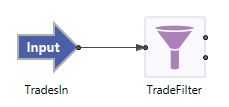
Open the Operators drawer of the Palette view. Drag and drop a Filter operator from the palette onto the canvas. Its default name is Filter. The canvas should now look similar to this:
-
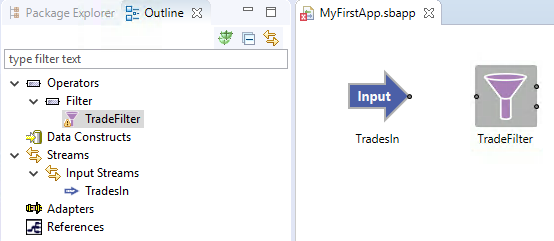
If the Outline view is not open, click → and choose Outline. This view provides a tree of all the components in your application. It can be helpful for navigating applications with many components. When your application was empty, its outline contained no instances, only a list of component types. Now, if you expand the Operators and Streams categories you should see your current components:
-
Double-click the Filter instance in the Outline view: this selects the component in your canvas and opens its Properties view. The Outline and canvas should like like the following picture.
-
In the General tab or on the canvas, change the name of the operator to
TradeFilter. -
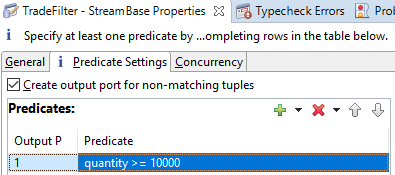
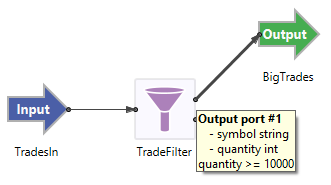
Open the Predicate Settings tab. Notice that a row in the Predicates table already exists for output port 1, with predicate expression
true. Edit this expression in the Predicate column, and specify:quantity >= 10000Note
A predicate is an StreamBase expression that resolves to either
trueorfalsefor field values in a tuple. A predicate expression can include variables or constants defined within the scope of a module or operator. Here, the predicate istruefor tuples containing trades of 10000 or more; for tuples having a smaller quantity, the predicate returnsfalse. An incoming tuple is passed through the Filter operator only if this predicate evaluates totrue; all other tuples are ignored. -
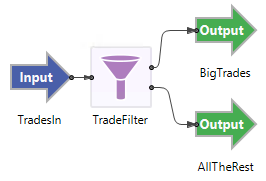
As now configured, the TradeFilter operator will discard non-matching tuples. Instead of throwing them away, we want to be able to check them. To do this, we can make the Filter operators dequeue those tuples to a separate output stream.
To make this change, select the option, Create output port for non-matching tuples.
At this point, your Filter operator's Properties view should look like this:
At run time, the Filter operator will evaluate each tuple as it arrives from the input stream. If you had defined multiple predicates, they would be evaluated in order. The first predicate that returns
truecauses the filter operation to occur immediately, and any later predicates are ignored.We have only one predicate, so each tuple is dequeued either on output port 1 if
true, or on output port 2 (the port created for non-matching tuples) iffalse. -
-
The canvas shows input and output ports as small black dots. Input ports are on the left side of components and output ports are on their right side. If there are multiple ports, the uppermost square represents Port 1; the next square down represents port 2, and so on. Your Filter operator now has an extra output port, which you configured in the preceding step.
On the canvas, drag a line from the tip of the InputStream arrow to TradeFilter to provide the filter operator with an input stream.
StreamBase Studio draws an arc connecting the two components. Arcs represent internal streams within EventFlow applications. When you connect the two components, the input stream and the filter operator backgrounds turn white, indicating that the operation typechecked successfully.
Typechecking errors can happen for a variety of reasons. For example, had the the
quantityfield of the TradesIn stream been namedvolume, a typecheck error would result because the filter operator predicate requires a field namedquantity. When a component fails to typecheck, StreamBase Studio colors its background red, as shown in the following image. For more about typechecking, see About Typechecking, below.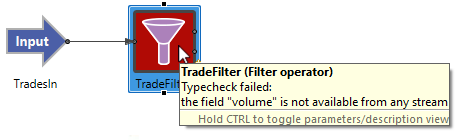
Notice that hovering over the Filter operator opens a tooltip that explains the typechecking error.
-
Add the output streams:
-
Drag and drop an Output Stream icon from the palette into the canvas, to the right of the Filter operator. Select the output stream on the canvas to open its Properties view.
-
In the General tab, change the stream's name to
BigTrades. -
In the canvas, draw an arc from the upper output port of the Filter operator to the input port of the output stream. When you hover the mouse pointer over the left end of the arc you just inserted, the canvas should look similar to this.
-
Add a second output stream by dragging the Output Stream icon from the Streams portion of the palette onto the canvas. Drop it below the BigTrades output stream. Select the new stream, and in its Properties view, change its name to
AllTheRest. -
Connect the lower output port of the Filter operator to the AllTheRest output stream.
Tip
If your canvas looks a little disorganized, try one or both of these adjustments:
-
To automatically arrange the components neatly on the canvas, click → or press Ctrl+L.
-
To rearrange the arcs around components (for example, if an arc overlaps a component's name), click → .
The final layout of your EventFlow application should look similar to the following:
-
-
-
Use → , Ctrl+S, or click the Save button to save your StreamBase Application.
Typechecking validates the design of your applications as you build them. StreamBase inspects each component of an application and will not run it if typechecking errors exist. One of the key advantages of designing in StreamBase Studio is that typechecking happens constantly and automatically as you work, so you can avoid accumulating problems.
Conceptually, typechecking occurs from the starting points of the application (usually the left side) — and proceeds to the downstream components (typically those connected on the right). When the typecheck process finds an error condition, the background color of the failing component turns red, and downstream components cannot be typechecked yet. Typechecks can fail for a number of reasons, such as:
-
Not providing a schema for an input stream or having duplicate field names in a schema.
-
Declaring a schema for an operator that is in conflict with the schema of the prior (upstream) connected operator.
-
Entering a wrong or misspelled field name in an expression or using one in an inappropriate way (such as specifying a string field in an expression that expects a timestamp).
-
Other incorrect uses of the expression language, such as an invalid identifier or function name, or providing a function with too many or too few arguments.
-
Incorrectly specified operator parameters.
In this topic you learned how to define a StreamBase schema, add components to your application, connect them together, and define functionality by editing the properties of one component. You also learned something about StreamBase typechecking. Your application doesn't do much, but it is now complete and ready to run.
Do not close StreamBase Studio. To continue the tutorial, please click .