Release 7.0.0 introduced a new version of the EventFlow Editor that provides significant usability improvements while maintaining compatibility with existing EventFlow application files. The new EventFlow Editor provides the following features, compared to the EventFlow Editor in StreamBase 6.x.
- Component Icon Changes
-
-
Component icons now have a modern look, with smoother scaling and larger port connectors.
-
Operator icons are now shown by default in an enclosing tile, and the left and right edges of the tile are where the component's ports attach.
-
When a component is selected, the enclosing selection outline is colored light blue. The selection outline is automatically sized horizontally based on the length of the name you assign, so that the component's name is always enclosed inside the selection outline.
-
Data construct icons are also automatically sized based on their assigned names.
-
If a component has more than one input or output port, resize handles appear at the top and bottom of the selection outline. These allow you to resize the component vertically to provide more room to connect arcs.
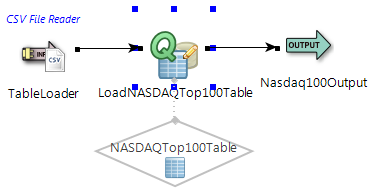
The following small EventFlow module is from StreamBase Studio 7.x, and shows the Query operator selected:

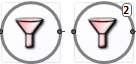
Compare the same module in StreamBase Studio 6.6, where the square blue dots show that the Query operator is selected:
-
- Arc States
-
Arcs have two states, selected and activated. Click an arc to select it, and hover the mouse over an arc to activate it.
Arc State Depiction Normal arc 
Selected arc 
Activated arc 
Selected and activated arc 
- Arc Changes
-
-
Drag-insert onto arc. You can now drag a component from the Palette view and insert it into an arc with automatic arc connections made on each side. To do this, drag a component and hover it over the arc of interest. When the arc turns bold to show it is activated, drop the component onto the arc. The component is automatically inserted into the stream at the drop point, with arcs automatically connected on either side.
-
Keyboard-insert onto arc. The keyboard shortcut commands to add a component to the canvas can also insert a component into an existing arc. To do this, select an arc so that it shows a blue outline, then invoke the keyboard shortcut, such as O M, to insert a Map operator.
-
- Concurrency and Module Instance Icon Decorations
-
-
A concurrency setting of Run this component in a parallel region is marked by default with a circle within the tile boundaries. You can suppress the drawing of these circles with a Preferences setting.
-
A concurrency Multiplicity setting of multiple is shown with an overlaid number that reflects the number of instances specified.
Extension Point operator icons can also show a numeric decoration. In this case, the circled number represents the number of module instances defined in the operator's Modules tab in its Properties view.
-
- Application Running Information Bar
-
In previous releases, Studio shows a text string at the top of the EventFlow canvas to distinguish which application was running. The same information is now shown in an information bar, which can be collapsed to an icon by clicking the arrow on the right side. Click the icon's arrow to restore the information bar.

- Component Names and Decorations
-
-
The first instance of a stream or operator you place on the canvas is no longer named with "1" appended to the name. Thus, the first input stream on the canvas is named
InputStream, notInputStream1, and so on. Subsequent components of the same type still get a number appended:InputStream2,Map3, and so on. -
Extension Point operator icons are shown with an overlaid number that reflects the number of locally defined modules.
-
- Rearrange Components with Grid Alignment
-
-
When dragging a component on the canvas, the icon in motion shows as a ghosted version of the icon.
-
When moving a component, blue guide lines appear to help you align the component with other nearby components in an alignment grid, to help maintain a clean grid organization of your canvas. Horizontal guide lines appear when the component you are moving is lined up with an adjacent icon's top edge, center, or bottom edge. Vertical guide lines appear to show you when the moving component lines up with an adjacent icon's left side, center, or right side.
-
Hold down the Shift key when moving components to align by arc. This lets you align your canvas grid with straight arc lines, independent of the moving component's horizontal or vertical grid alignment with nearby icons.
-
Hold down the Ctrl key to create and drag a copy of the selected component. The new copy is named for the original with
Copyappended. The copy retains the property settings of the original. For some components, arcs entering or leaving the original are duplicated in the copy. -
The Rearrange components and arcs function (
 button or Ctrl+L) now uses animation by default. As before, this function rearranges all components and arcs on the current canvas for the
best and clearest left-to-right layout, then runs the Reroute Arcs function. With two or more adjacent components selected, this function rearranges only those components, then centers the
EventFlow canvas on them.
button or Ctrl+L) now uses animation by default. As before, this function rearranges all components and arcs on the current canvas for the
best and clearest left-to-right layout, then runs the Reroute Arcs function. With two or more adjacent components selected, this function rearranges only those components, then centers the
EventFlow canvas on them.
-
The Reroute Arcs function (
 button or Ctrl+Alt+L) routes arcs around components, using curves and bends in the arcs as needed. With no arcs selected, this function acts on
all arcs on the current canvas; with one or more arcs selected, it acts only on the selected arcs. Use this function when
you are satisfied with the component layout of the current canvas, but want to add curved arcs.
button or Ctrl+Alt+L) routes arcs around components, using curves and bends in the arcs as needed. With no arcs selected, this function acts on
all arcs on the current canvas; with one or more arcs selected, it acts only on the selected arcs. Use this function when
you are satisfied with the component layout of the current canvas, but want to add curved arcs.
-
- Navigation and Zoom
-
-
You can now navigate through an EventFlow canvas with keyboard arrow keys.
-
There is now a canvas zoom level control in the main Studio toolbar with many zoom level options in its drop-down list.
-
The Outline view's graphical mode now shows the same icon representation as the canvas, but in miniature.
-
- Diagram Menu Now Named EventFlow
-
The EventFlow menu in the primary Studio menu bar contains the features of the Diagram menu in previous releases, and adds an Align submenu with six alignment options that act on two or more selected components in the EventFlow canvas.
- Component Stamping
-
-
As an alternative to dragging components from the Palette view, you can now use component stamping. To do this, click to select an icon in the Palette, release the mouse button, then click in the canvas to place the selected component. Hold down the Shift key to place more than one copy of the selected component on the canvas. Press Esc to clear stamping mode from the cursor.
-
- Notes and Groups
-
-
Notes are now resizable on the canvas to show their entire contents or to show only the first sentence, as necessary.
-
You can now edit Note text directly in the Note icon on the canvas.
-
You can now drag components into and out of Groups, and the length limitation on Group labels in previous releases was removed.
-
When you resize a Group on the canvas, the components inside grow and shrink in proportion to the Group size, retaining their relative positions.
-
- Studio Preference Settings
-
In Studio Preferences ( → , then ):
-
There is a new preference setting to determine the behavior of holding down the middle mouse button (or holding down a scroll wheel that emulates a middle button).
-
The preference was removed that specified the default state of the option to create an empty EventFlow file when using the New StreamBase Project wizard. That preference is replaced by new behavior in the wizard, which now automatically preserves the last setting of that option's check box.
-
You can configure the default behavior of certain rendering properties of the new EventFlow Editor in a new Studio Preferences page, → → , as described on EventFlow Rendering Panel.
-
- Font and Color Settings
-
You can configure the font to use on the canvas and the default color for all canvas components in Studio Preferences, → → . Open the StreamBase folder, select a canvas feature from the list, and click .