Contents
- Introduction
- Opening the Feed Simulation Editor
- Graphical and Source Views
- Overview of the Graphical Presentation
- Simulation Description Section
- Simulation Streams Section
- Generation Method Section
- Generation Method: Default
- Generation Method: Data File
- Generation Method: Customize Fields
- Conditional Field Generation
- Generation Method: JDBC Data Source
- Processing Options Section
- Description for Each Stream
- Saving Feed Simulations
- Related Topics
The Feed Simulation Editor is StreamBase Studio's interface for creating new feed simulations or editing existing ones. See Running Feed Simulations to learn about running your feed simulations.
Open the Feed Simulation Editor by opening an existing feed simulation file or by creating a new feed simulation.
Open an existing feed simulation file as follows:
-
In the SB Authoring perspective, double-click the name of a feed simulation file (with
.sbfsextension) in the Package Explorer. -
In the SB Test/Debug perspective, in the Feed Simulations view, double-click the name of an existing feed simulation file. (A StreamBase application must be running to see its list of feed simulations.)
Create a new feed simulation in one of the following ways:
-
From Studio's top-level menu, select → → .
-
Click the New Feed Simulation (
 ) button in the toolbar.
-
In the SB Authoring perspective, do one of two things:
-
Right-click in the Package Explorer and select → .
-
Select one or more Input stream icons, right click and choose from the context menu.
In the second case, the Feed Simulation Editor is initialized with a schema that matches each Input stream you selected, bypassing the usual first step of declaring schemas for the simulation.
-
-
In the SB Test/Debug perspective, right-click in the Feed Simulation view and select .
In the New StreamBase Feed Simulation dialog:
-
Select an existing project to contain the feed simulation file.
-
Provide a name for your feed simulation, which must be unique within the project.
-
Click .
The Feed Simulation Editor contains both graphical and source views of the same feed simulation. Notice that there are two tabs at the bottom of the editor. Use these tabs to switch between graphical and source presentations. The settings and values you enter on one tab are reflected on its partner tab after you save the changes.
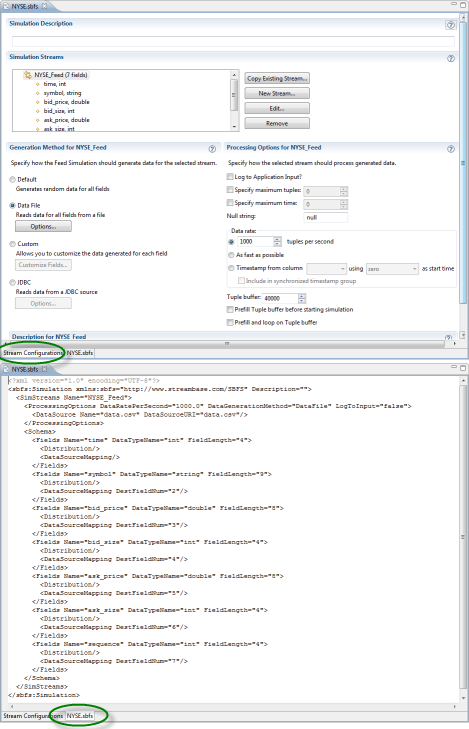 |
The graphical presentation of the Feed Simulation editor contains the following sections:
-
Simulation Description for entering brief documentation for the overall feed simulation.
-
Simulation Streams for specifying and editing the schema for each input stream in this feed simulation.
-
Generation Method for
StreamNamespecifies how the feed simulation generates or reads data for the selected stream. -
Processing Options for
StreamNamespecifies the runtime behavior of the simulation for the selected stream. -
Description for
StreamNamefor entering brief documentation for the selected stream.
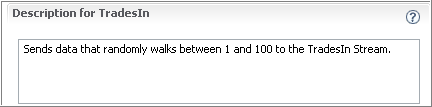
Enter a brief description for the overall feed simulation in the top Simulation Description field. (You can document each stream in this simulation with the second description field at the bottom of the editor view.)
An example of the Simulation Description section:
 |
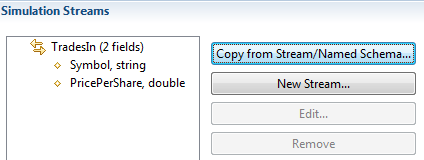
Use the Simulation Streams section to add, edit, or remove input streams from the current feed simulation.
 |
A single feed simulation file can be defined to enqueue data to one or more input streams. Those streams can be directed to the same or different containers. The feed simulation definition for each stream can define properties unique to that stream.
Note
The name you specify for each stream must exactly match an input stream name in the StreamBase application this simulation will run against. It is not enough that the stream's schema matches. The stream name in the simulation file and in the application file must be identical.
Tip
To assure that the simulation's schema matches a stream, start out by right-clicking an Input stream in Authoring view and choose from the context menu. If you select multiple streams before doing this (by shift-clicking them), each one will contribute its schema to the feed simulation.
You can use a feed simulation with more than one application, provided that the input stream names match in those applications.
The schema for an input stream in the application does not have to exactly match the schema defined in the feed simulation. For example, you might use a feed simulation to send a subset of data to a stream, relying on default values for the other fields in the schema.
You can specify a input stream with an empty schema, as described in Using Empty Schemas. In this case, only the Default generation method is available for such a stream. You can specify a limited set of Processing Options for such streams. When run, a feed simulation for streams with an empty schema sends a series of no-fields tuples to the specified stream.
Use the button to quickly copy the schema from an existing stream or named schema in your workspace.
Clicking this button opens a dialog that shows you a tree list of all modules and interfaces in your current Studio workspace. Click the arrows next to the project folder that you know contains the module or interface of interest. Select the module or interface that contains the stream or named schema of interest. Select that stream or schema and click to copy that schema to the Simulation Streams section.
Let's say a StreamBase application has two input streams: TradesIn and FuturesIn. In the Simulation Streams section, click to invoke the Add Simulation Stream dialog. In the following example, we have identified the name of the additional input stream in the application:
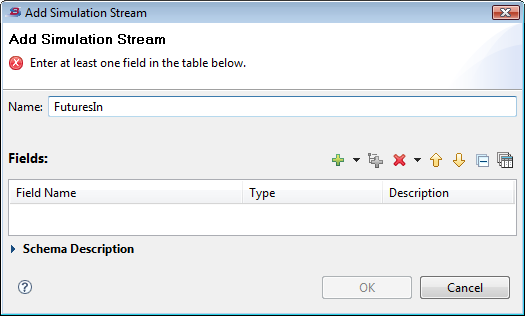 |
In this dialog, add a schema to the feed simulation using either of the following methods:
-
Use the plus sign (
 ) icon to add the fields and their data types and sizes line by line.
-
Use the Copy Schema From Existing Component (
 ) icon, which invokes the Copy Schema From dialog described on Copying Schemas. Use this dialog to select an existing schema from a system container stream, or from any module in your Studio workspace.
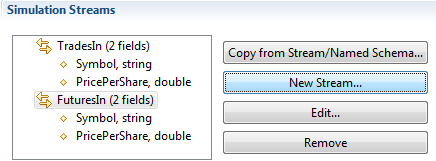
After clicking twice, the updated Simulation Streams section looks like this:
 |
Note
If you have multiple streams defined in the Simulation Streams section, remember to select the target stream before editing the other sections in the feed simulation editor. This is especially true of the Generation Method and Processing Options sections.
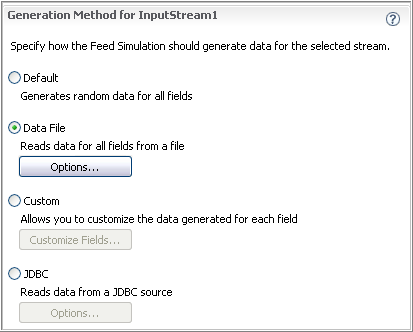
Use the Generation Method section to specify how this feed simulation should generate or read data for the selected stream. Be sure to select the stream of interest in the Simulation Streams section before continuing with the Generation Method section.
There are four ways to obtain data for this feed simulation:
-
Default: generate uniformly random data of the correct data type for each field in the selected input stream.
-
Data File: read from a file containing delimited values for each field in the selected input stream.
-
Custom: generate data values randomly or by other methods, with precise control over the type and range of data that goes to each field, including making field values contingent on other fields.
-
JDBC: read data for each field from a table in a JDBC-compliant database.
 |
Select the Default option to specify that this feed simulation should generate a default load. This means the following when you run the feed simulation on a running StreamBase application:
-
The feed simulation generates about ten tuples per second for each input stream in your application. (You can adjust the rate in the Generation Options section of the Feed Simulation editor.)
-
Every int, long, double, and timestamp field is assigned a random value from 0 to 10000.
-
Every boolean field is assigned
trueorfalse. -
Every string field is filled with characters from a random set of uppercase ASCII characters.
-
Every blob field is assigned 16 bytes of random data, corresponding to uppercase ASCII characters.
-
Every tuple field has all of its subordinate fields filled using the rules above.
When you select the Default generation method, the Timestamp from column, Tuple buffer, Prefill Tuple buffer, and Loop on Tuple buffer controls are dimmed.
In the Generation Method section, select the Data File option, and then click Options. In the Data File Options dialog, enter a file name and an absolute or relative path to an existing data file that this feed simulation should read to populate the selected stream. You can also specify how columns in the data file map to fields in the input stream.
The following image shows the Data File Options dialog filled in for a simple data file example.
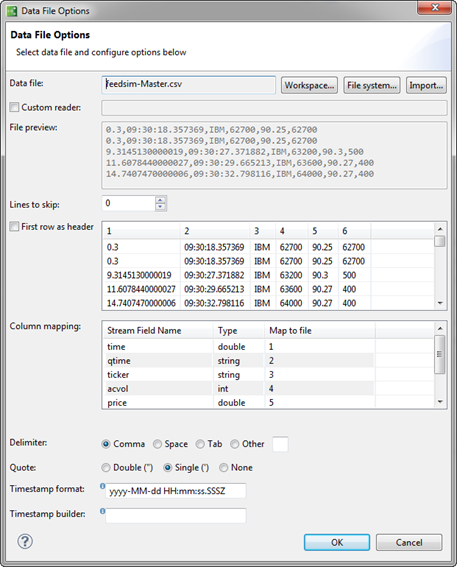
The following table describes the options in the Data File Options dialog.
| Option | Default | Description | ||||||||||||||
|---|---|---|---|---|---|---|---|---|---|---|---|---|---|---|---|---|
| Data file | None | Type the name of an existing delimited value file in your current project, or click Import to import a data file from any location on the local file system into the current Studio project. A preview of the selected
file's contents is shown in the File preview section.
The feed simulator reads uncompressed plain text CSV files, compressed CSV files, and StreamBase binary files. Compressed and binary files are recognized by their file name extension, as described in the following table:
|
||||||||||||||
| None | Use to identify a data file in your workspace. In the Select Data File dialog, choose a data file with one of the above extensions, and then select or to specify the type of path that the simulation should use to navigate to the data file. Relative paths are referenced from the feed simulation's file folder. When referencing a data file by pointing to an Eclipse link to it, feedsim stores the path to the file, not the path to the link. | |||||||||||||||
| None | Use to identify a local or remote data file in your installation's file system. In this case, the Select Data File dialog displays a platform-specific file chooser in which you can navigate to the location in which the data file exists. Select a data file, and then click . An absolute path is always used in file system. | |||||||||||||||
| None | Use to import a file to your workspace from your installation's file system. It opens StreamBase Studio's standard Import-from-file-system dialog. After you import a data file, use the button to identify the imported file. | |||||||||||||||
| Custom reader | None | Advanced. Select this check box to specify the fully qualified name of a Java class that implements a custom file reader for non-standard, proprietary, or binary files. The specified class must be on the classpath of the JVM running StreamBase Studio (or the JVM running the sbfeedsim command). See Feed Simulation with Custom File Reader for instructions on using this feature. | ||||||||||||||
| File preview | None | Shows a read-only view of the first few rows of the file specified in the Data file field. The preview updates automatically to reflect selections in other fields of the dialog. | ||||||||||||||
| Lines to skip | 0 |
Enter an integer number of lines to skip before interpreting lines as data. Use this control to skip a header line without using the First row as header option. This allows you to designate a column as a timestamp value without having to map fields to data by incoming column name. You can also use this control to start reading the data file at an arbitrary preferred starting point. For example, a compressed file of market data might have been recorded starting at 9:00 AM on a trading day, but you want to run your feed simulation starting with the trades that occurred after the exchange opened at 9:30 AM. You must empirically determine the starting point row in the data file, such as by entering a guessed number of rows to skip and checking the timestamp for the new top row in the File preview section or the Column mapping grid. Then enter a lower or higher number of rows to skip until the timestamp in the previews matches the timestamp you seek. When the First row as header option is enabled at the same time as this option, the number of lines to skip are counted from the second row of the data file, leaving the first row intact to be interpreted for its label information. |
||||||||||||||
| First row as header | Disabled |
When disabled (the default), the column headings of the File preview grid are numbered instead of named. This helps you line up data file columns to field names when using the Map to file control.
Enable this option to specify that the selected data file has one row of delimited column headers in the first line of the file. Watch the File preview control and the Column mapping grid to see if enabling this option is correct for your data file. When enabled, the column headings of the File preview grid show the heading text read from the file instead of numbers.
This option does not skip the first row, it reads and interprets the first row as labels. If you have enabled both First row as header and Lines to skip options, the first row is read for its header information, then the lines to skip start counting after the first row. If the current input stream (for which you are defining this input data file) has an empty schema, the First row as header control is dimmed and unavailable. It is still possible to specify a data file as input to a stream with an empty schema, such as to specify a sequence of timestamps to use with the Timestamp from column field, as described in Using the Timestamp from Column Feature. ImportantIf the incoming CSV file was written by the StreamBase CSV File Writer adapter, and has nested tuples in its schema, then
you must enable this First row as header option. If you do not, the fields of the sub-tuple are set to |
||||||||||||||
| Column mapping | None |
StreamBase attempts to map columns to fields by matching names found in the column header, if any. In situations where it cannot match correctly because field names differ from column names, use the Column mapping grid to map fields in the data file to fields in the currently selected input stream. By default, fields are lined up one to one. Use the drop-down list in the Map to file column to specify which data file column should be mapped to each schema field. The Map to file column shows column names from the header row if you enabled the First row as header control, and shows column numbers otherwise. NoteThere are conditions where the Column Mapping grid can show valid sub-tuple field data as quoted strings, but those sub-tuple fields end up set to For fields in the schema that are not represented in the data file or fields you don't need values for, you can select the
option rather than a column number or name. The feed simulation populates such fields with nulls. defaults to when either (a) is selected and StreamBase cannot match a field name to a label, or (b) is not selected and there are more fields than columns; that is, for Column names that include period characters (such as If your data file has a column with timestamp data, you can designate that column for use as a relative timestamp entry. In this case, map the timestamp data column using the Timestamp from column control in the Processing Options section, not with the Column mapping section of this dialog, as described in Using the Timestamp from Column Feature. |
||||||||||||||
| Map data file columns to sub-fields of tuple fields | Disabled |
This option only appears in the dialog when the schema of at least one of the input streams for this feed simulation contains at least one field of type tuple. Use the Map data file columns to sub-fields option to specify that the fields of a flat CSV file are to be mapped one-to-one to the sub-fields of tuple fields. This feature lets Studio read flat CSV files generated manually or generated by non-StreamBase applications and apply them to schemas that have tuple fields. See Map to Sub-Fields Option for details. |
||||||||||||||
| Delimiter | Comma | Specifies the character that delimits fields in your data file. | ||||||||||||||
| Quote | Double | Specifies the quote character, single or double, that delimits strings within fields in your data file. The default is the double quote. | ||||||||||||||
| Timestamp format | "yyyy-MM-dd HH:mm:ss" |
Specifies the incoming format of the timestamp field you have designated as the Timestamp from column field. See Using the Timestamp from Column Feature for more on this feature. The timestamp format pattern uses the time formats of the |
||||||||||||||
| Timestamp builder | None | Used in conjunction with the Timestamp format field, this control allows you to build a single timestamp from a combination of two or more data file columns plus optional text strings. See Using the Timestamp from Column Feature for details on using this feature. |


In the Generation Method section, select Custom. In this case, the Timestamp from column, Tuple buffer, Prefill Tuple buffer before starting simulation, and Prefill and loop on Tuple buffer controls are dimmed.
Click Customize Fields. In the Customize Fields dialog, choose values in the Generation Method column for each field in the schema. For example:
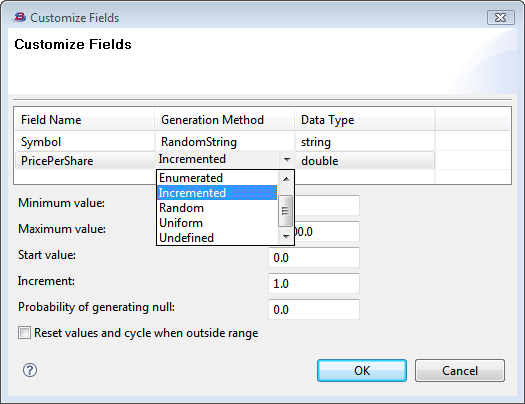 |
The table displays the names and types of the fields available in the selected input stream. The Generation Method column summarizes the way you customize each field. To specify a customized value, select the row and click into the Generation Method cell. Use the drop-down menu for that cell to select from a number of different options, then press Tab or click to move the cursor to the Data Type column. With the cursor moved, one or more data fields appear below the table. In those fields, specify the values relevant for the input stream field.
The choices in the drop-down list vary by the data type for each field, as described in the following sections.
-
Conditional: Values assigned to a field depend on the values of one or more other fields
-
Constant: a constant numeric value you specify will always be used.
-
Enumerated: selects a numeric value from an enumeration, or set of possible values, each of which may have a different weight. Weights for each value in the enumeration default to 1, meaning they are all equally likely to appear. Use a larger value to weigh a value to appear more often, or lower values to weigh toward less often.
-
Incremented: a numeric value that starts at a specified value, then is incremented by a specified value until it is outside a restricted range, defined by minimum and maximum values. If you specify a double as the increment, that increment will be used as is, but the result will be truncated. When the value is outside the range, you can choose whether or not to reset the values and repeat.
-
Random: performs a random walk. That is, a numeric value starts at a particular value, increments by a particular value, and has a restricted range, defined by minimum and maximum values. If you specify a double as the increment, that increment will be used as is, but the result will be truncated.
-
Uniform: a uniformly-generated random number in the range defined by minimum and maximum values, inclusive.
-
Undefined: No custom value is generated for this field.
-
Conditional: Values assigned to a field depend on the values of one or more other fields
-
Constant: a constant string value you specify will always be used.
-
RandomString: a string value consisting of a series of random, uppercase characters will be used. You can specify the minimum and maximum length of the generated strings, which defaults to 4 characters for both fields.
-
Enumerated: selects a string value from an enumeration, or set of possible values, each of which may have a different weight. Weights for each value in the enumeration default to 1, meaning they are all equally likely to appear. Use a larger value to weigh a value to appear more often, or lower values to weigh toward less often.
-
Undefined: No custom value is generated for this field.
For Boolean fields, a number with absolute value 0.5 or greater is considered true. For Boolean fields, you can select:
-
Conditional: Values assigned to a field depend on the values of one or more other fields
-
Constant: set the same specified value for each tuple. Specify
true,false, or any of the recognized synonyms for true and false. -
Uniform: set a range of values to alternate between. Setting a range of 0 to 1 will alternate between
trueandfalse, setting the field totrueabout half the time. Specify different range values to weight the distribution oftrueandfalsevalues towards 1 (true) or towards 0 (false). For example, a range of .25 to 1.0 will set the field totrueabout twice as often as it sets the field tofalse. -
Undefined: No custom value is generated for this field.
For fields of type list, the Generation Method column offers the ListSize option. You can specify the minimum and maximum number of elements to be generated, which defaults to 4 elements for both fields.
For fields of type tuple, each field of the tuple is shown separately. Each field's row offers the appropriate choice for its data type, as described in previous sections.
For all data types, in the Probability of generating null option, you can specify a range or 0.0 to 1.0 to indicate how often to randomly set the field's value to null. For example, entering 0.12 causes the field's value to be null in about 12% of the generated tuples. By default, this field contains the value 0, meaning the feed simulation will not set any field values to null.
Feed simulations can model interdependencies between data fields. For example, the typical range of variation for a stock's price or trading volume depends on what company it represents. (For example: if Symbol = AAPL then minimum price = 100 and maximum price = 400.) A feed simulation can incorporate this type of logic by designating the generation method for a field as . Conditional generation lets you identify specific cases for generating values for a field, based on the contents of one or more other fields. Typically, you base conditional fields on enumerated fields that take on a limited number of values, but you can also base them on numeric or Boolean fields. For example, you can vary values or value ranges for a numeric field according to whether a boolean field is true or false.
The following sub-sections describe how to make fields in the Feed Simulation Editor output values that depend on other fields in the schema. Your feed simulation must have at least one non-conditional field, and no field can be conditional on a field that in any way depends on that field's values (circular dependencies are not allowed).
Caution
Each condition you specify tests a field or combination of fields for strict equality. When your feed simulation assigns a
value to a conditional field at runtime, any data generated for the field or fields it depends on that do not precisely match
the conditional values you have specified falls into the <default> category, as in case statements in a programming language. Therefore, be aware that for assigning conditional values:
-
No relational operators other than equality are considered.
-
Tests on numeric values must match exactly.
-
StreamBase expressions cannot be used to evaluate conditions.
Consequently, to avoid defaulting values, base conditions on fields for which the simulation generates a limited—or at least predictable—set of values, such as the Enumerated and Incremented generation methods produce.
This topic shows you how to specify conditional field generation in the Customize Fields dialog.
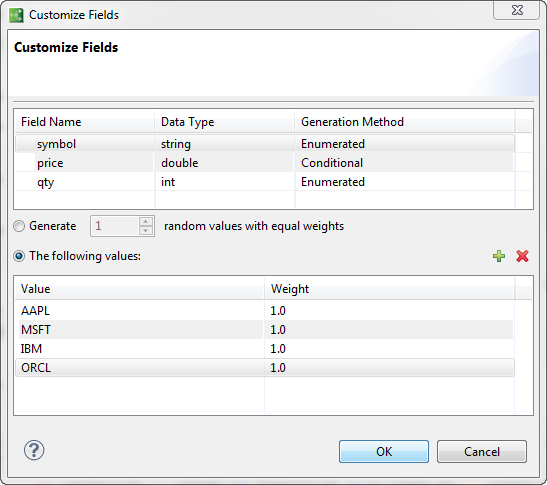
The following example is based on the feed simulation for the StreamBase Loop sample (loop-feedsim.sbfs) that you can open and modify. The sample's schema is {symbol: string, price: double, qty: int}. Let's assume that you want
to make the price field conditional on the value of symbol. When you first declare a field to be conditional, a dialog displays
for you to select the field(s) it will depend on, as the following steps describe.
-
Select → and load the
sample_loopsample. -
In the Package Explorer, double-click
loop-feedsim.sbfsto open it in the Feed Simulation Editor. -
Under Generation Method for BiTradeIn, select the Radio Button.
-
Click the button.
-
In the Customize Fields dialog, click in the price row.
-
Select from the drop-down menu.
-
Click the button. A dialog displays for you to choose the field that price depends upon.
-
Check symbol and click OK.
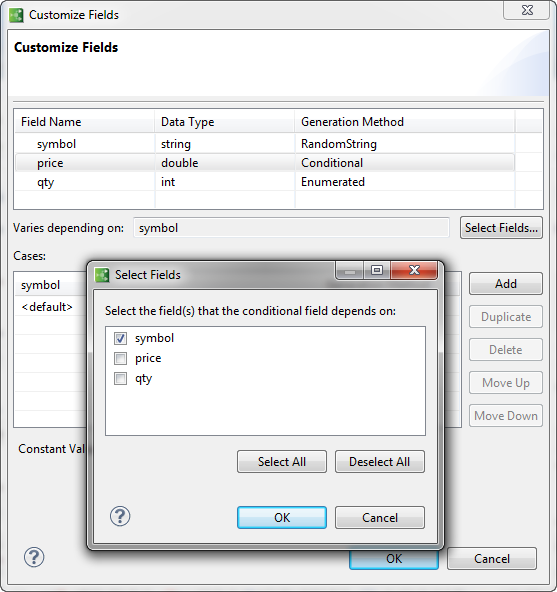
Notice that the Generation Method for symbol is set to RandomString. This is not helpful for any fields that depend on symbol, because at runtime they would rarely if ever key to a symbol value and thus their values would default.
It is much better to enumerate values for symbol, making them predictable and specific to the purpose of the simulation. For this simulation example, a limited set of actual stock symbols could could be itemized, such as AAPL, MSFT, IBM, and ORCL. To do that:
-
Set Generation Method for symbol to
-
Click radio button
-
Click the
button to add a row to the table
-
In the new row, type AAPL under Value, and optionally specify a Weight
-
Add cases for MSFT, IBM, and ORCL by repeating steps 3 and 4
-
Click
The grid for symbol now looks like this:
The price field is already conditional on the symbol field, so select price again to begin specifying how it should depend on each particular symbol.
-
Select price in the Customize fields dialog
-
Click . A new
<default>row is added. -
Click the top
<default>. A menu of the enumerated symbol values drops down. -
Select , and then click its Generation Method column to reveal the choices available.
-
Select
-
Specify values for Minimum, Maximum, Start and Increment. Set value ranges appropriately this stock.
-
Specify a Weight other than 1.0 if you want the stock to be traded more or less often than average.
After you have specified the generation for price based on the AAPL symbol, you can save time by clicking the Duplicate button to clone that entry on the next row down. Use the drop-down symbol menu to select a different symbol, and then fill in the random value parameters appropriately for that symbol. The Customize Fields dialog for price now looks like this:

You can complete the simulation setup by selecting field qty and making it also depend on the symbol field's values. If you want to use random values, the procedure is the same as for specifying conditional prices, except that a random walk of ints will be generated for the qty field.
Click to dismiss the Customize Fields dialog. Save your modified feed simulation as loop-feedsim-conditional.sbfs before running it.
In the Select Fields dialog you can choose more than one field to control how values are generated for a conditional field. For instance, suppose you create a feed simulation for an application that computes weekly average and extreme temperatures from daily weather data for a set of cities at different times during the year. By making the ranges of random temperatures depend on both city name and month, you can generate data appropriate to each location and time period by using actual weather records to set the range of temperatures that the simulation will generate.
When you make field values depend on more than one field, you need to specify combinations of outcomes. That is, you describe a generation rule for each possible combination of specified values of several other fields. In the temperature data simulation just described, to specify temperature ranges for every month of the year, you would need to enumerate 12 sets of them for each city for which you want to provide data, in addition to providing a default value for each.
Tip
You can save effort by clicking the button to copy the current entry to a new one below it. In the new entry, set the names of the depended-upon field(s), change the generation parameters to appropriate values, and then continue duplicating to add all your cases.
Here is an example of a Customize Fields dialog in which temperature is based on five cities and two months of the year, which produces ten cases. If all 12 months were included, there would be 60 cases to specify.
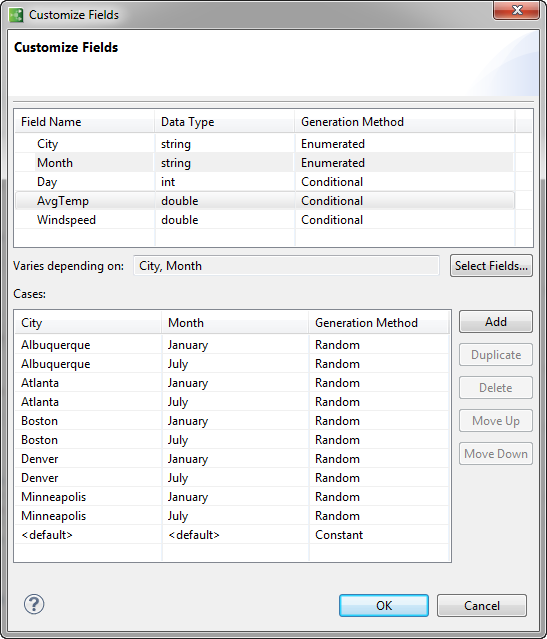
A random value is generated for the AvgTemp field (daytime average temperature for a given day) for each of these ten cases, based on parameters specified for each one. For example, the Boston-January combination has parameters: Minimum: -5° F, Maximum: 40° F, Start: 30° F, Increment 1° F, as shown below:
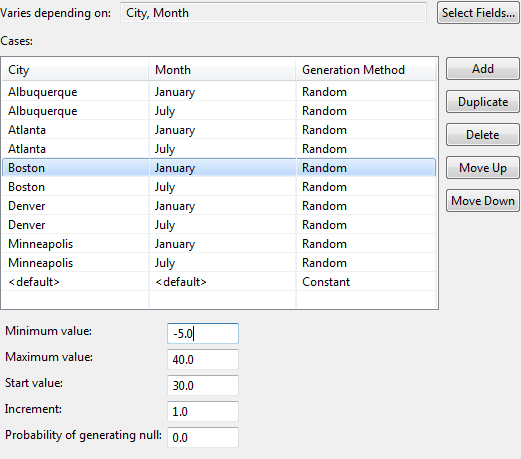
These parameters are independent of those for any other city-month combination, although you are free to duplicate cases without making changes.
A conditional field can depend on values generated for another conditional field. The only restriction is that you must not introduce circular dependencies. That is, if field B is conditional on field A and field C is conditional on field B, field A cannot depend directly or indirectly on either B or C.
As long as the values you select to identify cases are well-specified, you can use a sequence of conditional fields to create something like a decision tree. For instance, in the previous example that generates temperature data, the City field was enumerated and not conditional. If the schema also had a state identifier string (e.g., AK ... WY), you could make the City field conditional on it, and for each state enumerate a set of cities that it contains. Temperature and windspeed data would still be generated for specific combinations of city and month, and cities would be properly assigned to states. Were cities not conditional, they would be randomly associated with states.
In theory, you could continue to chain location identifier fields like this all the way down to individual weather stations. However, the number of cases would grow geometrically if you choose to specify all their hierarchical combinations. To avoid having to create long lists of such conditional values, keep the number of enumerated values small or allow unspecified combinations to default.
While conditional fields based on other conditional fields are supported, Studio does not populate the corresponding drop-down list with the previous conditionals; you must enter a value manually.
To learn more, see the Feed Simulation Conditional Field Sample documentation and run the sample application and feed simulation in StreamBase Studio.
You can configure a feed simulation to use the response from a SQL query to a JDBC database as the source of input tuples for the feed simulation.
This configuration of this feature is discussed in Feed Simulation with a JDBC Data Source.
Use the Processing Options section to set the runtime behavior of the selected stream. Be sure to select the stream of interest in the Simulation Streams section before continuing with the Processing Options section.
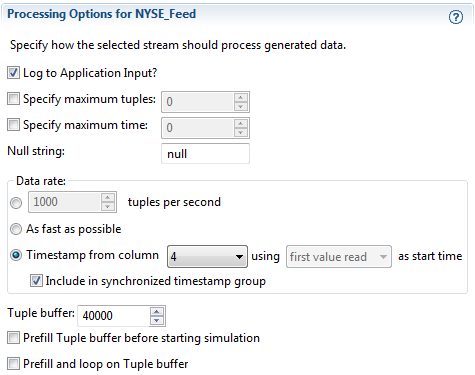 |
The following table describes the feed simulation processing options. Note that when you specify default values for these settings, those values do not appear in the feed simulation source file.
| Option | Applies to | Default | Description |
|---|---|---|---|
| Log to Application Input | All generation methods. | Enabled (after an input stream and its schema are selected) | If enabled, the generated feed simulation data is shown in the SB Test/Debug perspective's Application Input view. This helps you see the generated data and compare it with the dequeued results in the Application Output view. |
| Specify maximum tuples | All generation methods. | 0 (no set maximum) | Specifies the maximum number of tuples to generate on the input stream. For example, to stop generating on the input stream after 20 tuples, enter 20 in the Specify maximum Tuples field. The default setting, zero, means there is no limit. |
| Specify maximum time | All generation methods. | 0 (no time limit) | Specifies in seconds the longest time period to run this feed simulation. The default setting, zero, means there is no time limit. |
| Null string | All generation methods. | "null" | Specifies the string used to designate null values when encountered in an incoming data stream (whether read from a data file,
read from a JDBC database, or generated as part of customized simulation data). The default value is null, which means that by default, StreamBase sends a null value for that field when it encounters the lowercase letters n u l l in a field in an incoming data stream. You can change the null string value to blank to specify the empty string, or to any
value you expect the incoming data to have. For example, a CSV file generated from a MySQL database table dump might contain
\N to designate null fields. See Null Handling for further information.
|
| Data rate | All generation methods. | 10 tuples per second (after an input stream and its schema are selected) | Specifies the number of tuples per second to be sent to the specified input stream. You can use the up and down arrows to change the value, or click into the text box and enter an integer. A feed simulation with a specification of zero tuples per second will not run. |
| As fast as possible | All generation methods. | Disabled |
Enables an alternative to specifying a Data Rate value. Enable this option to send the feed simulation data as fast as the host computer allows. The actual data rate at runtime is a factor of the machine's speed, and may be somewhat limited. The feed simulator uses a substantial amount of CPU resources when this option is enabled. Use this setting only if any one of the following is true:
NoteRemember that StreamBase Studio is not intended for benchmarking the full performance capabilities of StreamBase Server on production machines. This IDE-managed environment is not suitable for high-speed data rates and high CPU utilization. |
| Timestamp from column | Data File and JDBC generation methods only. | Disabled |
Allows you to designate the field or column that contains relative timing values to be used to control the pace of sending tuples for the currently selected stream in the Simulation Streams section. You can designate a column in an incoming JDBC database query, in which case the data type of the column must be double or timestamp. You can also designate a column in an incoming data file, in which case the data type of the column must be double or must contain a string representation of a timestamp. When enabling this option, you must also specify whether to start counting time values from zero or from the value in the first value read. For most cases, select first value read. With this option enabled, the feed simulation uses the relative times from the designated timestamp column to drive the timing of the feed simulation. See Using the Timestamp from Column Feature for more on this feature. |
| Include in synchronized timestamp group | Data File and JDBC generation methods only. | Disabled | This check box is disabled unless (1) the currently selected stream in the Simulation Streams section uses a Data File or JDBC generation method, and (2) you used the Timestamp from column feature to specify a column in the input schema to use as a source of timestamp information.
This option designates the currently selected stream as a member of a group of streams in the current feed simulation file for which StreamBase attempts to coordinate delivery of tuples in timestamp order. See Using Synchronized Timestamp Groups for more on this feature. |
| Tuple buffer | Data File and JDBC generation methods only. | 40,000 tuples |
Specifies the size in tuples of the buffer that holds tuples read from a data file or database query. When used in conjunction with the two Prefill options, the specified size serves as a maximum upper limit of the buffer to be prefilled. |
| Prefill Tuple buffer before starting simulation | Data File and JDBC generation methods only. | Disabled | Designates whether to fill the entire tuple buffer before sending the first tuple to StreamBase Server. |
| Prefill and loop on Tuple buffer | Data File and JDBC generation methods only. | Disabled |
When enabled, specifies that this feed simulation is to run in a loop, starting over and resending the first tuple in the buffer after it reaches the last tuple in the buffer. Use this feature to continuously replay a known, repeatable data set, or to generate a longer data set from a smaller one. See Using the Prefill and Loop on Tuple Buffer Feature for more information. When you select this check box, the Prefill Tuple buffer before starting simulation check box is automatically checked for you and dimmed. |
The Timestamp from Column feature is discussed in Using the Timestamp from Column Feature.
The Include in Synchronized Timestamp Group feature is discussed in Using Synchronized Timestamp Groups.
With the Prefill and loop on Tuple buffer feature enabled, the feed simulation reads from the specified data file or JDBC data source. The tuple buffer grows to fit the data source, until either all data source rows have been read, or the buffer reaches the limit specified in the Tuple buffer field, or the process runs out of memory (which results in an error). The feed simulation then sends tuples from the tuple buffer from beginning to end. When the last tuple is reached, the feed simulation immediately resends the first tuple in the buffer, then resends subsequent tuples according to the Data rate and other settings for this simulation.
If you also specify the Timestamp from column option, the buffer is sent according to the timing information in the timestamp column. When replaying the tuple buffer, the second and subsequent times through the buffer are also replayed with the same timing.
Tip
To minimize or eliminate the effects of disk access speed when running a feed simulation for benchmarking purposes, you can restrict the size of the buffer with the Tuple buffer option to exactly fit the number of tuples you expect to read from the data source, then use the Prefill and loop on Tuple buffer option.
As tuples are resent from the tuple buffer, no fields are modified in the buffer, including any timestamp or sequence number fields. Let's say the first tuple read into the buffer has sequence number 1, and the last tuple has sequence number 20,000. On starting over and rereading the buffer, sequence number 1 is resent to the running StreamBase application. If your application requires monotonically increasing sequence numbers or timestamp fields, then you must adjust the application logic to detect the restart of a looped-buffer feed simulation, to compensate for the restart of sequenced fields. For example, your application's input stream logic might add 20,000 to each sequence number after a loop restart is detected.
You can use this technique to generate a larger feed simulation data set from a smaller one. For example, let's say you captured a day's worth of trading data in real time in a CSV data file or JDBC database. You want to use this data set with its real-world timestamps to run a month's worth of trading data for testing or benchmarking purposes. To do so, use the Prefill and loop on Tuple buffer option, and have your application's input logic detect when the last tuple in the buffer is received. Then add one day to the received timestamp of the next set of tuples received.
StreamBase handles empty strings encountered in incoming data files, database queries, or feed simulations with custom generated data as follows:
-
If an empty string is encountered in an incoming field whose target schema field is a blob or a string, StreamBase sends an empty string value.
-
If an empty string is encountered in an incoming field whose target schema is other than blob or string, StreamBase sends a null value.
You can also set a specific string to be treated as an incoming null field value, as described in the Null string field in the preceding section.
Use the Description for StreamName field at the bottom of the Editor view to document the currently selected stream. (Use the Description field at the top of
the view to document the feed simulation as a whole.)
For example:
 |
On the upper tabs of the Feed Simulation Editor, StreamBase Studio displays an asterisk if the file has changed. You cannot
toggle between a graphical or source presentation of the feed simulation until you save the file. All feed simulations have
the .sbfs file extension, and are saved by default in the currently active Studio project.