Contents
This page describes the conditional formatting feature of LiveView Desktop that allows you to apply formatting to individual cells or rows in a grid view, for cosmetic or alerting purposes, based on specified conditions in the incoming data.
This page takes its examples from the preloaded workspace for the Hello LiveView sample, and its grid views for the ItemsSales and ItemsInventory tables. Before reading the example sections of this page, follow the steps at the top of the LiveView Desktop Grid View page to load and run the Hello LiveView sample.
LiveView Desktop's conditional formatting feature lets you set up a specification that evaluates or compares the value of each field in one column of an incoming stream of data in a LiveView table. Each such specification is called a rule. You can specify more than one rule that tests the same column fields, and can apply more than one formatting type based on matched results. You can specify as many rules as your data set requires.
There are two main reasons to apply conditional formatting to incoming fields:
-
For cosmetic rearrangement of incoming data for human consumption.
For example, an incoming field that represents currency values might be received as double values with a dozen decimal places. You can apply currency formatting to round the decimal places to two, add commas, and prepend or append your locale's currency symbol.
Incoming data might arrive in scientific notation that you want to display as more readable numbers.
-
To alert the end-viewer of a grid view to the presence of an awaited outcome, or to an error condition, or to unusual activity.
For example, a grid view that shows a sequence of currency trades might want to flag a particular currency when its value compared to another currency rises above a certain level. You can highlight individual cells or rows or both, adding text color and/or background color. You can add an alert image such as a flag, heart, or weather symbol, or up or down arrow symbols to show the direction of movement.
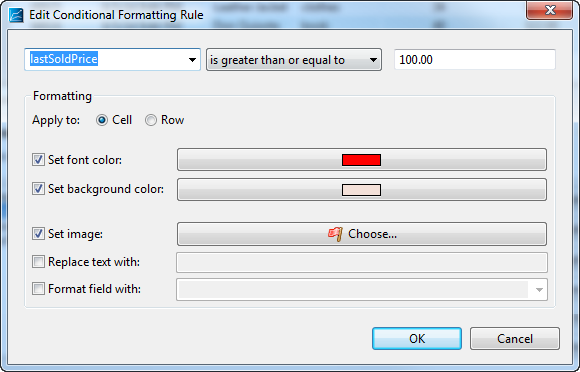
The following image shows the Edit Conditional Formatting Rule dialog with an example rule in place.
 |
Conditional formatting rules offer simple string and substring comparisons, numeric comparisons, and timestamp comparisons. Any comparison that requires regular expression matching or that must be expressed as a StreamBase expression is more appropriate in a transformation layer module that can be placed between the raw incoming data stream and the input to a LiveView table.
Be aware that the alerting aspect of conditional formatting is only one part of the alerting capabilities of LiveView. On the client side, LiveView Desktop also offers table actions, and the LiveView Server can be configured to provide real-time alerts from the server side.
This page uses the terminology illustrated in the following image to refer to the three fields at the top of the Edit Conditional Formatting Rule dialog:
 |
You can compare values in the Select column field to a specified value in the Compare-to field using the following set of comparison operators, selected from the drop-down list in the Select operator field:
| equals |
| does not equal |
| starts with |
| ends with |
| contains |
| does not contain |
| is greater than |
| is greater than or equal to |
| is less than |
| is less than or equal to |
| always |
The four relative comparison types do not operate on string values. Other than that, all operators apply to both string and numeric comparisons.
The always operator does not perform a comparison, but is used when you want a condition to apply to all of a column's fields in all
cases. This is useful, for example, when you want to convert incoming numeric values into currency formats.
The Compare-to field accepts any valid value, but comparisons are only useful between similar data types. Thus, for a field with int, long,
or double type, enter a number in the Compare-to field. For a string field, enter a string or substring in the Compare-to field. For timestamp values, enter a string that can be parsed as a timestamp according to the java.text.SimpleDateFormat standard. Standard StreamBase numeric coercion applies to comparisons between different numeric data types.
In the Compare-to field, you can also enter the name of another field in the incoming tuple, using the syntax $field-name. Such a rule compares the value of the field selected in the Select column drop-down control with another field you specify in the Compare-to field. You can specify a JSON sub-field in another field using a dollar sign with braces: ${field-name.sub-field}.
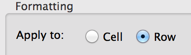
Remember to specify whether the current formatting rule applies to matching cells or to the entire row that contains matching cells. By default, rules apply to cells, and all rule options are available. When you select Row, only the two color-related rule options are available.
 |
You can apply the types of formatting discussed in this section for values that match your specified conditions.
It is possible for one format rule to override or mask another. See Evaluation Order below to understand how to order your formatting rules to avoid conflicts.
- For Cells and Rows
-
- Set font color
-
Use this option to specify an alternate color for cell text, or for the text of all fields in matching rows. The default text color is black.
Select this check box and click the wide button to its right. This opens the standard Color Chooser dialog for your current platform. Select a color, then click OK in your color chooser dialog to accept the selection.
- Set background color
-
Use this option to specify an alternate color for the background of a single cell, or for the background of all cells in the row containing a matching cell. The default background color is transparent.
You can specify both cell and row color changes for the same rule, such as red text for a cell that goes over a specified limit plus a pale red background for the row that contains the over-limit cell. This allows you to alert end-users of significant events even when the over-limit cell is scrolled right or left offscreen in a wide grid view.
- For Cells Only
-
- Set image
-
Use the Set image control to add a small image file to the left of cells that match a specified condition. Click the check box, then click the wide button to open the Image Chooser dialog:
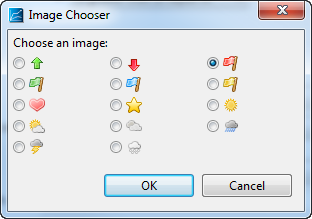
The purpose of these images is to alert the end-user to a particular event or condition for a cell in the scrolling grid view.
- Replace text with
-
Use this control to replace the incoming field, when the test condition is met, with a message pattern in the format of the java.text.MessageFormat standard. The value of the matched field is to be embedded in the string expanded from the message pattern in the position indicated with {0} in the message pattern. For examples, see the Usage Information section of the MessageFormat documentation. Leave the text field blank to replace the matching field with an empty cell.
- Format field with
-
Use this control to add human-facing formatting to incoming data fields, such as adding the appropriate currency symbol, commas, and two decimal places to an incoming double value to show it as a currency value.
The format strings you can use are based on Java standards, as described in the next section.
When you specify formatting for numeric values, you can directly enter a format string that follows the java.text.DecimalFormat standard. Format string fields also serve as drop-down lists that offer the following selection of pre-defined formats:
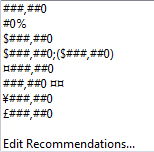 |
The list provides currency format strings for dollars, pounds, and yen, as well as providing a placeholder symbol (¤) that is automatically replaced with the currency symbol for the current locale.
When you specify formatting for a timestamp field, you can directly enter a format string that follows the java.text.SimpleDateFormat standard. You can also use the field as a drop-down list that offers you the following selections:
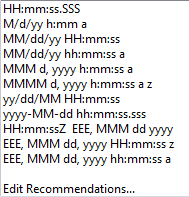 |
You can select any suggested format, then edit it to your needs in the format string field.
Select the Edit Recommendations link in any drop-down list of predefined format strings. This opens a dialog that lets you reorder the list to move your
favorites to the top, or to add your own entries. The Edit List of type Formatting Choices dialog shows a standard edit list of strings, with a large Examples section below. To duplicate an existing string as a starting point for a new format string, click to select a string, copy
it with Ctrl+C, then click the Add button, which opens an empty line in the edit list. Click in the empty line opened by the Add button, then paste your copied starting point string and press Enter. Click to edit your newly added string.
The Examples section shows how the currently selected string looks when applied to various template values.
The following image shows the Edit List of type Formatting Choices dialog for the list of numeric DecimalFormat strings:
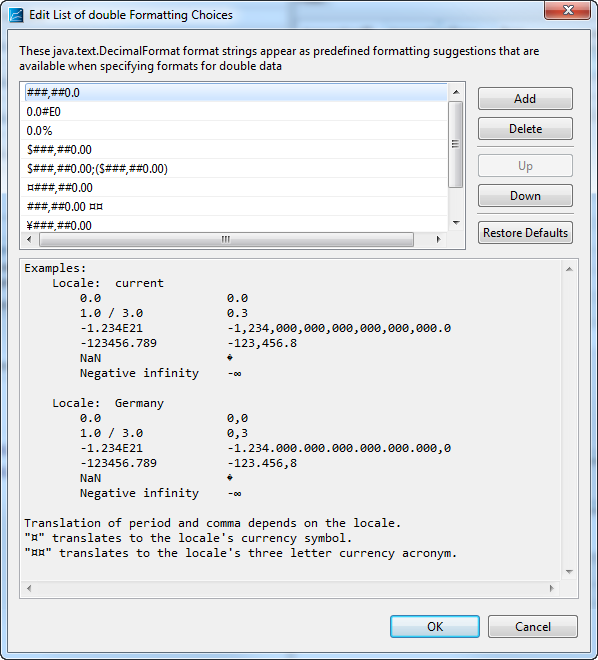 |
The next image shows the same dialog for the list of timestamp formatting choices:
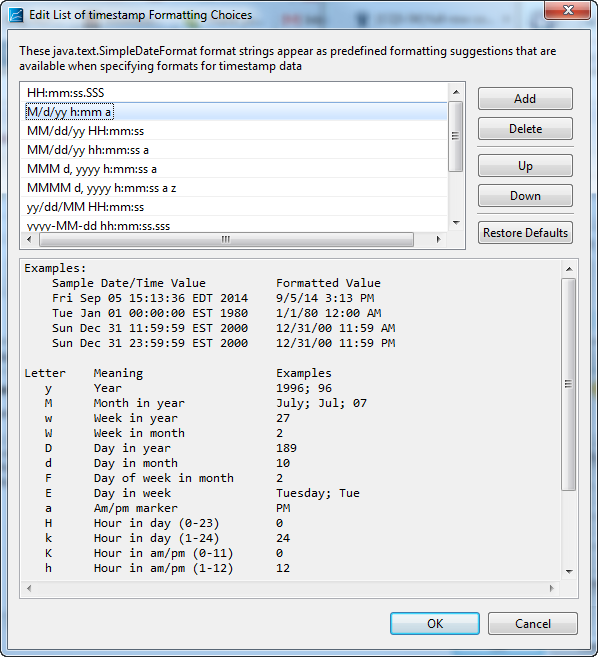 |
The same Edit Recommendations dialogs, along with the drop-down list functionality, are shared by the LiveView Desktop Preferences dialog, when setting the default formatting strings for all numeric and timestamp types. Any format strings you add to the list from either starting point persist and are visible both to conditional formatting dialogs and to the Preferences dialog. If you reorder the list of format strings, the new order also persists and is available to both features.
Your customized set of formatting strings is stored in the current Desktop workspace. To share a set of format strings with a workgroup, arrange for all its members to use the same server-based Desktop workspace.
This example demonstrates how to use the conditional formatting feature by starting from a unformatted view of the ItemsSales table.
-
Right-click the
ItemsSalesgrid and select . The Conditional Formatting dialog opens with theItemsSalestable selected. -
Select all the entries in the Conditional Formatting dialog with Ctrl+A. (You can also use Ctrl+Click to select multiple entries, or Shift+Click to select a range of entries.)
-
Click .
-
Click . The
ItemsSalestable now appears with no formatting.
Now you can configure conditional formatting for the ItemsSales table.
The lastSoldPrice field represents a price, but appears as a double with a single digit after the decimal point. You can format the field to
round to two decimal places, either globally for all fields with double values, or individually for this grid view.
To specify rounding to two decimal places for all double fields in all Desktop grid views, follow these steps:
-
Select → from LiveView Desktop's top-level menu. The Preference dialog opens.
-
Enter
###.00in the Double formatting string field.
To specify rounding to two decimal places only for the lastSoldPrice column of the ItemsSales table's grid view, follow these steps:
-
Right-click the
ItemsSalestable in the Tables view, or right-click anywhere in theItemsSalesgrid view, and select Conditional Formatting. -
Click . This opens the Edit Conditional Formatting Rule dialog.
-
In that dialog, select
lastSoldPricefrom the drop-down field. -
In the drop-down field, select
always. -
Select the check box for Format string with.
-
In the text field for that control, enter
###.00.You can also use the drop-down list in that text field to select the closest match for the format string you want from the available choices. You can edit format strings in the list, and add your own strings to the list. See Format String Helpers for more on these features.
-
Click twice to see the specified formats applied to the
ItemsSalesgrid view.
The Main view in the provided default workspace for the Hello LiveView sample shows the ItemsInventory grid view in addition to the ItemsSales grid view. This example demonstrates how to use conditional formatting features by starting from a unformatted view of the
ItemsInventory table. Follow the procedure in the previous section to clear all existing format strings, but this time from the ItemsInventory table's Conditional Formatting dialog.
Without the existing condition formatting, the quantityAvg and totalInventory fields show their raw computed double values. Since these values all represent various counts of physical items sold, we
want to show integer values for all three columns. We also want the priceAvg column to display its double value as currency.
Specify those features with the following steps:
-
Right-click the
ItemsInventorytable in the Tables view, or right-click anywhere in theItemsInventorygrid view, and select . The Conditional Formatting dialog opens with theItemsInventorytable selected. -
Click . The Edit Conditional Formatting Rule dialog opens.
-
Select
quantityAvgfrom the pull-down menu. -
Select
alwaysfrom the pull-down menu. -
Select the check box for Format field with.
-
In the text field for that control, enter
##,##0. -
Click .
-
Repeat steps 2 through 7 for the
totalInventorycolumn. -
Click .
-
Select
priceAvgfrom the pull-down menu. -
Select the check box for Format field with.
-
From the text field for the Format string with control, use the drop-down menu to select
$###,##0.00or¤###,##0.00. (The ¤ symbol is a placeholder that specifies using the currency symbol for the current locale.) -
Click twice to see the specified formats applied to the
ItemsInventorytable.
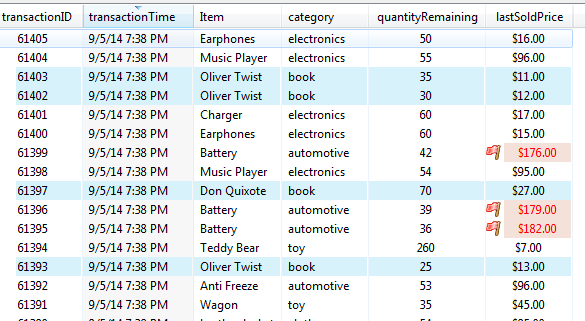
This example demonstrates how to add color highlights as a form of alerting to changes of interest in a fast-changing grid view.
Starting from the Hello LiveView sample's ItemsSales table, let's say we want to keep an eye on book sales, but at the same time want to know about every transaction over $100
from any category. We can follow both types of transactions in the ItemsSales grid view with the following settings:
-
Add a row background color in light blue to every transaction in the
bookcategory. -
Color the cell text for every sale in red text with a cell color highlight, and add a red flag symbol.
Specify those features with the following steps:
-
Right-click the
ItemsInventorytable in the Tables view, or right-click anywhere in theItemsInventorygrid view, and select . The Conditional Formatting dialog opens with theItemsInventorytable selected. -
Click . The Edit Conditional Formatting Rule dialog opens.
-
Select
categoryfrom the Select column pull-down menu. -
Select
equalsfrom the pull-down menu. -
Type
bookin the top-right text field. -
In the Apply to field, select Row.
-
Select the check box for Set background color.
-
Click the wide button for that control, which opens the standard color selection dialog for the current platform.
-
Select or define a light blue color and click OK to exit the color selection dialog.
-
Click twice to see the specified formats applied to the
ItemsInventorytable.If you do not see the blue background color for book sale transactions, return to the Edit Conditional Formatting Rule dialog and use the and buttons to move the new format specification to the top of the list of specifications. Then click OK to see the results.
Now add another condition that highlights every sale over $100 in red.
-
Re-open the Conditional Formatting dialog.
-
Click . The Edit Conditional Formatting Rule dialog opens.
-
Select
lastSoldPricefrom the Select column pull-down menu. -
Select
is greater than or equal tofrom the Select operator pull-down menu. -
Enter
100.00in the upper-right text field. -
In the Apply to field, select Cell.
-
Select the check box for Set font color.
-
Click the wide button for that control, then select bright red from the color selection dialog.
-
Select the check box for Set background color and select a pale red or orange color.
-
Click once to return to the Conditional Formatting dialog.
-
Use the button to move the new rule above both of the custom format settings.
-
Click to see the specified formats applied to the
ItemsInventorytable.
The steps in this section result in a display much like the following example:
To avoid formatting conflicts when two different format conditions apply to the same row or field, use the Up and Down buttons in the Conditional Formatting dialog to organize the rules. The following algorithm is used to determine which rules win if there is a conflict:
-
The list of rules is scanned top to bottom for rules that apply to rows. Rules scanned last (at the bottom of the dialog) win if there is a conflict between two or more rules.
-
The list is scanned again top to bottom for rules that apply to cells. Again, last-scanned rules at the bottom win.
As a general guide, place format rules that specify the Always condition near the end of the list of rules. Other than that, the enormous range of conditions and formats you can apply
to any grid view makes it hard to generalize. If a specified format does not appear even when you see matching conditions
scroll by in the grid view, try using the and buttons to experiment with rule placement order.
The rule scanning algorithm described above allows you to add different color settings for a cell that matches a condition, and also for the row that contains that cell when testing for the same condition. Set the row rule first, then the cell rule for the same condition. This is useful for tables with wide schemas, where a portion of the table is always offscreen in LiveView Desktop's grid view. In such cases, a color-change alert might be missed if a cell is colorized offscreen. When you color the entire row, perhaps with a background color, it serves as a reminder to scroll left or right to locate the cell or cells that caused that row to change.