
Contents
- Running Modules vs Fragments
- Before Running a Module
- Running a Module or Fragment
- Running Module vs Processing Module
- Studio Automatic Node Management
- Studio Node Name Assignment
- How to Tell Which Fragments Are Running
- Stopping a Running Module
- Normal Fragment Termination vs Clusters View Stop
- Run Configurations
- Running with a Custom Configuration
- Prompts for Unsaved Changes
This topic describes how to run and stop EventFlow modules and fragments in StreamBase® Studio.
To debug your module, see Debugging Overview.
An EventFlow module is an individual file with .sbapp extension.
An EventFlow fragment is a Studio project composed of at least one EventFlow module, but potentially composed of dozens of modules. In a complex EventFlow design, a primary, main module references several subordinate modules that encapsulate a particular portion of the design's logic. Subordinate modules can reference subordinate modules of their own.
To run a fragment in Studio, you select the primary, top-level module to run. During development, you can also select individual submodule to test whether its individual processing steps are working as you intend.
An EventFlow module can only be run when it is:
-
Saved to disk
-
Free of typecheck errors
See Typechecking to learn how to recognize and correct typecheck errors in your EventFlow modules.
To run an EventFlow module or fragment in Studio using the current or default Run Configuration:
- The module of interest is open and is the currently active module in the EventFlow Editor:
-
-
Click the Run button (
 ) in Studio's top toolbar.
-
Press Ctrl+F11 (Windows) or command+F11 (Mac).
-
Use Alt+Shift+X, B (Windows) or Option+Shift+X, B (Mac). That is, press and hold the Alt (Option), Shift, and X keys at the same time. Release them, and immediately press the B key.
-
Right-click in the canvas of your module in its Editor view, and select > from the context menu.
-
Select >> from the top-level menu.
-
Click the down-arrow next to the toolbar's button, and select > from the menu.
-
- Whether or not the module of interest is open and active:
-
-
Right-click the name of the EventFlow fragment project in the Project Explorer view. From the context menu, select > from the context menu.
If the selected project contains only one module (as in many of the samples shipped with StreamBase), the fragment begins to run. If the selected project contains more than one module, Studio prompts you to select the module of interest.
-
When you run an EventFlow module, Studio performs the following actions:
-
Creates a Run Configuration using default settings, if this is the first time you have run this module in this Studio workspace.
-
Places an entry in the > list.
-
Opens the SB Test/Debug perspective in Studio.
-
Opens the selected module in the EventFlow Editor, if it is not already open.
-
Installs and starts a node to contain the module or fragment.
-
Places an entry for the node in the Clusters view.
-
Displays a progress dialog and shows progress information in the Console view.
-
Places an entry for this module in the Debug view (for both Run and Debug launches).
-
Blocks the Manual Input view with the message "Waiting for fragment to initialize".
The module is not fully running the Manual Input view is ready to accept input to one of the module's Input Streams.
When the module is running, you can use Manual Input or Feed Simulation views of the SB Test/Debug perspective to interact with the running EventFlow fragment deployed to the node. The fragment also now responds to input from the sbc command or other StreamBase clients from the command line.
An EventFlow module is said to be processing when it is actively accepting data on its input streams and/or input adapters, passing the input tuples through the module's logic, and optionally emitting tuples to output streams and/or output adapters. Modules might also read tuple data from an external JDBC or direct-store database, or store tuple data in an external database.
When a module is running, whether in Studio or from the command line, it is not necessarily processing any tuple data when its containing node starts. Many modules, including a majority of the samples included with StreamBase, start but then wait for input data to arrive on their input streams.
Some StreamBase samples are configured to automatically start a feed simulation on module start, and thus appear to both run and process data at the moment of node startup. Your might configure you own modules to start and immediately begin listening to a market data feed, or to a shared data bus such as TIBCO EMS, or to a stream of sensor data. In these cases, as long as the source of incoming data is available to the module, it begins processing when its containing node starts.
StreamBase Runtime nodes have a fixed and well-defined node lifecycle. Nodes are:
-
Installed
-
Started
-
Stopped
-
Removed
In general, the normal workflow for EventFlow fragment launches in Studio is:
-
You launch a module or fragment. This installs and starts a node in a cluster running locally on your development machine. The launch goes through three stages, which are displayed in a progress dialog as well as the Console view:
-
Installs a node
-
Starts the node
-
Deploys the module to the node
-
-
You stop the fragment with the Terminate button in Studio's top toolbar. This stops the fragment from running, but the node and cluster remain installed and started.
-
You launch the same fragment. Studio deploys the fragment into the same node already installed and started to contain that fragment.
-
You launch a different fragment. Studio installs and starts a new node designated for the new fragment, and deploys the new fragment to the new node.
-
You terminate the first fragment. The second fragment remains running.
-
And so on ...
-
When you exit Studio, the nodes and cluster that hosted your fragment launches are automatically stopped and removed.
Studio automatically assigns a different node name for each node launched, even when the same EventFlow module is run more than once. Nodes are named according to a customizable pattern.
Studio's default node name is generated from a naming pattern generated from a set of variables. You can change the node name assigned in the next launch of a node in two ways:
- Node Name Pattern in Run Configuration
-
You can change the node name assignment pattern for a particular node in the node's Run Configuration, in the Node control.
- Default Node Name Pattern for Studio
-
You can change the default node name pattern for all EventFlow and LiveView node launches in Studio Preferences.
In both places, the naming pattern you assign must include the S(SeqNum) variable, to make sure a sequence number is assigned to make node names unique.
The default cluster name for Studio-initiated nodes is the system login name in effect when Studio started, and is not specified in a Run Configuration. You can change the default cluster name in Studio Preferences.
There are several ways to tell what fragments are currently running:
- The Clusters view
-
The Clusters view is the primary display of the nodes running fragments as installed and started by Studio.
- Application tab in the Editor window
-
-
A small green triangle is overlaid on the icon in the running module's EventFlow Editor tab. The triangle disappears when you stop the fragment.
-
A currently running message is shown in the information bar at the top of the Editor canvas of the running fragment. If the running fragment is the only instance of that EventFlow module, the message includes the full StreamBase URI.

If there is more than one instance of that module running, the message does not include the URI:

A message about Other applications is shown in the information bar of non-running Editor modules:

Notice that the information bar can be collapsed to an icon by clicking the arrow on the right side. Click the icon's arrow to restore the information bar.
-
- StreamBase icon in the lower left corner of Studio window
-
When no application is running, the lower left corner icon is not active. When at least one fragment is running, the icon acquires a small green triangle. To see the name and location of the running fragments and their client API ports, hover your mouse over the icon.
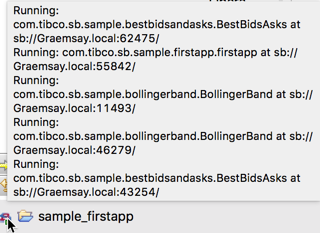
The lower left icon display shows only fragments currently running in nodes launched by Studio, even if there are other running nodes in the same cluster launched with epadmin.
Note
Do not use the Clusters view Stop Node button to terminate a normally running fragment! The difference is described in the next section.
To stop a running EventFlow module:
-
Select the Editor tab for the running EventFlow module.
-
Stop the selected fragment with one of these actions:
-
Press the F9 key.
-
Select Terminate StreamBase Launches from Studio's Run menu.
-
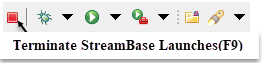
Click the Terminate StreamBase Launches button
 in Studio's top toolbar.
-
Click the Terminate button at the top of the Console view — but first make sure you are seeing the Console for the fragment you want to end. Click the Display Selected Console button several times to cycle through the available Consoles for both running and recently terminated fragments. Only currently running fragments have an active Terminate button.

-
If there is more than one fragment running, Studio prompts you to select which ones to stop.
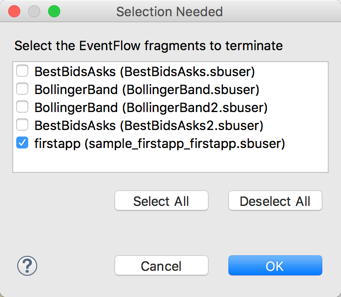 |
The same dialog appears whether you use the F9 key or the command. However, this command is not required when you stop a fragment from the Console View's Terminate button. More importantly, you can only terminate the current fragment using the Console View's Terminate button. In case of multiple fragments running from an application launch, you can again terminate only the current fragment and Studio will warn you about the same.
Terminating a module also stops any feed simulations that may be sending tuples into the module.
Termination does not affect the node that was started to contain the fragment, and does not remove the node directory launched to contain logs and operation state information.
If there is a single module running, stopping that module causes Studio to switch back to the SB Authoring perspective. (You can change this default behavior in Studio Preference Settings.) If there is more than one module running, Studio remains in the SB Test/Debug perspective.
There is an important distinction between terminating a running EventFlow or LiveView fragment and stopping a node. Your fragment's launch and Studio node management have independent life cycles, and that is important to understand.
As part of the normal course of EventFlow development, you only need to terminate running fragments, as described in the previous section.
When you terminate a fragment correctly, the EventFlow fragment running on the node is gracefully shut down. Gracefully can mean, for example, any adapters running in the fragment are notified that shutdown is underway,
and are thus given an opportunity to release or close resources.
After the fragment is terminated, its node remains and is kept in the started state. This is what makes subsequent deployments of the same fragment faster.
Stopping a node with the Clusters view button is an action reserved for rare cases when you might need to intervene in Studio's automatic node management process. For example, a failed node can leave the node in an orphaned state that cannot be reused by the next launch of the same fragment. See Clusters View Toolbar for more on the best uses of these Clusters view features.
Every run of an EventFlow fragment occurs in the context of a Run Configuration that defines the parameters for the run. You can specify a custom set of runtime parameters and save them as a named Run Configuration, as described in Editing EventFlow Run Configurations.
StreamBase Studio generates a default Run Configuration the first time you run a module, which allows you to run your module right away without stopping to edit a custom configuration.
Use the Run Configurations dialog to edit, name, and save a run configuration. See Editing EventFlow Run Configurations.
To run a custom configuration, invoke the configuration's name in one of the following ways:
-
Open the Run Configurations dialog as described in Open a Run Configuration Dialog. Select the name of the Run Configuration in the contents pane on the left, then click the Run button.
-
Select >> from the top-level menu.
-
Click the down-arrow next to the toolbar's button, and select your configuration's name from the menu.
If the specified module has any unsaved changes, StreamBase may display the Save and Launch dialog.
The Save and Launch dialog offers to enable the Eclipse feature that automatically saves modules before running them. This dialog is displayed when the Auto-save Options in your Studio preferences is set to Ask me next time (its default setting).
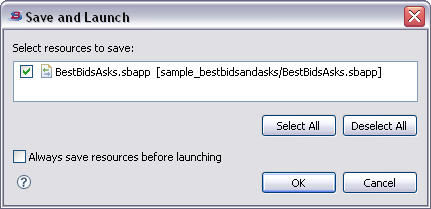
The dialog displays a list of the EventFlow Editor sessions for files associated with the fragment you are trying to run. The checkboxes are pre-selected for files that need saving before the run request can proceed. You can clear the checkboxes for support files such as feed simulation files, but you must allow the top-level EventFlow module file to be saved before running it.
If you select the Always save resources before saving check box, Studio changes the Auto-save option in your workspace preferences to Save without prompting. The next time you run an application or deployment with unsaved changes, it is automatically saved and run immediately.
Cancel dismisses the dialog and the module is not run.
By default, running a module causes Studio to switch from the SB Authoring perspective to the SB Test/Debug perspective. You can change this behavior in Studio Preference Settings.