Contents
LiveView server offers rich functionality for querying your streaming data. LiveView server has a built-in SQL-like query language, LiveQL, the LiveView query language.
This document demonstrates three ways to run queries:
-
Create a query against a configured table with LiveView Desktop.
-
Use the Java Client API to run a query.
-
Run a command-line query using lv-client.
You can use LiveView Desktop to create, save, and edit queries that continuously run against LiveView tables. This example demonstrates how to write a query in LiveView Desktop that returns a continuously updating view of all table rows where the query predicate conditions evaluate to true. This example runs against the tables in the Hello LiveView sample project using the preloaded workspace available with the sample.
Load and run the Hello LiveView sample as delivered with LiveView, and view the resulting tables with LiveView Desktop. Follow these steps:
-
Start StreamBase Studio in the SB Authoring perspective.
-
Load the Hello LiveView sample:
-
Select → from Studio's top-level menu.
-
Enter
helloin the filter field to narrow the selection. -
Select the sample whose description is
Shows a simple Hello World applicationfrom the TIBCO LiveView category. -
Click .
The Hello LiveView sample loads into Studio with the project name
sample_lv-helloliveview. If you already have a project folder of that name, Studio adds a counter digit to the folder name and adds a new project. -
-
In the Package Explorer view, select the name of the project, right-click, and from the context menu, select → . The Console view shows several messages as the LiveView Server compiles the project and starts. This startup process can take several minutes, depending on the configuration of your computer.
-
When you see the message
All tables have been loadedin the Console view, start LiveView Desktop with one of the following methods:-
On Windows and Linux, if your StreamBase Studio sample project folder includes
Start LiveView Desktopentries, then a Run Configuration entry was automatically added to Studio when you loaded the sample. In this case, the simplest way to start LiveView Desktop is to invoke → → . -
On macOS, only if LiveView Desktop is installed in the canonical location in
STREAMBASE_HOME/liveview/desktop, you can invoke → → .Otherwise, use Spotlight or Launchpad to locate and invoke the app named
liveview. -
On Windows, you can also invoke → → → → .
-
On Linux, you can also run the following command:
/opt/tibco/sb-cep/
n.m/liveview/desktop/liveview &
Any of these methods opens the Connect to LiveView dialog.
-
-
In the Connect to LiveView dialog, select the radio button for Download and click .
-
Select the workspace named
Hello LiveViewand versionLatest. -
Click . This returns you to the Connect to LiveView dialog. The Download field now contains
Hello LiveView (Latest). -
Click .
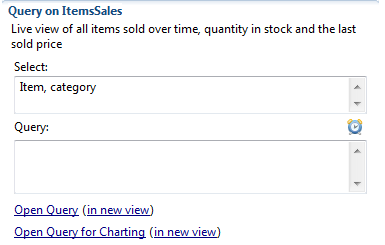
The ItemsSales table of the sample_lv-helloliveview project contains information about product inventory. You may want to track which products in a particular category have low inventory. To see which items in the category toys have fewer than 20 remaining:
-
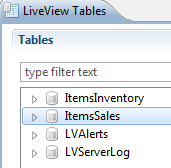
Click the ItemsSales table in the Tables view of LiveView Desktop:
-
Enter the projections in the Select window:
-
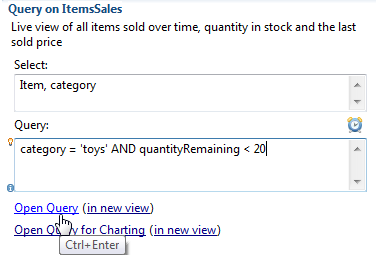
Enter your query predicate into the Query window and click or type Ctrl+Enter. This query will return all toys with low inventory (< 20):
-
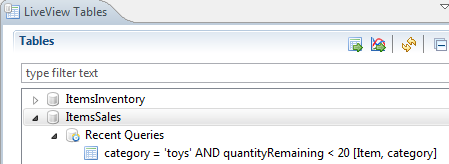
Once you execute this query, it is automatically saved in the Recent Queries node of the Items table:
-
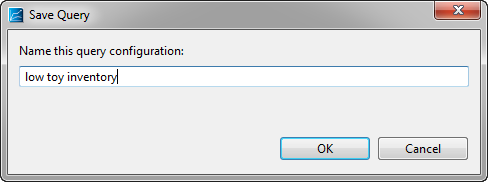
You can then save this query by clicking the Save Query button (
 ) and giving the query a name. Query names should contain only alphanumeric characters and spaces.
The named query now appears under the
Itemstable in the Tables view: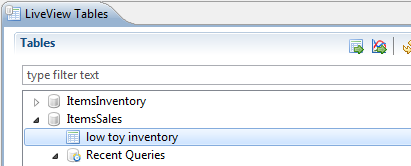
-
You can re-run the query
low toy inventoryseveral ways:-
Double-click the name of the query. The query will focus an existing open query view or, if there is no view on the query open, open a new view.
-
Select the query name in the Tables view and click the Open Query link. If you click Open Query, the query will focus an existing open query view or, if there is no view on the query open, open a new view. If you click in new view, the query will always open a new view, even if one is already open.
-
-
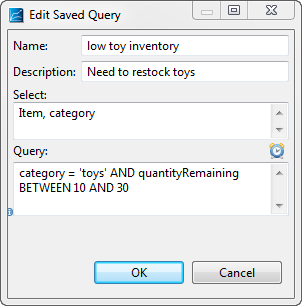
You can edit this query by right-clicking on it and selecting from the drop-down menu. For example, you can change the query name, add a short description, and limit the query to a range between 10 and 30 for quantityRemaining.
-
Every time you run this query, you add an entry to the Recent Query node.
To delete a query:
-
Right-click the name of the query or the query's entry in the Recent Queries node and select , or
-
Left-click the query and press the Delete key.
-
LiveQL provides streaming data modifiers that let you use the fact that your data is constantly being updated to specify query results.
-
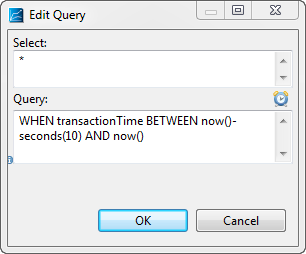
Time-window query predicates return only results that fall within a specified time interval. You can use a time-window query predicate to limit query results to a specific time window. A time-windowed query includes a time window predicate that specifies a timestamp field and the lower and upper bounds of a time window; a row satisfies the predicate if the timestamp is within the bounds of the time window.
Time-window predicates have the following syntax:
WHEN
TimeStampFieldBETWEENolder-time-expressionANDnewer-time-expressionTimeStampFieldis a timestamp field in the target table,older-time-expris the lower bound of the time window, andnewer-time-expris the upper bound of the time windows.TimeStampFieldmust advance monotonically in tuples published to the table; that is, the value ofTimeStampFieldmust not decrease from one tuple to the next.older-time-exprandnewer-time-exprmust be absolute timestamps, not interval timestamps.Tip
The WHEN clause is an essential part of the time-windowed query. If you remove the WHEN from the BETWEEN query clause, the query predicate will be evaluated once, when the query is executed. The results will not be updated, so, for example, the
now()function will be evaluated exactly once and replaced with a single timestamp result. This is a different result than the time-windowed query.Time windows are designed to show granularity on order of minutes and seconds. Time windows of granularity smaller than 1 second are not evaluated.
Note
For optimal query performance, the
TimeStampFieldfor the time-windowed query must be indexed. If this field is not indexed, LiveView periodically scans the table for updates. In the case of large target tables, back-to-back table scans have a severe adverse effect on LiveView Server's performance.For example, this query returns all rows from the ItemsSales table where the transationTime is in that last ten seconds:
-
Time-delay query predicates return only results that are true for a specified time interval in milliseconds. Time-delay queries have the following syntax:
WHERE
expressionFORnumberMILLISECONDSFor example, this query returns all rows from the ItemsSales table where the quantityRemaining field is less than 40 for 5 milliseconds:

LiveQL query modifiers let you sort and limit query results.
-
Top-N queries let you limit query results to a specified number of rows.
-
GROUP BY clauses let you sort by table fields.
Top-N queries use ORDER BY ... LIMIT clauses in a query to specify that at most N rows are returned in the result, sorted by the fields specified in ORDER BY. A query with an ORDER BY ... LIMIT statement has the following syntax:
Predicate-ExprORDER BYField1[asc | desc][,Field2 [asc | desc]],... LIMITN
The ascending and descending order options can be specified for every field argument of the ORDER BY clause. The default value is ascending.
For example, this query, issued against the ItemsInventory table, returns three rows with the largest values of totalInventory:
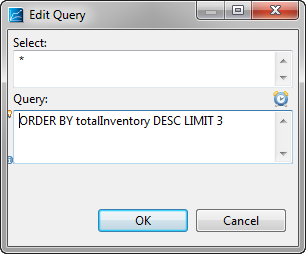 |
For optimal query performance:
-
The volatility of the top rows should be fairly modest. If the ORDER BY field contains values that shift in and out of the top N results, the amount of data processed by the server and sent to the client could become very large. For example, a good ORDER BY field might be the average selling price for blocks of the same stock. This value may not change radically from second to second, so the entries in the top N results would be reasonably static. A poor ORDER BY field is something like arrival time; this kind of field is volatile by design. Increasing volatility in the top N increases processing time and causes a high volume of add and remove traffic to the client.
-
The value of N should be small enough to view query results easily. A typical use of a top-N query feature is to display the N rows most interesting to a user on a single screen. Typical values of N might be 5, 10, or 50. Larger values of N require more processing and may generate more server traffic. Values larger than 100 should be avoided.
Note that it is possible to use a LIMIT clause without an ORDER BY clause; however, there are significant differences between these two uses:
-
ORDER BY ... LIMIT
Nmeans that the client will see no more thanNrows in the result, using the order provided. Queries with an ORDER BY clause must also include a LIMIT clause. -
LIMIT
Nwithout an ORDER BY clause is a safety measure for the client. In this case, after theNth row is returned to the client, LiveView Server throws an error and terminates the query.
GROUP BY clauses let you collect data from multiple rows and group the results by query projection. A GROUP BY entry is required for any raw field name in the Select window. Queries with GROUP BY clauses have the following syntax:
SELECTfieldname1,fieldname2, ...aggregate_expression1ASalias, ... FROMTableWHEREexpressionGROUP BYfieldname1,fieldname2, ...
For example, the following query will return all rows from the ItemsSales table and group the results by quantityRemaining, lastSoldPrice, and Item:
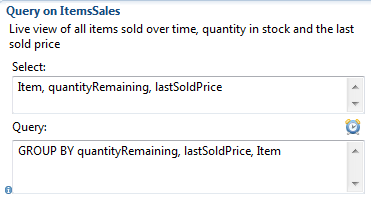 |
The LiveView Java Client API lets you create your own custom client to connect to a LiveView Server. You can use the Java Client API to create queries.The sample_lv-java-clientapi provides example queries that you can run against the sample_lv-helloliveview project.
Load this sample using the same steps you used for sample-lv-minimal. Once you have loaded the sample, you can view the file structure in the SB Authoring perspective of StreamBase Studio.
The Java source files are contained at → → . The files in this demo are:
- SimpleQuery.java
-
Demonstrates how to use the LiveView Java API to connect to and query a table.
- QueryWithLiveResult.java
-
Demonstrates a simple query that uses a LiveResult query listener to provide continuous updates.
- QueryWithFilter.java
-
Demonstrates a query that selects a subset of columns from a table and filters the results using a simple predicate.
- ConnectAndListTables.java
-
Demonstrates how to connect to a LiveView server and list the LiveView tables.
- DynamicAggregation.java
-
Demonstrates a dynamic aggregation query.
- AdvancedConnect.java
-
Demonstrates the use of a progress monitor listener that reports the progress of connection and disconnection events.
The comments in the source files explain more about how the queries work. To run a query, follow these steps:
-
Open the Java file in StreamBase Studio. When you open the file, Studio silently compiles the file.
-
Right-click anywhere in the Editor canvas and select → .
-
Set the Console to view the query output. By default, the Console view updates when standard output changes. To display the query results only, de-select the Console tab button Show Console When Standard Out Changes:

For example, DynamicAggregation.java contains the following query. This query aggregates the quantityRemaining column grouped by color:
QueryConfig queryConfig = new QueryConfig().
     setSelectExprs("category", "sum(quantityRemaining) as totalQty").
     setTable("ItemsSales").
     setPredicate("quantityRemaining > 10").
     setGroupByExprs("category").
     setQueryType(LiveViewQueryType.SNAPSHOT_AND_CONTINUOUS);
This query is of type SNAPSHOT_AND_CONTINUOUS. The snapshot part of the query returns results like the following:
Begin snapshot, query result fields are:
  category string
  totalQty int
Tuple added, key: 2, tuple: toy,45702
Tuple added, key: 4, tuple: book,58475
Tuple added, key: 3, tuple: clothes,52316
Tuple added, key: 1, tuple: automotive,65872
Tuple added, key: 5, tuple: electronics,172951
Snapshot ended
You can add aggregates to setSelectExprs using the list syntax. For example, you can add an average value field to the query output by changing the setSelectExprs argument:
setSelectExprs("category", "sum(quantityRemaining) as totalQty",
avg(lastSoldPrice) as avgPrice")The command-line tool lv-client is run at a DOS or UNIX command line, and provides basic query functionality without using StreamBase Studio. The following example for Windows demonstrates how to start the Alerting sample project from the command line and run queries against the project's tables.
Note
If you have an instance of LiveView Server currently running, use the lv-client shutdown command before you run the sample.
These steps presume you have loaded the Advanced Alerting sample into StreamBase Studio.
-
Open a StreamBase Command Prompt. Do not use a standard Windows command prompt.
-
Navigate to the directory that contains your Studio workspace. The following example on Windows shows the location of the Studio workspace of the user named
sbuser:cd "C:\Users\
sbuser\StreamBase Studiom.nWorkspace" -
Run the Alerting sample.
lv-server run sample_lv-alerting-advanced
-
The command prompt window in which you start LiveView Server shows a series of messages reporting the progress of the server as it starts. Wait for a message that says:
{ Server Started } -

(... "All tables have been loaded. LiveView is ready to accept client connections. ")
The command prompt window then pauses and waits to display any runtime messages that may be necessary.
-
Open another StreamBase Command Prompt. You can use this second prompt to issue queries against the current LiveView server instance.
-
Start lv-client:
lv-client
You can see syntax help for the lv-client at any time by typing
help; -
Connect to the local server. The connect command without any arguments connects to LiveView Server running on the local machine with the default port number, 10080:
LV>connect;
If you wanted to connect to a remote machine and a specified port number, you would use the following syntax:
connect lv://
hostname:portnumber; -
List the tables in the currently running project:
LV> listtables;
-
Run a snapshot query for the ItemsSales table:
LV> select Item,category,quantityRemaining from ItemsSales where lastSoldPrice < 30;
-
Run a snapshot query that shows only the five items that have the smallest values for the quantityRemaining field:
LV> select Item,category,quantityRemaining from ItemsSales order by quantityRemaining limit 5;
-
Run a snapshot query against the LVAlerts table that shows all alerts created in the last 30 seconds:
LV> select * from LVAlerts when Created between now()-seconds(30) and now();
-
Exit from the lv-client prompt back to the shell prompt:
LV> quit;