Contents
This section describes how to deploy an application archive containing a Streaming fragment to Kubernetes. The primary focus is desktop development, i.e., testing of application images in a desktop Kubernetes node.
Here are some key terms that are used in Kubernetes frequently:
-
Kubernetes Node is a worker machine.
-
Kubernetes Cluster is a set of machines, called nodes, that run containerized applications managed by Kubernetes. A cluster has at least one worker node and at least one master node.
-
Kubernetes Master Node is a specific Kubernetes Node with responsibility for maintaining the state of the cluster.
-
K8s is an abbreviation of Kubernetes.
-
POD is the smallest deployable unit of computing that can be created and managed in Kubernetes.
-
StatefulSets manages the deployment and scaling of a set of PODs and provides guarantees about the ordering and uniqueness of these PODs.
-
Service is an abstract way to expose an application running on a set of PODs as a network service.
-
Ingress is an API object that manages external access to the services in a cluster, typically HTTP.
-
Kubectl Proxy usually runs on the user's desktop and proxies localhost address to the Kubernetes API server.
This section consists of a basic EventFlow fragment contained in an application archive. Additional files are included to support deploying in a Kubernetes environment. The sample shows how to build, deploy, and use TIBCO Streaming applications in Kubernetes.
-
Install Kubernetes. See Prerequisites.
-
Build this project to create container image. See Building and running from StreamBase® Studio and Building this sample from the command line and running the integration test cases.
-
Use
kubectl applyto grant permissions (if required). -
Use
kubectl applyto start the Streaming Nodes in the Kubernetes cluster. -
Use
kubectl get podto see what PODs were started. -
Use
kubectl logsto view the Streaming Node logs. -
Use
kubectl deleteto stop the Streaming Nodes and remove the PODs.
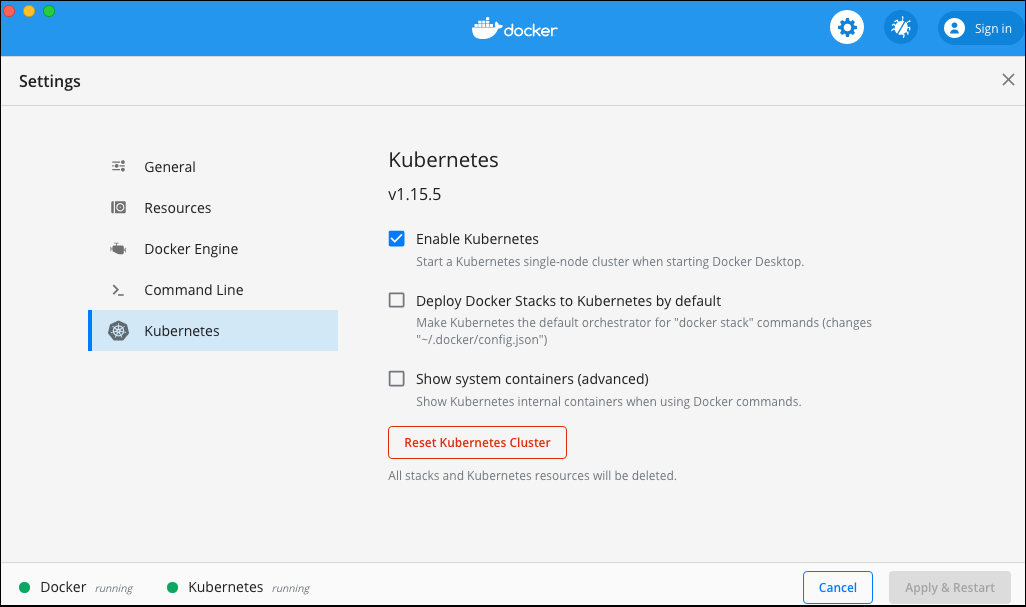
Kubernetes is required to be installed and configured. When using Docker desktop, this can most easily be achieved by enabling Kubernetes:
 |
Verify that docker-for-desktop is the current context:
$ kubectl config current-context
docker-for-desktop
Docker for desktop only supports a single Kubernetes Node.
Create a new StreamBase Project, select StreamBase Application, and enable both Use Kubernetes for container orchestration and Use Helm as packaging type.
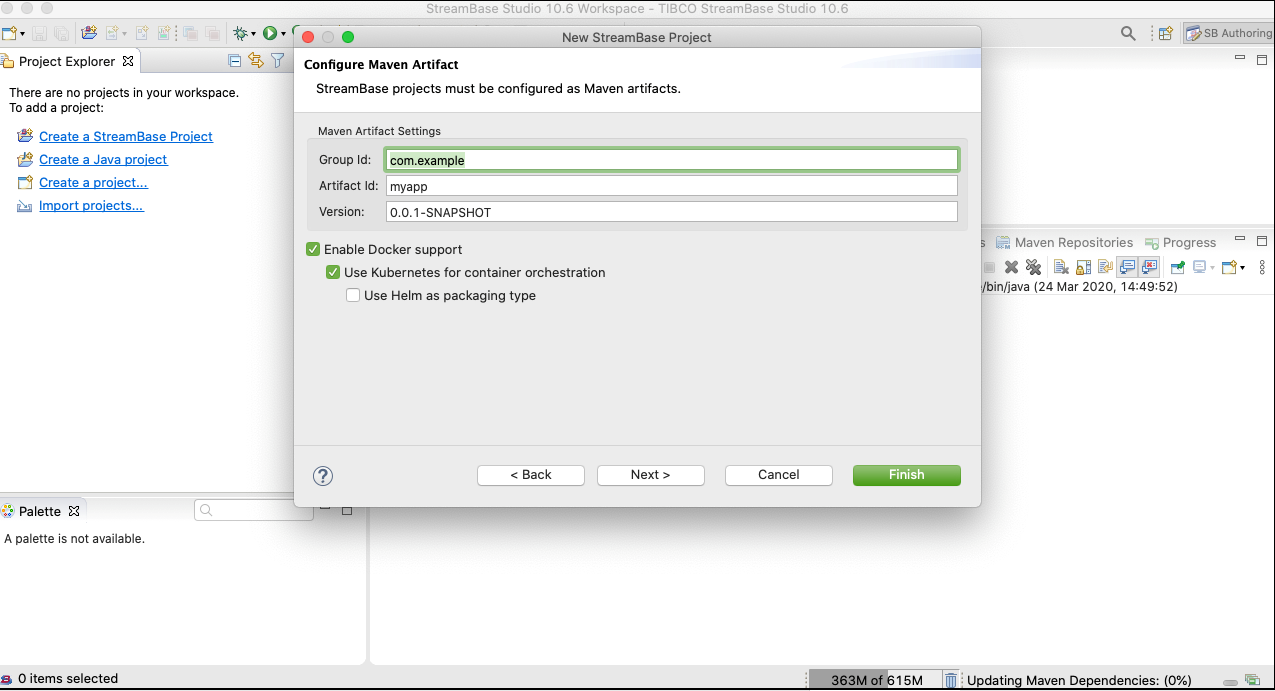 |
The resulting project contains maven rules for building a container image containing the application and the necessary Kubernetes configurations for deployment.
The Kubernetes configurations include:
-
ef-kubernetes-app.yaml - Kubernetes definition for a scaling cluster
-
security.conf - Trusted hosts names need to match Kubernetes DNS names
-
start-node - Script to start the Streaming node.
Streaming applications require sufficient permissions to run in Kubernetes. These permissions are shown in the example below:
$ kubectl apply -f - <<!
# ClusterRole
#
kind: ClusterRole
apiVersion: rbac.authorization.k8s.io/v1
metadata:
  name: service-update-cr
rules:
- apiGroups: [""]
  resources: ["services", "pods"]
  verbs: ["get", "list", "watch", "create", "update", "patch", "delete"]
---

# ClusterRole Binding
#
apiVersion: rbac.authorization.k8s.io/v1
kind: ClusterRoleBinding
metadata:
  name: service-update-crb
roleRef:
  apiGroup: rbac.authorization.k8s.io
  kind: ClusterRole
  name: service-update-cr
subjects:
- kind: User
  name: system:serviceaccount:default:default
  apiGroup: rbac.authorization.k8s.io
---
When running in a non-default namespace, the user above has to be adjusted. For example, in namespace production use:
- kind: User
  name: system:serviceaccount:production:default
  apiGroup: rbac.authorization.k8s.io
An example code for deploying the Streaming fragment on the OpenShift platform is:
$ kubectl apply -f - <<!
# ClusterRole
#
kind: ClusterRole
apiVersion: authorization.openshift.io/v1
metadata:
  name: service-update-cr
rules:
- apiGroups: [""]
  resources: ["services", "pods"]
  verbs: ["get", "list", "watch", "create", "update", "patch", "delete"]
---
# ClusterRole Binding
#
kind: ClusterRoleBinding
apiVersion: authorization.openshift.io/v1
metadata:
  name: service-update-crb
userNames:
  - "system:serviceaccount:default:default"
groupNames: []
subjects: []
roleRef:
  name: service-update-cr
The container image(s) can be pushed to a Docker registry using the mvn
deploy command. Parameters are supplied to set registry address and any
credentials. Standard parameter -Dmaven.deploy.skip=true is useful to skip
deploying the maven artifacts.
$ mvn -Dmaven.deploy.skip=true -Ddocker.push.registry=server.example.com:2001
-Ddocker.push.username=username -Ddocker.push.password=password deploy
...
[INFO] --- docker-maven-plugin:0.31.0:push (push application image) @ ef-kubernetes-app ---
[INFO] DOCKER> The push refers to repository [na-bos-artifacts.na.tibco.com:2001/ef-kubernetes-app]
4960dc540fa2: Pushed
6aba3a55a28a: Layer already exists
e3deac335052: Layer already exists
2438d0874da2: Layer already exists
a51f3f96403a: Layer already exists
8aa787eac029: Layer already exists
5087ff81b27f: Layer already exists
877b494a9f30: Layer already exists
[INFO] DOCKER> 1.0.0: digest: sha256:8376f155273b662149e9e4a4bdc2524a6e0bc1a9682e8326803e4207b5783093
size: 1992
[INFO] DOCKER> Pushed ef-kubernetes-app:1.0.0 in 18 seconds
...
Registry parameters are typically set in continuous integration builds using a maven
settings.xml file:
<settings>
    <servers>
        <server>
            <id>server.example.com:2001</id>
            <username>username</username>
            <password>password</password>
        </server>
    </servers>
    <profiles>
        <profile>
            <id>cloud</id>
            <activation>
                <activeByDefault>true</activeByDefault>
            </activation>
            <properties>
                <docker.push.registry>server.example.com:2001</docker.push.registry>
            </properties>
        </profile>
    </profiles>
</settings>
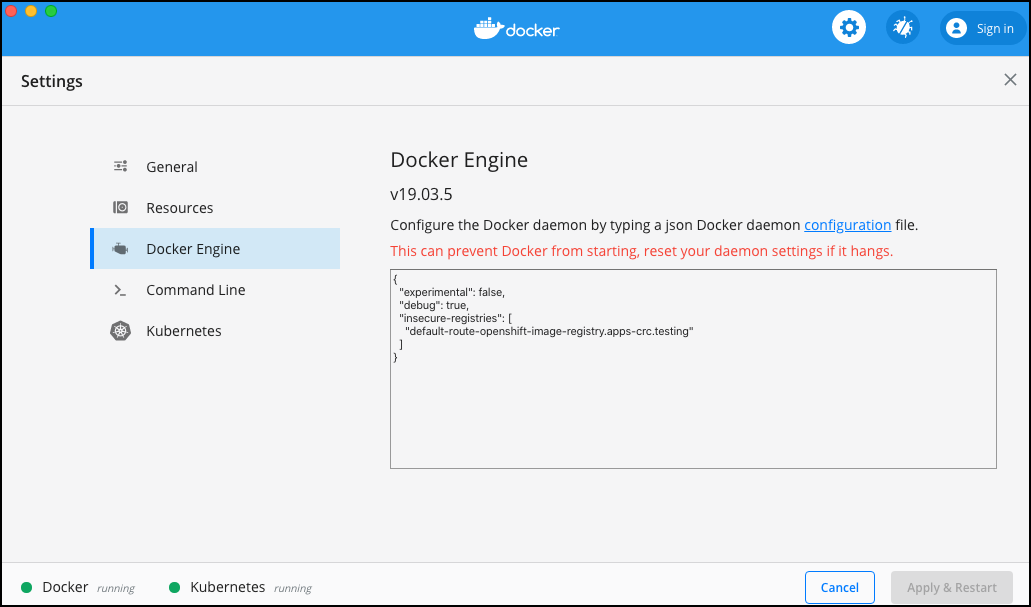
The Docker registry used should be secured. However, if it can not be (for example, a self-signed SSL certificate is being used or plain HTTP), then it may be possible to still use the registry by declaring it insecure:
 |
To start the Kubernetes dashboard in a docker-for-desktop context see Deploy and Access the Kubernetes Dashboard:
$ kubectl apply -f https://raw.githubusercontent.com/kubernetes/dashboard/master/aio/deploy/recommended.yaml
namespace/kubernetes-dashboard created
serviceaccount/kubernetes-dashboard created
service/kubernetes-dashboard created
secret/kubernetes-dashboard-certs created
secret/kubernetes-dashboard-csrf created
secret/kubernetes-dashboard-key-holder created
configmap/kubernetes-dashboard-settings created
role.rbac.authorization.k8s.io/kubernetes-dashboard created
clusterrole.rbac.authorization.k8s.io/kubernetes-dashboard created
rolebinding.rbac.authorization.k8s.io/kubernetes-dashboard created
clusterrolebinding.rbac.authorization.k8s.io/kubernetes-dashboard created
deployment.apps/kubernetes-dashboard created
service/dashboard-metrics-scraper created
deployment.apps/dashboard-metrics-scraper created

$ kubectl -n kubernetes-dashboard get secret
NAME                               TYPE                                  DATA   AGE
default-token-4nc9f                kubernetes.io/service-account-token   3      18s
kubernetes-dashboard-certs         Opaque                                0      18s
kubernetes-dashboard-csrf          Opaque                                1      18s
kubernetes-dashboard-key-holder    Opaque                                2      18s
kubernetes-dashboard-token-jq4z8   kubernetes.io/service-account-token   3      18s

$ kubectl -n kubernetes-dashboard describe secrets kubernetes-dashboard-token-jq4z8
Name:         kubernetes-dashboard-token-jq4z8
Namespace:    kubernetes-dashboard
Labels:       <none>
Annotations:  kubernetes.io/service-account.name: kubernetes-dashboard
              kubernetes.io/service-account.uid: 65fc5a3d-ee85-11e9-b8d1-025000000001

Type:  kubernetes.io/service-account-token

Data
====
token:      eyJhbGciOiJSUzI1NiIsImtpZCI6IiJ9.eyJpc3MiOiJrdWJlcm5ldGVzL3NlcnZpY2VhY2NvdW50Iiwia
3ViZXJuZXRlcy5pby9zZXJ2aWNlYWNjb3VudC9uYW1lc3BhY2UiOiJrdWJlcm5ldGVzLWRhc2hib2FyZCIsImt1YmVybmV0ZXMuaW8vc2VydmljZWFjY291bnQvc2VjcmV0Lm5hbWUiOiJrdWJlcm5ldGVzLWRhc2hib2FyZC10b2tlbi1qcTR6OCIsImt1YmVybmV0ZXMuaW8vc2VydmljZWFjY291bnQvc2VydmljZS1hY2NvdW50Lm5hbWUiOiJrdWJlcm5ldGVzLWRhc2hib2FyZCIsImt1YmVybmV0ZXMuaW8vc2VydmljZWFjY291bnQvc2VydmljZS1hY2NvdW50LnVpZCI6IjY1ZmM1YTNkLWVlODUtMTFlOS1iOGQxLTAyNTAwMDAwMDAwMSIsInN1YiI6InN5c3RlbTpzZXJ2aWNlYWNjb3VudDprdWJlcm5ldGVzLWRhc2hib2FyZDprdWJlcm5ldGVzLWRhc2hib2FyZCJ9.IPOva4ok6-w2VrLNidNdREWUWlYvkN4hJ0Tw3Kfik8tD50aofAO2DRFuH6GkSO94FOSbSCRay8bRIECIIjxt8FUjXXInhe7sh32NRTYs_-yRARId5V0kIHP7lUKuXTQcg5cIg7GoCO0ZkWwfdxMhQnMBUVY_HMF1LQVOx_Etth72ujJbIVBoSbQNoenTdOl9xUCFsQa9O_fa33PK5Uv0PaCqAo9vBO4j8CMVpLcXgjN_nypNx6PgUGzcLAIRqvCf-s7RYVhR3njHN6H_VrH92G_NkszWkX2T5cPsXlX6cIEK_CHskaQ5MnZhRPobAmjz3nXRy-KNkratn3HfZwcIPQ
ca.crt:     1025 bytes
namespace:  20 bytes

$ kubectl proxy
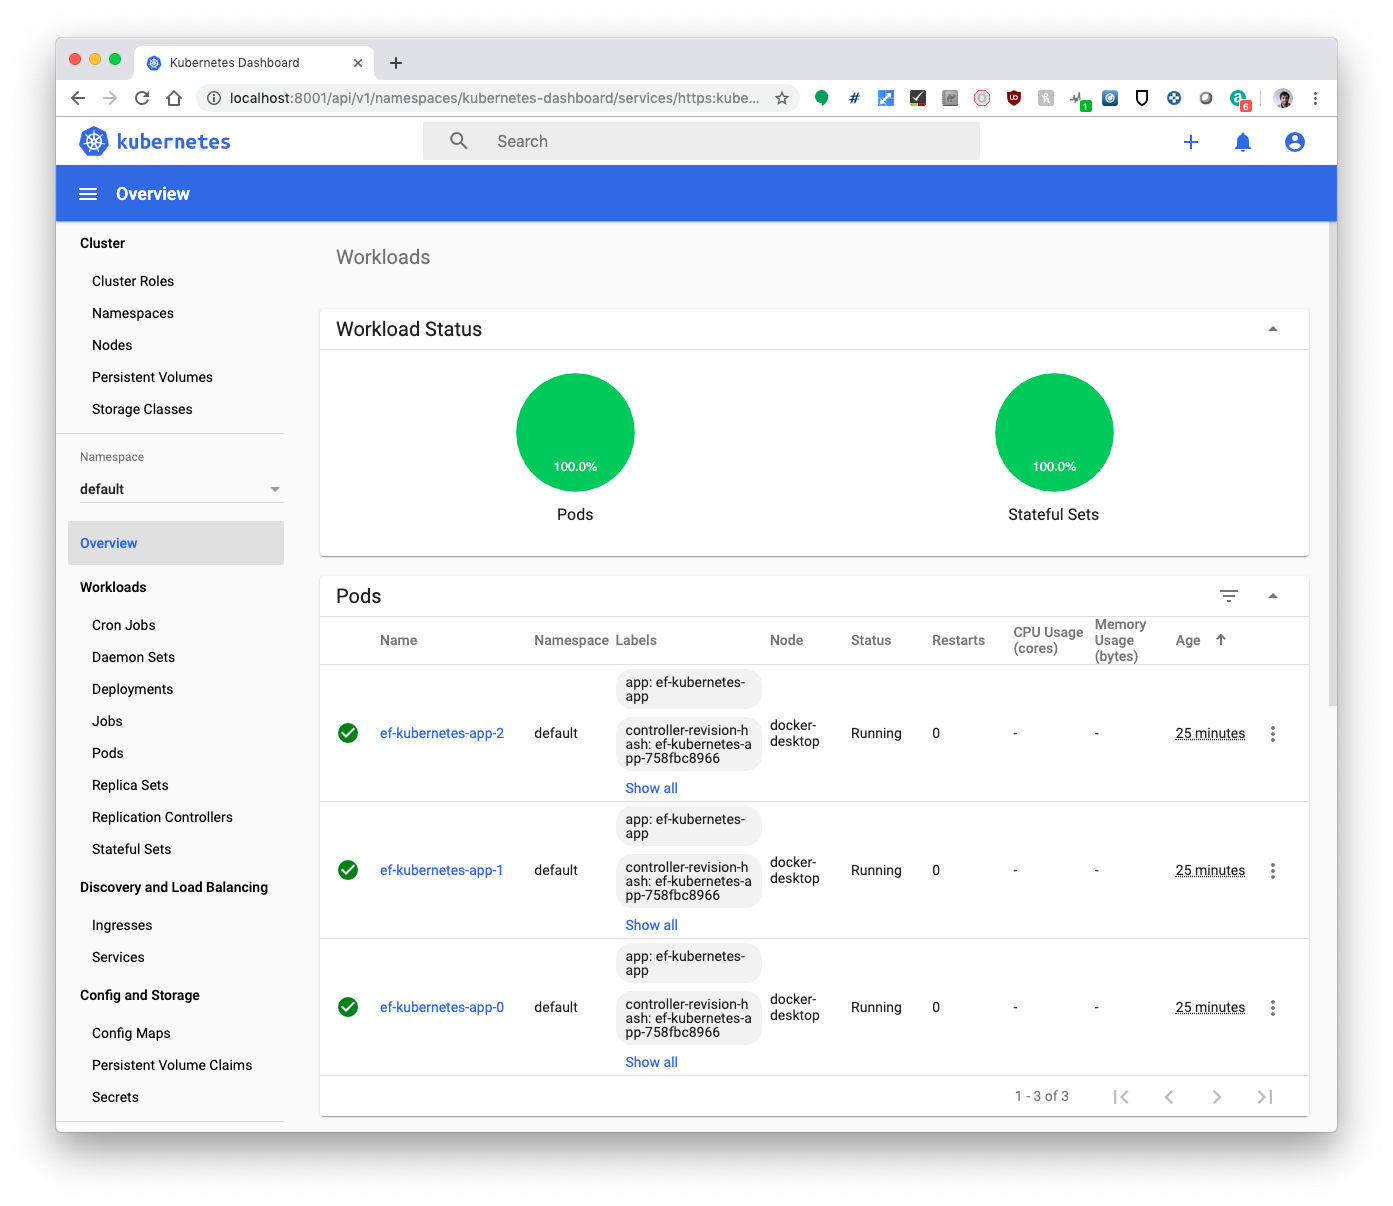
The dashboard can be found at http://localhost:8001/api/v1/namespaces/kubernetes-dashboard/services/https:kubernetes-dashboard:/proxy/ with token credentials as exported above:
 |
For demo purposes, a skip button can be added to the login screen (to avoid requiring the authentication token) by running:
$ kubectl -n kubernetes-dashboard patch deploy kubernetes-dashboard --type='json' -p='[{"op": "add",
"path": "/spec/template/spec/containers/0/args/-", "value": "--enable-skip-login"}]'
deployment.extensions/kubernetes-dashboard patched