Contents
Use the Manual Input view to send test data to a running StreamBase application one tuple at a time, or a few tuples at a time, in order to watch the results in the Application Output View and the Application Input View.
The Manual Input View offers two ways to enter values to be sent to a stream:
-
The forms-based input panel uses a forms-based view that shows one input box for each field in the selected stream's schema, including hierarchical list and tuple fields. The forms-based input panel lets you send one tuple at a time.
-
The JSON input panel lets you specify tuples to be enqueued to a stream using standard JSON notation. The JSON input panel lets you specify more than one tuple at a time.
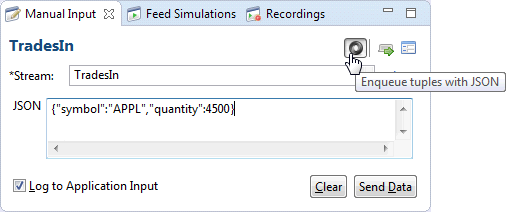
Toggle between the forms-based and JSON input panels by clicking the round JSON symbol ![]() in the upper right of the Manual Input view. The view retains the last-specified setting of this toggle when you return to
the Manual Input View.
in the upper right of the Manual Input view. The view retains the last-specified setting of this toggle when you return to
the Manual Input View.
 |
The command-line equivalent of the forms-based manual input panel is to start an sbc enqueue stream-name session on an input stream of a running application. You can then type the CSV equivalent of tuples that match that stream's
schema.
The command line equivalent of the JSON input panel is sbc enqueue --json stream-name. You can then type a JSON string for each tuple.
When your application is running, StreamBase Studio queries the running server to determine the number of input streams and the schema for each stream. The Manual Input view shows the application's input streams in the *Stream drop-down list, and shows the schema for the currently selected stream in the forms-based input panel.
If the running application has more than one input stream, select the stream of interest in the *Stream drop-down list.
Notice the select link on the right of the *Stream field. When working with large applications with many input streams in several modules, click this link to open a dialog that shows all input streams in the current project's module search path. This dialog allows you to limit the number of input streams that appear in the drop-down list.
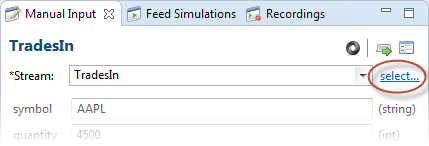 |
The example below is taken from the firstapp.sbapp module shipped with StreamBase in the First Application sample. The input stream TradesIn is selected as the stream onto which data will be enqueued. This input stream's schema had two fields, symbol and quantity.
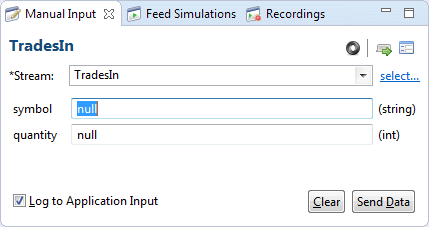
When you run an application in Studio, the initial values in the forms-based panel of the Manual Input view has all fields
are set to null, which is a reserved word representing an empty value for this field. This default setting is a convenience when enqueuing
a tuple that contains many fields: you can let some fields remain as null, and enter non-null values only for the fields that you know must not be null during your test of downstream components.
 |
(For further information on using nulls, see Using Nulls in the Authoring Guide.)
The following example shows values entered to replace the default nulls:
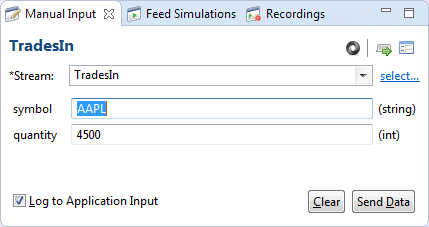 |
The text in parentheses to the right of each field reminds you of the field's data type.
You can enter data for any valid StreamBase data type. See StreamBase Data Types for the range of values allowed for each data type. The following data types have specialized input methods:
-
To enter a timestamp value, press Ctrl+Space with the cursor in a timestamp field (illustrated by the red line in the following example). Studio prompts with an autocompletion message as shown below. Select the message and press Enter to fill the field with the current date and time formatted as a timestamp string.
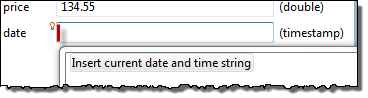
If the current date and time are not the values you mean to enter, edit the string to specify a different date or time value. Be sure to preserve the timestamp format when editing.
Studio calculates the current time value once per application run, the first time you invoke this feature. If you have other timestamp fields in the same Manual Input view, Studio inserts the same timestamp value.
-
To enter data in a blob field, the forms-based input panel provides a free-form text field where you can enter multiple lines of text to represent the blob data.
-
To enter data in a field of type list, see Manual Input of List Fields.
-
To enter data in a field of type tuple, see Manual Input of Tuple Fields.
When you enter valid values for each of the tuple's fields in the forms-based input panel, Studio enables the Send Data button. Click this button to send a tuple with those values to the specified input stream of the running application. Depending on the current work load, the sent data might join a queue of tuples waiting to enter the specified stream. Depending on the application design, the sent tuple does not always produce a result in the Application Output view, such as when values must accumulate before an output tuple is emitted.
Click the Send non-string blank fields as null button ![]() to toggle on and off the send blank fields feature. With this feature enabled, Studio automatically sends nulls for any fields
you do not enter, except string fields. The next time you run or debug an application, this button's on or off state remains
as last selected.
to toggle on and off the send blank fields feature. With this feature enabled, Studio automatically sends nulls for any fields
you do not enter, except string fields. The next time you run or debug an application, this button's on or off state remains
as last selected.
By default, each tuple you send is logged to the Application Input view. You can disable this behavior by clearing the Log to Application Input check box.
After you click the button, the last-entered values remain in the fields of the forms-based input panel, which saves time if you are entering similar values in sequence. Edit the values as required and press again.
Click the round JSON symbol ![]() in the upper right of the Manual Input View to toggle between the forms-based input panel and the JSON input panel.
in the upper right of the Manual Input View to toggle between the forms-based input panel and the JSON input panel.
 |
Last-entered tuple values are preserved when switching between forms-based and JSON input panels. If all field boxes are filled in with valid values in the forms-based input panel (including default-entered nulls), a valid JSON structure with the same values is generated for you when you switch to the JSON input panel. The reverse is also true, that a valid JSON input structure with a single tuple is automatically converted to the forms view when switching back to the forms-based input panel.
You can use this feature to generate valid JSON input strings for use in StreamBase unit tests.
Exception
When the JSON input panel shows a valid array of more than one tuple and you toggle back to the forms-based input panel, only the first tuple in the array is preserved in the forms-based input panel.
You can enter more than one JSON structure in the JSON input panel, using the following guidelines:
-
Each tuple's field values must be valid according to the input stream's schema, with each field specified. Null values must be explicitly entered, not assumed.
-
Each tuple is bounded by braces.
-
Brace-delimited tuples are separated by commas.
-
The entire array of tuples is bounded by square brackets.
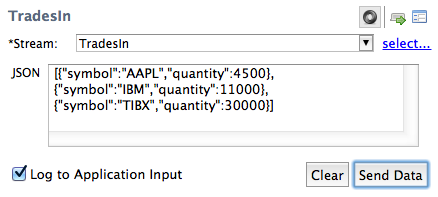 |
As long as each tuple in such an array represents a valid input tuple for the current stream, all tuples in the JSON input panel are sent when you click . The following illustrates three valid two-field tuples for the TradesIn input stream:
[{"symbol":"AAPL","quantity":4500},
{"symbol":"IBM","quantity":11000},
{"symbol":"TIBX","quantity":30000}]
Separating tuples one per line as shown preserves clarity, especially for complex tuples. However, as long as the guidelines above are followed, you do not need to separate tuples with line breaks. The following version of the above is a valid three-tuple JSON input string.
[{"symbol":"AAPL","quantity":4500},{"symbol":"IBM","quantity":
11000},{"symbol":"TIBX","quantity":30000}]You can copy tuples from the Application Input view and paste the selected tuples automatically into the Manual Input view.
Let's say the Manual Input view is currently configured to send tuples to stream ABC of the running application. If you have recently used the Manual Input view to enter successive tuples manually to ABC, or you have recently run a feed simulation that feeds stream ABC, then tuples in the current Application Input view are presumed to be in the correct schema for stream ABC.
Select one row in the Application Input view, right-click, and invoke Copy Tuples to Manual Input View. The selected tuple is automatically entered into the forms-based or JSON input panel, whichever is currently showing.
Select more than one row in the Application Input view by selecting a range of contiguous rows or by holding Ctrl (Command on OS X) while selecting non-contiguous rows. When a group of rows is selected, right-click and invoke Copy Tuples to Manual Input View. This pastes the selected rows to the JSON input panel as one long JSON string. If the Manual Input view is in its forms-based input panel, the paste operation automatically switches to the JSON input panel.
You can also copy tuples from the Application Output view if you select an output stream whose schema is a perfect match for
the schema of the currently selected input stream. In this case, the Copy Tuples to Manual Input View menu option does not operate; you can instead right-click and select ![]() Copy as JSON (or Copy as Single Quote JSON). Then select the JSON input panel of the Manual Input view, click , then paste with Ctrl+V (Command+V on OS X).
Copy as JSON (or Copy as Single Quote JSON). Then select the JSON input panel of the Manual Input view, click , then paste with Ctrl+V (Command+V on OS X).
When you enter an invalid value for a field, an error icon (![]() ) warns you of the error. Error icons appear for both the forms-based input panel and JSON input panel.
) warns you of the error. Error icons appear for both the forms-based input panel and JSON input panel.
When using the forms-based input panel, the error icon appears in two places:
-
To the left of the stream name at the top of the view.
-
To the left of each field that contains an input error.
When using the JSON input panel, the error icon appears:
-
To the left of the stream name at the top of the view.
-
To the bottom left of the JSON input field.
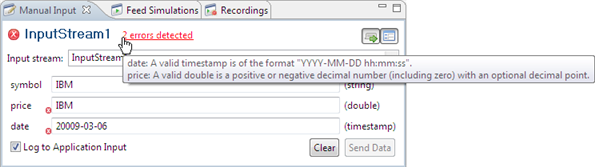
In the forms-based input panel, hover the mouse over an error icon to the left of a field value to show a tooltip that indicates why that field's value is invalid.
In the JSON input panel, hover the mouse over the bottom left error icon to show a tooltip that leads you to the tuple has
the error: Parsing error in tuple 2 ...
In both input panels, the view shows an errors detected link at the top of the view. Hover over the link to see in one place the tooltips for all errors in the view. In the forms-based input panel, click the link to take the cursor to the exact field with the error, so you can fix them.
In the example below, the value entered for the price field is text, but the field's data type is double. The date field has an extra zero in the year portion of the otherwise valid timestamp entry. Notice that Studio disables the Send Data button until the problems are fixed.
 |
When working in the forms-based input panel, the Manual Input view has two ways to enter data for fields with data type list:
-
The default list input method, with collapsible list fields and a variable number of element fields.
-
An alternate lists-as-text input method, where you enter an entire list in a single field in array notation.
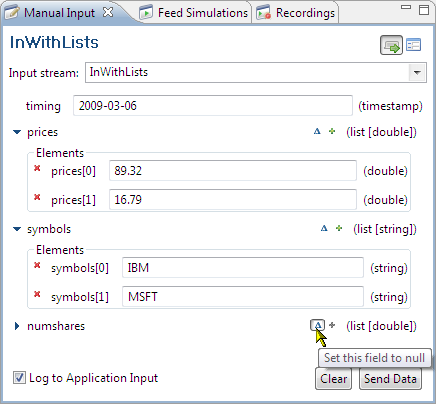
The default list input method is illustrated for the prices, symbols, and numshares fields in the following example:
 |
Notice the following points about the default list input method:
-
The
pricesandsymbolsfields are shown open, and with two elements each. -
All lists have a variable number of elements from zero to hundreds. We could have shown as an example six
priceselements with foursymbolselements. There is no reason the number of elements has to be the same for each list in a tuple. -
The
numsharesfield is shown collapsed. Collapse a list field by clicking the arrow to the left of its name. -
Add an element to a list by clicking the green plus sign on the left of the field's element type.
-
Remove an element by clicking the red X on the left of the element name.
-
Set the entire list field to null by clicking the triangle to the left of the green plus sign. Notice that the
numsharesfield is set to null, and the tooltip for the Set this field to null button is shown. (Setting a list field null is not the same as setting one or more elements of the list to null.)
See Null Lists for a discussion of null lists compared to empty lists.
Click the Enter Lists as Text button ![]() to input lists in array notation with comma-separated values. The lists as text input method is illustrated in the following
example, which shows the same values being entered as the example above.
to input lists in array notation with comma-separated values. The lists as text input method is illustrated in the following
example, which shows the same values being entered as the example above.
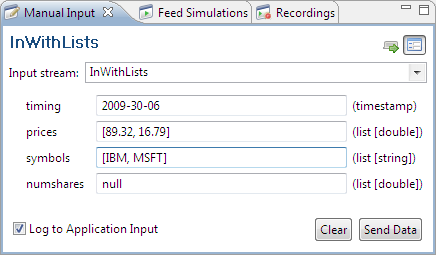 |
Notice the following points about the lists as text input method:
-
Use CSV input style, with the entire list enclosed in brackets and list elements separated by commas.
-
For list(string) fields, you do not need to enclose each element in quotes.
-
Notice that the
numsharesfield is designated null, which is the same action performed by the Set this field to null button in the default list input method.Setting a list field to null is not the same as setting one or more list elements to null. To enter a list field with a single null element, enter
[null]. A list field with three null elements would be[null, null, null].
See Null Lists for a discussion of null lists compared to empty lists.
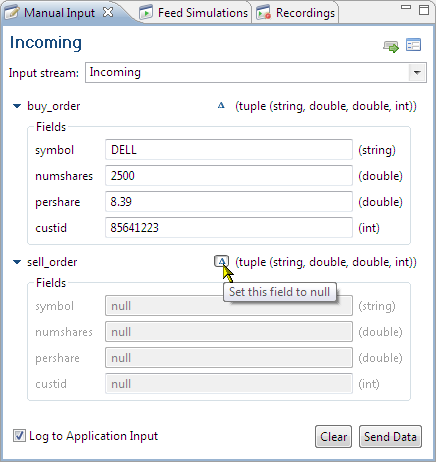
When working in the forms-based input panel, the Manual Input view shows fields of type tuple with sub-fields for entering
data. The tuple field is collapsible, and you can set the entire tuple to null, or set individual fields to null. Tuple field
input is illustrated in the following example, which shows two fields of type tuple, buy_order and sell_order, both having the same schema:
 |
Notice the following points about entering tuple field data:
-
Collapse a tuple field by clicking the arrow to the left of its name. Both tuple fields in the example above are shown open.
-
The schema of the tuple field is shown on the right, across from the field's name.
-
Set the entire tuple field to null by clicking the triangle to the left of the field's schema. (Remember that setting a tuple field null is not the same as setting all the sub-fields of the tuple field to null.)
The following example shows the first tuple, buy_order, with data, and the second tuple, sell_order, set null.
 |
See Null Tuples for a discussion of null tuples compared to empty tuples.
The schema for a stream might have a field of type tuple that contains a sub-field, also of type tuple. This inner tuple sub-field is known as a nested tuple. The following example illustrates manual input in the forms-based input panel of a tuple with a nested tuple.
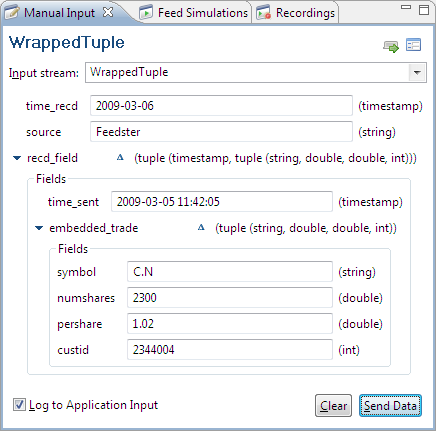 |
The schema of the stream WrappedTuple has three fields:
| Field | Type |
|---|---|
| time_recd | timestamp |
| source | string |
| recd_field | tuple |
The schema of the recd_field field has two fields:
| Field | Type |
|---|---|
| time_sent | timestamp |
| embedded_trade | tuple |
Finally, the inner tuple field embedded_trade has four fields:
| Field | Type |
|---|---|
| symbol | string |
| numshares | double |
| pershare | double |
| custid | int |