This document uses the Hello LiveView sample to explain how to use grid views in LiveView Desktop.
Load and run the Hello LiveView sample as delivered with LiveView, and view the resulting tables with LiveView Desktop. Follow these steps:
-
Start StreamBase Studio in the SB Authoring perspective.
-
Load the Hello LiveView sample:
-
Select → from Studio's top-level menu.
-
Enter
helloin the filter field to narrow the selection. -
Select the sample whose description is
Shows a simple Hello World applicationfrom the TIBCO LiveView category. -
Click .
The Hello LiveView sample loads into Studio with the project name
sample_lv-helloliveview. If you already have a project folder of that name, Studio adds a counter digit to the folder name and adds a new project. -
-
In the Package Explorer view, select the name of the project, right-click, and from the context menu, select → . The Console view shows several messages as the LiveView Server compiles the project and starts. This startup process can take several minutes, depending on the configuration of your computer.
-
When you see the message
All tables have been loadedin the Console view, start LiveView Desktop with one of the following methods:-
On Windows and Linux, if your StreamBase Studio sample project folder includes
Start LiveView Desktopentries, then a Run Configuration entry was automatically added to Studio when you loaded the sample. In this case, the simplest way to start LiveView Desktop is to invoke → → . -
On macOS, only if LiveView Desktop is installed in the canonical location in
STREAMBASE_HOME/liveview/desktop, you can invoke → → .Otherwise, use Spotlight or Launchpad to locate and invoke the app named
liveview. -
On Windows, you can also invoke → → → → .
-
On Linux, you can also run the following command:
/opt/tibco/sb-cep/
n.m/liveview/desktop/liveview &
Any of these methods opens the Connect to LiveView dialog.
-
-
In the Connect to LiveView dialog, select the radio button for Download and click .
-
Select the workspace named
Hello LiveViewand versionLatest. -
Click . This returns you to the Connect to LiveView dialog. The Download field now contains
Hello LiveView (Latest). -
Click .
Open a view on a LiveView table by double-clicking its table name in the LiveView Tables view. When you double-click a table name, you issue a query to LiveView Server that returns the entire contents of the table. By default, LiveView Desktop opens a grid view on the table.
You can use the following features to modify the display of a grid view:
-
Filter the display using a simple string match, discussed in Using LiveView Desktop Filters.
-
Limit the number of rows a grid view can display, discussed in Setting Row Limits in LiveView Desktop.
-
Apply cosmetic or alert formatting based on specified conditions in the incoming data, discussed in Conditional Formatting.
LiveView Desktop's grid view allows you to filter data from a query. A filter allows you to enter a specific string and limit results to rows that match that string. Use a filter when you have a set of results that is too large to show in one page.
To open the table Filter field for a grid view, you can either:
-
Click to select a grid view and press Ctrl+F.
-
Click the button (
 ) on the right side of the grid view's toolbar, and select .
In the Filter field, enter a string or substring to be matched against. If you enter an all-lowercase string, the filter matches
case-insensitively. If you enter a mixed-case search string, the match is case-sensitive. For example, to limit the current
table display to the rows that report book sales, type book into the Filter field. Notice that if you type Book, the filter does not match any rows.
The Filter field provides a simple substring match functionality, and is not designed to provide an exhaustive query mechanism. See Querying Your Data for ways to perform queries against tables.
The row limit for query results allows a LiveView client to prevent the server from sending excessive data. The limit specifies the maximum number of rows that the server returns to the client. Without a row limit, an insufficiently restrictive query on a large table or a rapid-changing table might overwhelm the client with more data than it can process.
Regard the row limit feature as a mechanism to protect clients from an extraordinary data load or from incorrectly defined queries. Because query results are not updated once the row limit is reached, we recommend that users not run queries that consistently reach the row limit. (If a query does reach the row limit, you can use the option in LiveView Desktop to see recent updates.) Set row limits low enough that client processing capacity is not exceeded, and define query predicates to be restrictive enough that the row limit is never or rarely reached.
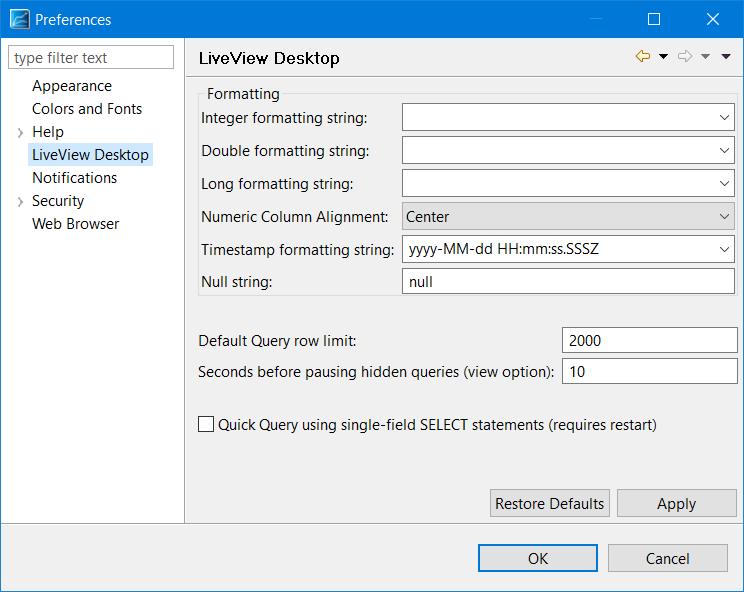
- Changing the LiveView Desktop Default Query Row Limit
-
In LiveView Desktop on Windows, invoke → ; on Mac OS X, invoke → . Select TIBCO LiveView from the left-hand navigation panel. The Default Query row limit field is set to the default value of 2000. Increase or reduce this value as appropriate for your expected data set.
This setting, like all LiveView Desktop Preference settings, is saved in your LiveView Desktop workspace, and persists across LiveView Desktop sessions if you restart Desktop and select the same workspace name.
- Changing the Query Row Limit Per Table
-
You can change the query row limit for individual tables. To do this, right-click the table name in the Tables pane and select → .