Contents
A table schema is a named schema for a set of Query Tables that completely defines the structure of those Query Tables, and ensures that all Query Tables in the set are identically defined. A table schema includes the table structure of a Query Table, as well as its primary index and secondary indexes (if any). You can apply a table schema by name to two or more Query Tables to quickly assign the same structure to Query Tables in several modules across a large application.
Table schemas are only used with StreamBase Query Tables, and not with JDBC tables.
Once a table schema is defined for a module or imported into a module, it appears in the Definition dropdown list on the Table Settings tab of every Query Table data construct in the same module (or in referenced modules).
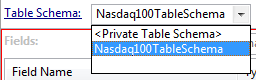 |
To define the table and index structure of the current Query Table using a table schema, select the name of the defined table schema from the dropdown list.
When a table schema is selected, the Schema, Primary Index, and Secondary Indices tabs of the Query Table's Properties view are dimmed and unavailable for direct editing. The information in those tabs is active and always reflects any changes in the definition of the table schema, but cannot be edited directly in the Query Table properties.
See Properties: Table Settings Tab for further details on using a defined table schema.
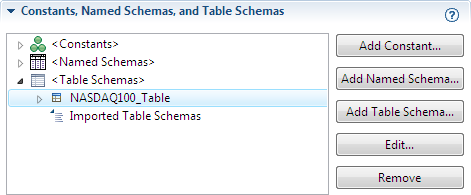
Define table schemas in the Definitions tab of an EventFlow Editor. Manage table schemas in the Constants, Named Schemas, and Table Schemas section of the tab as follows:
-
To create a table schema for the current module, click the button. You can also select any entry in the list, right-click, and select from the context menu. This opens the Edit Table Schema dialog.
-
To modify an existing schema, select it in the list, then use the button or the context menu command. Both functions open the Edit Table Schema dialog.
-
To remove a table schema, select it in the list, then use the button or the context menu command.
The following example shows the Constants, Named Schemas, and Table Schemas section of the Definitions tab with a single table schema defined:
 |
Use the Edit Table Schema dialog as follows:
-
Provide a name for the table schema. The name must follow the StreamBase identifier naming rules.
-
Provide an optional description to document the purpose of your table schema.
-
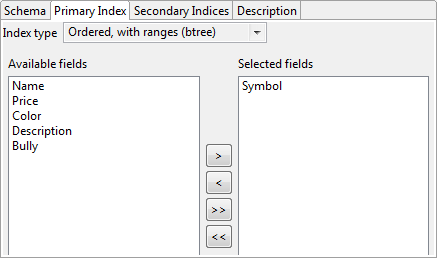
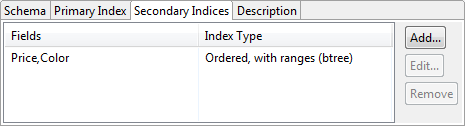
The dialog has four tabs:
-
Use the Schema tab to define the schema structure for this table schema. You can select the name of a named schema, copy the schema of an existing component, or you can define the individual fields in an unnamed schema. See the Edit Schema tab of the input stream for further details on using the standard schema editing control.
-
Use the Primary Index tab to specify one or more fields to serve as the primary lookup field for Query Tables that use this table schema. See the Primary Index tab for the Query Table data construct for further details on defining a primary index.
-
Use the Secondary Indexes tab to specify one or more secondary lookup fields for Query Tables that use this table schema. See the Secondary Indices tab for the Query Table data construct for further details on defining a secondary index.
-
Use the optional Description tab to enter documentation on the purpose and use of this table schema as a whole.
Notice that the Schema tab has a separate Schema Description field, which holds separate documentation for only the schema portion of the table schema. If this table schema uses a named schema as its schema definition, the Schema Description field is inherited from the named schema's definition.
-
The following example shows the Edit Table Schema dialog.
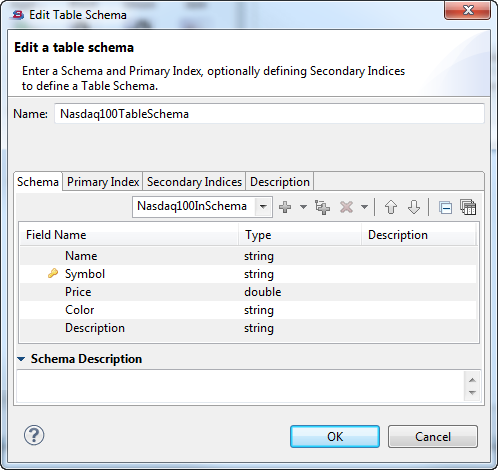 |
Notice that the primary key field is shown with a key icon.
Use the Manage Module Imports section of the Definitions tab of the EventFlow Editor to use a table schema from an interface or another module. You can import a table schema from any module or interface in the current module's module search path.
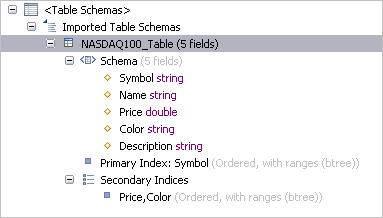
The following example shows an imported table schema with its table fields and index entries expanded.
 |
You can create a table schema by promoting an existing Query Table's privately defined table schema to a named table schema accessible in the Definitions tab for the current module.
Note
You may prefer to first create a named schema from the same Query Table, then create a table schema that incorporates that named schema plus index settings. To do so, use > as described in Promoting a Private Schema to a Named Schema.
Follow these steps to promote a Query Table's private schema to a named table schema:
-
Select a Query Table that does not have a table schema defined.
-
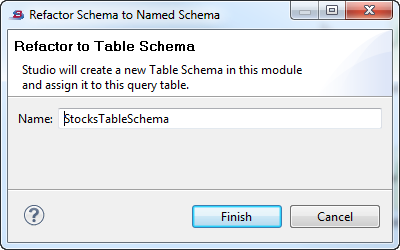
Right-click and select > from the context menu.
-
In the Refactor to Table Schema dialog, Studio suggests a named for the new table schema based on the Query Table's name with "Schema" appended.
Click to accept the suggested name, or type a different name, then click .
-
To add documentation for the newly promoted table schema, select its name in the Definitions tab, click the button, and add text in the Description tab of the Edit Table Schema dialog.