Contents
You can define schemas as named objects that can be referenced in the defining module, and in any module that references or imports the defining module. Named schemas and their fields can be referenced in any component that takes a schema. By contrast, unnamed schemas, called private or anonymous schemas, are accessible only to connected downstream components in the application flow.
Table schemas are a form of named schema for Query Tables, and include a definition for the primary and secondary indexes of the table, in addition to the schema for the table's fields. Table schemas are described on Using Table Schemas.
A named schema effectively becomes a new data type for the module in which it is defined or imported. The following sections describe how to create and use named schemas in EventFlow applications:
Once you have defined a named schema, you can use it in the Edit Schema tab of the Properties view of any component that requires a schema. This includes:
-
In all input streams.
-
When using the declared schema feature of output streams.
-
In all Query Table data constructs.
-
In the Union operator, when the Union Settings property specifies Require this Schema.
-
In the Field Serializer global Java operator.
-
In the Edit Schema tab of many input and output adapters.
Once a named schema is defined for a module, the schema's name is added to the dropdown list at the top of the Edit Schema grid in other components in the same module or in a referenced module. The schema's name also appears in the list of data types in the Type column of the Edit Schema grid. You can apply a named schema in two ways:
-
You can replace the entire schema of a component with the fields defined in a named schema. To do so, select the name of the named schema from the dropdown list at the top of the Fields grid. This pulls the field definitions of the named schema into the current Fields grid, replacing any private field definitions already there.
Thereafter, the Fields grid shows the read-only contents of the named schema. If you change the definition of the named schema in the Definitions tab of the EventFlow Editor, the changes are automatically propagated to all components that specify the same named schema.
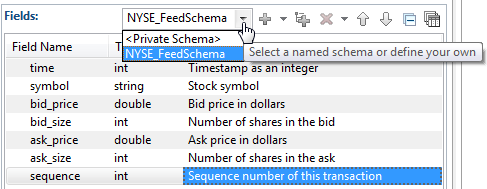
-
You can define the fields of an individual tuple field with a named schema. To do so, select the name of the named schema in the Type column's dropdown list. In the following example, the component has a private schema with three fields. The third field,
IncomingTuple, has the data type tuple, and its fields are defined as an instance of theNYSE_FeedSchemanamed schema.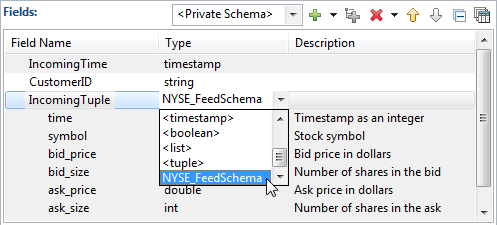
In EventFlow applications, you can create and view named schemas in the Constants, Named Schemas, and Table Schemas section of the Definitions tab of the EventFlow Editor. To create a named schema:
-
Open the Definitions tab.
-
Click the Add Named Schema button.
-
In the Edit Named Schema dialog, enter a schema name.
It is a best practice that you establish site-specific schema naming conventions, such as always appending
_schemato the names of schemas. However, Studio only enforces its standard identifier naming rules. Take care to avoid reusing an existing expression language function's name, as described below. -
Populate the schema fields using one of these methods:
-
Define the schema's fields manually, using the
 button to add a row for each schema field. You must enter values for the Field Name and Type cells. The Description cell
is optional. For example:
Field Name Type Description symbol string Stock symbol quantity int Number of shares Field names must follow the StreamBase identifier naming rules. The data type must be one of the supported StreamBase data types, including, for tuple fields, the identifier of a named schema and, for override fields, the data type name of a defined capture field. See Using the Function Data Type for more on defining function fields.
-
Add and extend a parent schema. Use the
 button's Add Parent Schema option to select a parent schema, then optionally add local fields that extend the parent schema. If the parent schema includes
a capture field used as an abstract placeholder, you can override that field with an identically named concrete field. Schemas
must be defined in dependency order. If a schema is used before it is defined, an error results.
-
Copy an existing schema whose fields are appropriate for this component. To reuse an existing schema, click the
 button. (You may be prompted to save the current module before continuing.)
In the Copy Schema dialog, select the schema of interest as described in Copying Schemas. Click when ready, and the selected schema fields are loaded into the schema grid. Remember that this is a local copy and any changes you make here do not affect the original schema that you copied.
Use the , , and buttons to edit and order your schema fields.
-
-
Click to add the named schema.
The new schema is added to the tree list of named schemas. You can manage items in the list using either the buttons or context menu commands.
You can import a named schema defined in another module or interface to the current module or interface. Use the Manage Module Imports section of the Definitions tab of the EventFlow Editor. For interfaces, use the Imports tab of the Interface Editor.
You can import a named schema from:
-
An interface or another module in the same project.
-
An interface or module in another project in the current project's module search path.
See Importing Resources from One Module to Another for details.
You can create a named schema by promoting the existing private schema of a schema-bearing component to a named schema, accessible in the Definitions tab for the current module. Schema-bearing components that can promote their schemas to named include: connection arcs, input streams, output streams with declared private schemas, Union operators with declared schemas, and the Query Table data construct. Follow these steps:
-
Select the component in the EventFlow canvas that carries the schema of interest.
-
Right-click and select > from the context menu.
-
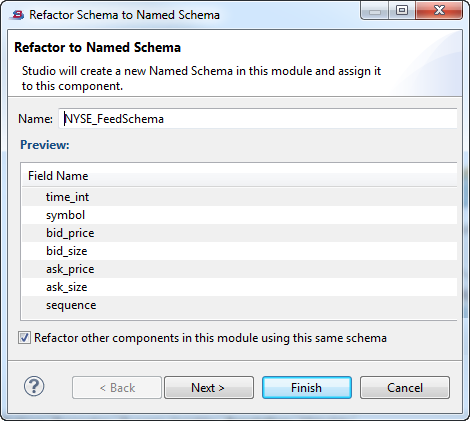
In the Refactor to Named Schema dialog:
-
The Name field shows a suggested name for the named schema, generated from the selected component's canvas name plus "
Schema". Edit this suggestion to reflect your site's naming standards, or leave it in place to accept the suggested name. -
The Preview section shows the schema of the selected component.
-
The checkbox for Refactor other components in this module using this same schema is selected by default. This directs StreamBase to locate other components in the current module that use a private schema with the same field names, data types, and field order as shown in the Preview section. If any such components are located, StreamBase converts them from using that private schema to using the schema you are currently promoting to named.
Clear this checkbox to create a named schema without applying it to any component other than the current one. (Clearing also disables the button.)
-
-
If you leave the Refactor other components checkbox selected, the button remains active. Click to see the second page of the dialog.
You can also press to complete the dialog now. In this case, Studio applies this named schema to all components found with the same schema in the current module.
-
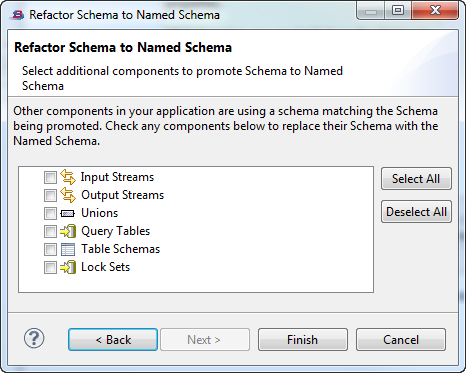
Use the second page of the dialog to narrow the list of other components to which you want the named schema applied. The second page shows a list of schema-bearing component categories. If there are any component candidates in the current module that use the same schema, they are shown in the list. Use the checkboxes to select the components to which you want the named schema applied.
If all the checkboxes are disabled or if the and buttons have no effect, then StreamBase did not locate any components with matching schemas in the current module.
-
Click to create and apply the named schema.
-
To add documentation for the promoted named schema or for any of its fields, open the Definitions tab of the EventFlow Editor, select the newly promoted named schema's entry, and click . Fill in the Schema Description field and the Description column for each field as required.
In EventFlow applications, the name of a named schema is analogous to the data type tuple. Use the named schema's name where
you would use tuple, when referencing the schema of a tuple field.
When using a named schema to define the tuple of a nested tuple field, use the name of the
field, not the name of the schema, to resolve the names of sub-fields. The following image
shows a Fields grid where a three-field tuple is defined as a private schema. The third field
has the type tuple, and its schema is defined with the named schema
NYSE_FeedSchema.
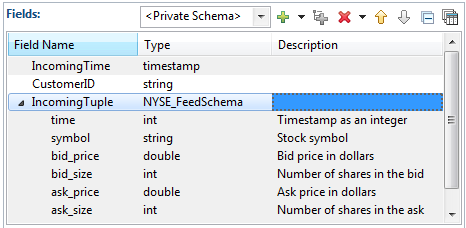 |
In this case, the name of the fourth field of the IncomingTuple field
resolves to IncomingTuple.bid_size for use in expressions. Do not use
the name of the named schema as any part of the field name resolution. For example, the
identifier NYSE_FeedSchema.bid_size has no meaning
and cannot be used in an expression.
See tuple for more on using tuple data in expressions.
Consider the following specialized uses of named schemas:
| The Named Schema Constructor Function |
| Null Tuple |
| Copying Named Schema Tuple Contents |
For every named schema you define or import into a module, StreamBase automatically generates a new function in the StreamBase expression language that allows you to construct tuples with that schema. The generated function's name is the name of the named schema, and it takes one or more comma-separated expressions as value arguments. The result is a single tuple with the same schema as the named schema.
For example, for the named schema point, whose schema is (x double, y double), you can use a function named point() anywhere in the module that defines the named schema:
point(32.0, 44.5)
See named schema constructor function for further details.
If you invoke the name of a named schema with no arguments, it creates a null tuple whose schema is that of the named schema. This is analogous to using the Set null checkbox for a field of type tuple in the Manual Input view in StreamBase Studio.
point()
Use the * AS * syntax for tuples defined with a named schema to copy the entire tuple into a single field of type tuple.
For example, let's say the tuple arriving at the input port of a Map operator was defined upstream with the NYSE_FeedSchema named schema. To preserve the input tuple unmodified for separate processing, the Map operator could add a field of type
tuple using settings like the following in the Additional Expressions grid. When using the * AS * syntax in the Expression column, the name of the tuple field in the Field Name column has an implied asterisk for all of its fields.
| Action | Field Name | Expression |
|---|---|---|
| Add | OriginalOrder | NYSE_FeedSchema(input1.* as *) |
Because the Map operator has only one input port, the port does not need to be named:
| Action | Field Name | Expression |
|---|---|---|
| Add | OriginalOrder | NYSE_FeedSchema(* as *) |
See Copying Tuple Contents for more ways to copy tuple contents.
Avoid giving a schema the same name as a built-in expression language function. Since StreamBase automatically generates a named schema constructor function with the name of the schema, the generated function would mask and prevent the use of the built-in function of the same name.
For example, when creating a schema to describe tuples that record the events of a stock split, you might be tempted to name
the schema split. Thereafter, the generated schema constructor function split() would be called when you tried to use the expression language's split() function.
A name collision occurs when you reuse the exact spelling of a built-in function. If you named a schema Split, with uppercase S, StreamBase would recognize both Split() and split() functions.
