Invoke the Connectivity Wizard from the Authoring perspective in StreamBase Studio with >. Use the wizard to quickly stand up a LiveView server application for the purpose of streaming live data to TIBCO from certain known, working data sources. These are:
-
Apache Kafka
-
JMS or TIBCO EMS
-
MQTT — MQ Telemetry Support
-
TIBCO Cloud Messaging (TCM)
-
StreamBase Feed Simulation
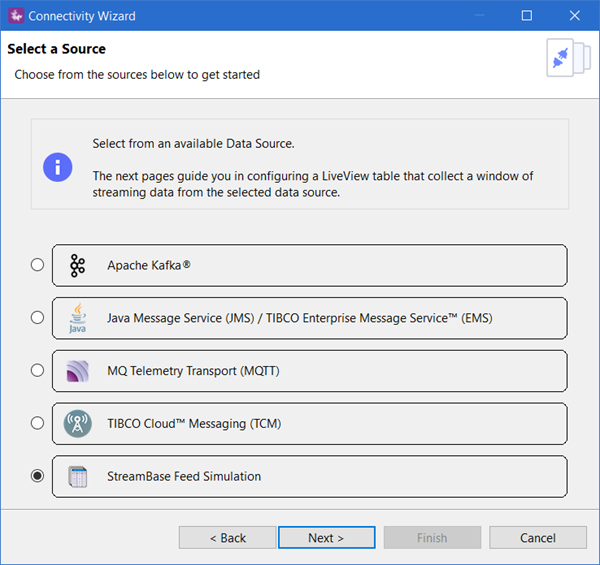 |
For the wizard to be useful, you must have access to a stream of data published over one of these data streams. You must have the URL for a server based on one of these technologies, or must have connection information for a JMS or TIBCO EMS bus, and you must have valid login credentials for that server or bus. In general, you must have basic understanding of your data source, including knowing what published topic you want to use.
For early stage development of your project, you can also use a StreamBase feed simulation as an alternate data source. You can have the feed simulation generate random data that matches the schema you specify, or you can provide a CSV file, which must be in standard format, and must have a header row.
The wizard takes you through the following general steps:
-
Select your data source type and specify its server URL, optionally testing connectivity to that server.
-
Select the topic on that data source you want to use.
-
Specify your topic's schema, or have the wizard extract the schema from the source. Specify its primary index and optional secondary indexes.
-
Specify an optional data retention policy.
-
Specify a project name and review project details. You can specify optional Docker image creation, which requires you to have Docker Desktop for Mac or Windows installed and running.
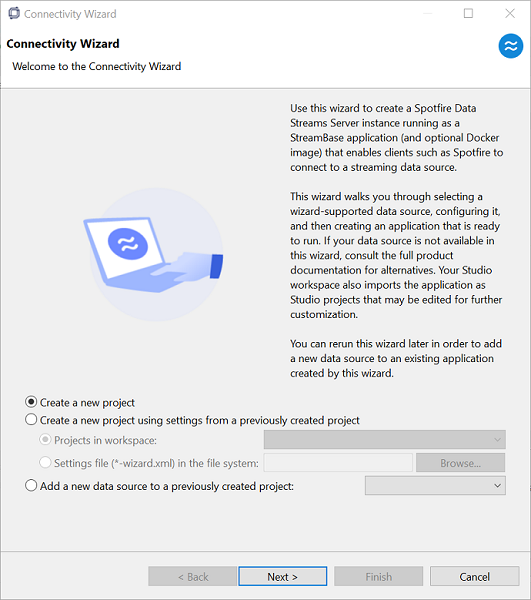
The wizard proceeds to generate two Studio projects for you:
-
A LiveView fragment project that supports a single LiveView server instance. The server is configured to connect to your data source and immediately begin publishing data from that source.
-
A StreamBase Application project, which contains the LiveView fragment project as its sole dependency. This Application project is compiled into an application archive file in this project's
targetfolder, whose file name ends in-ep-application.zip. This application archive can be deployed into a StreamBase Runtime node.If you specified the Docker option, the application image is installed in your local Docker registry under the name
artifactId-app
If you chose the Docker option, you can deploy and run this Docker image using standard Docker commands.
If you chose the application archive output target, you do not need to know much about TIBCO Streaming in order to deploy and run the generated application archive. However, it will prove valuable to review the topics in the Concepts Guide.
In either case, the LiveView server runs at port 11080 by default on the Docker image's URL or on the StreamBase Runtime node's LiveView URL.
As versatile as the Connectivity Wizard is, be aware of the following limitations when attempting to connect to the communication method of choice:
-
Non-EMS bus limitations — the acceptable payload is:
-
JSON formatted
-
single level
-
key value
-
-
EMS limitations:
-
Sniffing is not currently supported. The reason for this is when you start a new project, you do not yet have the necessary JAR files, and StreamBase does not ship them; on this path, you must have some knowledge of what is on your bus.
-
PAYLOAD: the only EMS payload type supported is Map Message.
-
The following tutorial walks you through the basic steps of connecting to a StreamBase feed simulation.
-
Invoke the Connectivity Wizard from the Authoring perspective in StreamBase Studio with >.
-
Choose and click .
-
Choose and click .
-
Select a Data File. In this tutorial, a CSV file was selected and the Connectivity Wizard uses it to generate a data stream.
Configure the number of rows per second, taking into consideration how long you want your feed simulation to run (for example, if your CSV contains 6000 rows of data, and you set your project to run at 10 rows per second, your feed simulation will last 10 minutes). You may want to use slow-moving data in order to inspect the data at human-visible speed.
Do you want the simulation to loop or finish? Choose whether to automatically start the simulation when it completes (see above for considerations). This applies when using a JDBC or CSV file.
The Connectivity Wizard examines the data file and attempts to determine the appropriate file encoding. If the selected encoding type is not correct, select one from the dropdown list.
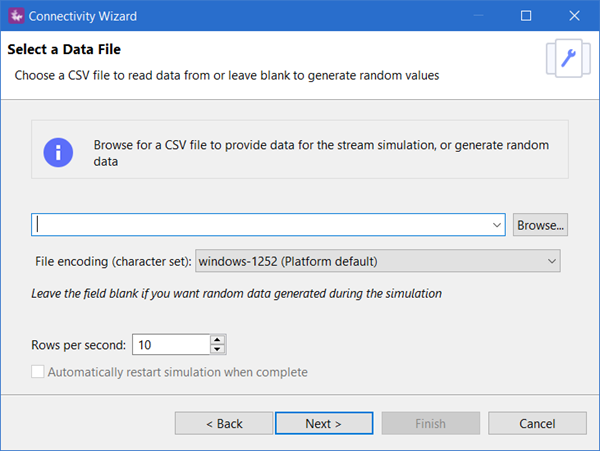
Click .
-
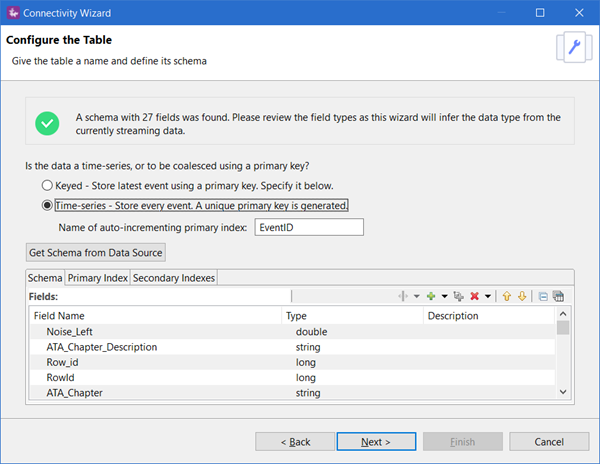
Configure the data table. Use a field as a primary key, or let the Connectivity Wizard do it for you. The advantage of the latter: data can be replayed repeatedly, each time generating a new key. If you do not set a primary key, any replay of the data would be considered an update (as opposed to a new row). This in effect looks like the simulated stream appears to stop. This tutorial selected . From the returned schema definition, you can select a primary key.
Alternatively, (as in this tutorial) you can choose the data to be treated as a Time-series. This option means each row of data is read and given a time stamp. This option also provides an auto-incrementing number, which the Connectivity Wizard uses as a primary key. By default the field name for the primary key is
EventID. (editable)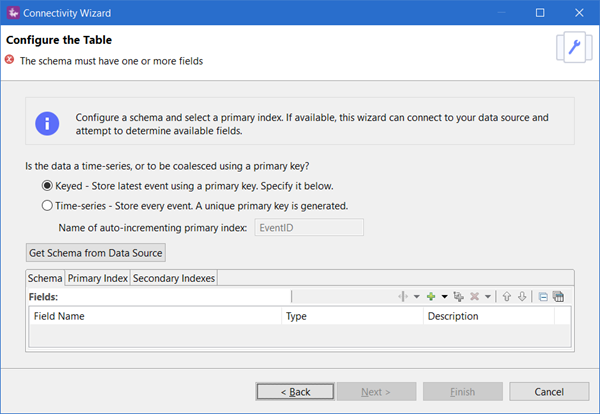
-
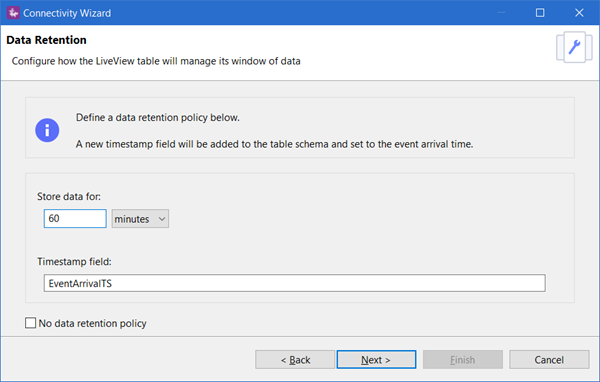
In the next dialog, set the data retention policy to define how much data your table will retain in memory. This is an important consideration depending on your use-case; as new data arrives, a new row is added to your data table. If left to grow indefinitely, you run the risk of exhausting your system's memory resources. When determining a retention policy, also take into account whether you chose to automatically start the simulation when it completes. In that scenario, your project may retain additional data if left unbounded.
-
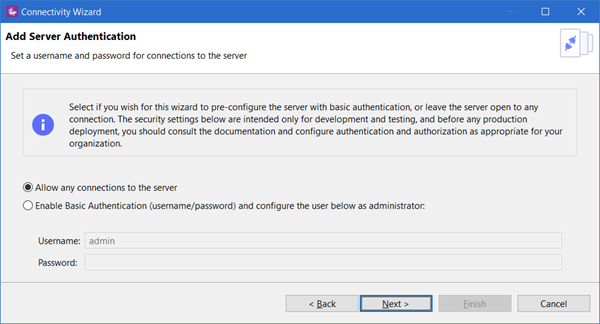
Add basic server authentication: this dialog determines whether your generated data stream requires a login, or allows any user with a URL access to your data stream. If you choose to authenticate, the Connectivity Wizard provides one administrative user for the project. You provide the password for that user. In practice, you may want to configure additional users and passwords for this project. The generated readme from this project provides instructions for doing so (which is out of the scope of the Connectivity Wizard and this tutorial).
-
The Summary dialog appears. In this tutorial, the dialog explains that a feed simulation was defined and includes a schema containing 27 fields with a specified retention policy. From this dialog, you name your project and have the opportunity to change the read-in table name, which is based on the CSV file selected earlier.
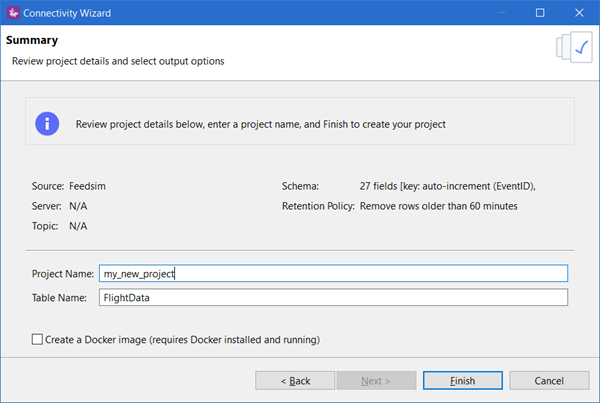
Note the option to create a Docker image for your project. If you select this option, you must have Docker installed and running. See Cloud for more information.
-
Click . The Connectivity Wizard builds the project for you, which can take some time based on system performance. Once successfully built, a dialog appears to explain the actions the Wizard performed.
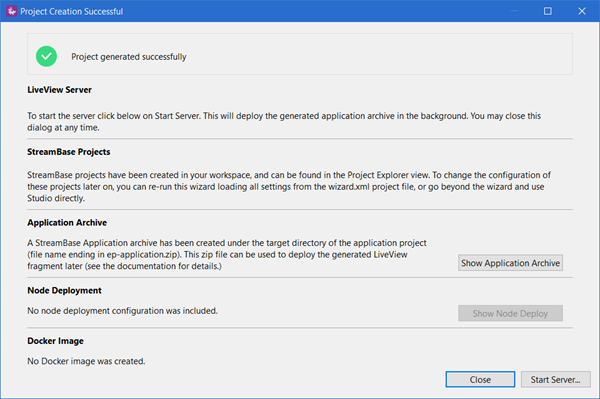
- LiveView Server
-
A data stream is a live table, and that table is served by a LiveView server. As instructed by this dialog, you can click to run this project now.
- StreamBase Projects
-
The Connectivity Wizard generated a StreamBase project for you, which is available in Studio's Project View. In this tutorial, the project uses the feed simulation capabilities to read a CSV file, simulate a live stream, and publish that data into a live table.
- Application Archive
-
The archive is an artifact that you can use to deploy the generated data stream outside of StreamBase Studio (for example, on another machine).
- Node Deployment
-
When an application archive is deployed, a node is created upon which the application is run. Nodes can be configured. However, no node deployment was generated in this example.
- Docker Image
-
Indicates whether you configured your project to build and run a Docker image.
Refer to the project's readme (located in the StreamBase application folder) to learn about additional configuration options for your project.
-
You can test your project by clicking . Several dialogs may appear as the Wizard starts LiveView server for you. From the Studio Console view, your project is ready to run in your LiveView client when the following message appears:
All tables have been loaded. LiveView is ready to accept client connections.
-
When finished, switch to the Test/Debug perspective and select your application in the Debug View. Clicking the red square icon to the left of the view terminates the application.
If you do not select Start Server from the wizard, or you wish to run your project again, select the projectname_liveviewfragment![]() ) in the Console view's toolbar.
) in the Console view's toolbar.