Contents
- Introduction
- Use Cases for Launch Configurations
- Open a Launch Configuration Dialog
- Create a New Launch Configuration
- Edit an Existing Launch Configuration
- The Main Tab
- The Advanced Tab
- The Containers Tab
- The Source (Java) Tab
- The Environment Tab
- The Common Tab
- Launch Configuration Perspective-Change Preferences
This topic describes how to use the Run Configuration, Debug Configuration, and Trace Configuration dialogs. All three dialogs have the same usage and allow you to set the same settings.
StreamBase Studio automatically generates a launch configuration the first time you run, debug, or trace debug an EventFlow or StreamSQL module, or a deployment file. Studio creates a single named launch configuration for each application, whether for running, debugging, or tracing. You can copy the default-created launch configuration and rename it if you want to maintain separate run and debug launch configurations.
The Run Configuration, Debug Configuration, and Trace Configuration dialogs are nearly identical, and are treated on this page as if they are the same dialog. When referring generically to any of the three dialogs, this page uses the term launch configuration dialog.
You can save sets of launch configurations with different names, to be used in several ways:
-
You can save a single run-debug-trace configuration for each StreamBase application. (This is Studio's default.)
-
You can save separate run, debug, and trace configurations for each application, with different parameters for the three conditions.
-
You can save several run configurations for any one application, to run and test it with different runtime parameters. For example, you can quickly switch between testing the same application against both local and remote servers with separate configurations for each server.
-
You can specify a run configuration instead of a top-level application file when exporting a StreamBase bundle. See Application Bundling.
Open the Run Configuration, Debug Configuration, and Trace Configuration dialogs using any of the following methods:
-
Select → from the top-level menu (or → or → ).
-
Select from the drop-down arrow next to the (
 ) button in the Studio toolbar (or next to the (
 ) or (
 ) buttons.
-
Right-click in the EventFlow Editor canvas for your application. From the context menu, select → .
-
In the Package Explorer, right-click the name of your application's EventFlow or StreamSQL file. From the context menu, select → .
Launch configurations are stored as metadata in your Studio workspace. Thus, by default, your set of named launch configurations is common to all your StreamBase projects. However, a launch configuration includes the pathname to the individual application to be launched, so you cannot share launch configurations among StreamBase applications.
Studio automatically creates a new launch configuration for you the first time you run, debug, or trace a module, with the configuration taking the name of the top-level application being run. These launch configurations are created with default settings, and you can edit or copy them to specify custom settings.
You can also create a new launch configuration from scratch. To do this, open the Run Configurations, Debug Configurations, or Trace Configurations dialog and do one of the following:
-
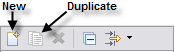
In the left pane, right-click StreamBase Application, and choose New in the context menu.
-
In the left pane, select StreamBase Application and click the New toolbar button.
-
Select the name of an existing StreamBase launch configuration and click the Duplicate toolbar button.
To edit an existing launch configuration:
-
Open the Run Configurations, Debug Configurations, or Trace Configurations dialog.
-
Select the name of the configuration to edit.
-
Make changes in the tabs of the wizard and click the Apply button before you leave each tab.
-
Click to undo changes since the last saved version.
After applying your edits, you can:
-
Click to preserve your edits and exit the dialog.
-
In the Run Configurations dialog, click to run the edited launch configuration.
-
In the Debug Configurations dialog, click to run and debug the edited launch configuration.
-
In the Trace Configurations dialog, click to run the edited launch configuration, generate a tuple trace file, then automatically open the SB Trace Debugger perspective.
 |
- Name
-
A configuration name is generated for you. Change the name according to your site's standards. The name you enter is not reflected in the navigator pane on the left until you click Apply.
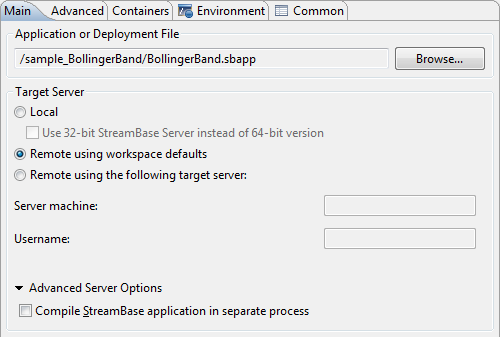
- Application or Deployment File
-
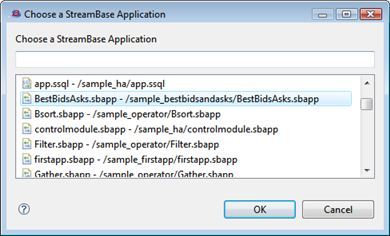
Specify the path to the StreamBase EventFlow, StreamSQL application file, or StreamBase deployment file to be run, debugged, or traced. Paths are measured from the root of the current Studio workspace. The easiest way to enter the correct path format is to browse for an application file using the button. The resulting dialog shows a list of all EventFlow, StreamSQL, and deployment files in your workspace. Select the one you want and click OK.
- Target Server
-
Choose one of the following options:
- Local
-
Launches StreamBase Server on this machine.
- Remote using workspace defaults
-
Launches StreamBase Server on a separate UNIX machine using default server settings. If you previously defined a default server machine and username in the Studio preferences dialog, those defaults are automatically used. See Launching Panel for those settings.
- Remote using the following target server
-
Launches StreamBase Server on a separate UNIX machine with settings that you specify for this launcher only (any workspace defaults are ignored). Fill in the next two fields:
- Server machine
-
Enter the name of the remote host on which to invoke StreamBase Server. The remote host name must be a valid DNS name, IP address, or the string
localhost, and can be optionally followed by a colon and the port number of the SSH server on that host. Studio uses the standard SSH port 22, if you do not specify a port. The remote server must be accessible from this machine using SSH. For example, enter:wayfast.example.com:22
- Username
-
Enter a valid SSH username on the specified remote host. The username must be already set up and tested for SSH connectivity to the specified host. StreamBase supports both password and keyboard-interactive authentication methods with the remote SSH server.
Any remote server designation here is ignored when making an executable bundle with the sbbundle command, or with the StreamBase Export dialog described on Application Bundling.
- Advanced Server Options
-
- Compile StreamBase application in separate process
-
If StreamBase Server is unable to start and shows an error message about insufficient heap or memory, this option might help by using external processes for the compilation tasks. This option primarily affects large application launches for running, debugging, or tracing on memory-constrained systems, but may improve launch times for other platforms as well. Setting this option is the same as setting the
streambase.codegen.generate-bytecodesand its related system properties, as described in StreamBase Java Properties.
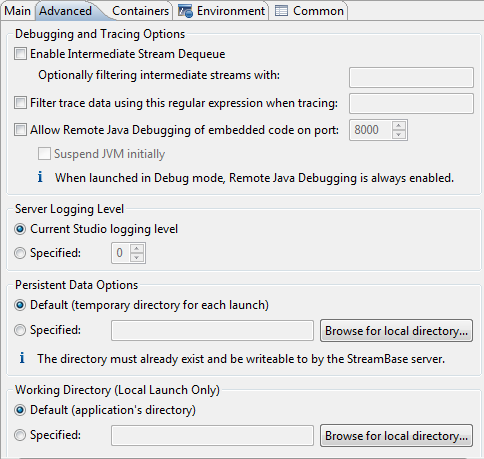 |
- Debugging and Tracing Options
-
The check box for the Enable Intermediate Stream Dequeue field allows you to dequeue from intermediate streams while your application is running, for temporary debugging purposes only. You can optionally specify a regular expression to match against the names of intermediate streams in the top-level module and all sub-modules. Intermediate streams whose name matches the provided expression as a substring are exposed for dequeuing; all other intermediate streams are not. See Intermediate Stream Dequeuing for more information.
The check box for the Filter trace data using this regular expression when tracing field allows you to specify a regular expression that narrows the tuples stored in the trace output. Specify a pattern that matches against a component's full module path. For example, enter an expression that specifies a single output stream:
".*TradesOutputStream", or one that specifies a particular module:".*ModuleName.*". You can specify more than one match string in the pattern:".*ModuleRef1.*|.*Quotes.*"The Allow Remote Java Debugging check box is for debugging embedded Java modules you have added to your StreamBase application. Specify the port number to which a remote Java debugger will connect to your Java module (default port is 8000). For example, you might be using Eclipse's Remote Java Application Debug Launch Configuration to debug embedded Java code live, running inside a StreamBase Server instance that was launched with this option checked.
Note
Allow Remote Java Debugging has no effect when executing in Studio's Debug mode, as the Studio EventFlow debugger itself is attached to the server JVM process. Also, when debugging adapter code, it normally suffices to debug from StreamBase Studio rather than from a remote instance of Eclipse.
When Allow Remote Java Debugging is checked, the check box beneath it becomes enabled. It determines how the server process is started.
-
When you select it, the server JVM process is started but pauses (suspends) before executing anything, even before the
mainmethod of the process, until its JVM detects that an external debugger successfully connected to the server process. At that time, the server process resumes. This handshaking lets the external debugger see everything that happens once themainmethod is called. -
If it is not selected (the default), then at runtime the server JVM process starts executing without pausing. An external debugger can still attach to the JVM process, but it will only see what is being executed after it attaches.
-
- Server Logging Level
-
Select Current Studio logging level to use the logging level that Studio knows about at launch time. If you start Studio with a higher log level, launch configurations that use this setting will use the higher logging level.
Select Specified to override the global logging level. The higher the log level number you specify, the more messages and message types are sent to the Console View and/or to an output log file, if this launch configuration specifies one.
- Persistent Data Options
-
This option specifies a directory to be used for persistent data in disk-based Query Tables. (Disk-based query tables are a feature that you can use only if your StreamBase license enables it.) This is the same option specified as
--datadirwhen running sbd from the command line. Use the default or specify an existing directory, accessible to and writable by StreamBase Server. - Working Directory
Use this option to change the working directory for a local launch. Any files output by your running application (for example, generated CSV files) are created relative to launch-time working directory. By default, the working directory is the folder that contains the application file you are launching. Click Specified to enter a different working directory. This option is ignored for remote target servers.
The Container tab is active if you specify running an EventFlow or StreamSQL application in the Main tab.
If you specify a StreamBase deployment file in the Main tab, the Container tab is passive, and serves only to display the containers, parameters, and container connections specified in the deployment file. All buttons in the tab are dimmed and inactive under these conditions; in this case, make any necessary container and parameter changes by editing and saving the deployment file.
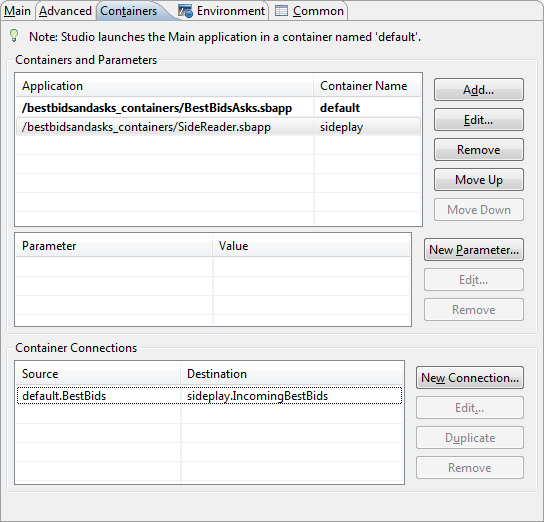 |
Use the Containers tab to specify one or more containers to hold and run other StreamBase modules that you want to start at the same time as the primary application specified on the Main tab. The primary application is shown in bold in the Application grid. StreamBase containers are described on Container Overview.
You can also specify containers, parameters, and container connections in a StreamBase deployment file, then specify that deployment file as the application to run on the Main tab.
With multiple applications running in containers, the names of streams in applications running in non-default containers are
prefixed with the container name. Thus, sideplay.OutgoingBids refers to the output stream named OutgoingBids in the module running in the container named sideplay.
Most of the features of running an application in Studio apply equally to modules running in containers. This includes:
-
In the Manual Input view, you can send tuples manually to input streams in non-default containers.
-
The Application Input view shows tuples sent to all input streams, including those in non-default containers.
-
The Application Output view shows tuples from all output streams in all running containers.
However, running multiple containers in Studio has the following limitations:
-
The primary StreamBase application, the one specified on the Main tab, is always started in a container named
default. You cannot change the name of the container for the primary application. -
You cannot run separate feed simulations in Studio for the primary application and for applications running in containers. Only streams in the
defaultcontainer can be addressed.
Click the button, and specify the Name and Value settings. The parameter name you specify must be already defined with the Parameters tab of the EventFlow Editor for the module specified to run in the selected container. See Using Module Parameters for more on module parameters.
Container connections are global for the Studio project, much like connections specified in the <container-connections> element of a StreamBase deployment file. Use the Container Connections grid to specify one or more connections between containers. Container connections are described in Container Connections.
You will typically use this feature to specify a stream-to-stream connection, where an input stream in one application and container receives tuples from an output stream in another application and container. However, you can specify any container connection type in the Containers tab that you can specify in a deployment file or interactively with the sbadmin command, as described in Container Connections.
Click the button, and specify the Source and Destination streams, using stream names qualified with the container name, as shown in this example:
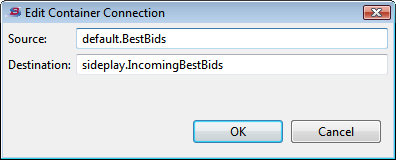 |
You can use Ctrl+Space in the Source and Destination fields to invoke auto-completion to show the list of streams in the applications listed in the Containers and Parameters grid.
Select an existing container connection line to activate the , , and buttons. To create a container connection that is very similar to an existing connection, use the button to copy the existing connection, then select the new connection and use the button to modify the new connection.
Use the and buttons to specify container start order. Studio starts containers in the order listed in the top grid in the Containers tab.
For some container connections to work, you must specify a non-default container start order. For example, if you specify a container connection that causes the primary application, A, to read from a stream in another container, B, then the module in B must be started before A.
It is possible to specify container connections in the application itself, using the Container connection field in the Advanced tab of the Properties view for input and output streams. In this case, you may need to adjust the container start order to allow the container with the outgoing stream to start before the container with the incoming stream.
Only Debug Configuration dialogs include the Source (Java) tab, which defines the location of source files used to display source when debugging Java code as part of your StreamBase application. By default, these settings are derived from the current project's Java Build Path. You can override the default settings in the new tab.
 |
The settings in the Environment tab are common to all Eclipse launch configurations. Use Eclipse Help to learn how more about these options. Use the Environment tab to specify or override environment variables with which to launch the application specified in the Main tab.
You can define new, application-specific environment variables with the button, or you can override or append to existing system environment variables. Use the button to show a list of the system's currently set environment variables, from which you can select one or more. Once a system variable is in the table, use the Edit button to change or append to its value.
You cannot replace or override the STREAMBASE_HOME, PATH, STREAMBASE_JVM_ARGS, or STREAMBASE_LOG_LEVEL variables.
The New/Edit Environment Variable dialog contains a Variables button, which is a feature inherited from Eclipse. Use this button to specify the value of an environment variable using one or more Eclipse system variables whose contents are resolved by Eclipse when this configuration is run. Use the Help button on this dialog for further information on each available variable.
The list of variables includes ${sb_home}, which is defined as the absolute file system path of the StreamBase installation directory as currently set in Studio's
Preferences dialog.
 |
The settings in the Common tab are common to all Eclipse launch configurations. Use Eclipse Help to learn how more about these options.
- Save as
-
This option determines where this launch configuration is saved. The default setting, Local file, saves configurations in the workspace metadata area. As an alternative, you can select Shared file to save this launch configuration as a file in one of your Project folders. In this case, the launch configuration is saved as
Name.launchNameis specified in the Name field. Specify the target Project folder using the button. - Display in favorites menu
-
The favorites menu is a list of launch configuration names that appears in the second section of the drop-down menu of the and buttons on the toolbar. The first section contains a changing list of recently-run launch configurations. Add a configuration to the favorites section to keep it in the menu, even when other applications have replaced it in the recently-run section. This option performs the same function as the Organize Favorites option in the and drop-down menus.
- Console Encoding
-
Use this section to specify a non-default character encoding for log messages sent to the Console View (and optionally to a standard output file).
- Standard Input and Output
-
Allocate Console is selected by default. This specifies using the Console view to display logging messages written to standard output and standard error, and to accept text input, if your application requires it. You can disable this option for launch configurations that will run on remote StreamBase Servers.
File is unselected by default. To specify that standard output and standard error of your application's run are written to a log file, select the File check box, and enter a path to an existing file. If both Allocate Console and File are selected, log messages are written to both places. You must designate the path to the file using an Eclipse-specific syntax. Rather than typing a path, use the or buttons to navigate to an existing file, and let Eclipse write the syntax for you. To navigate to a file in the workspace, you must have created it ahead of time with Studio's → → menu option. If you are familiar with the Eclipse syntax required in this field, you can use the button to build up a path from components.
is dimmed unless is checked. Check the check box to have log messages appended to the file specified in the field. By default, the file is overwritten with each run of this launch configuration.
- Launch in background
-
Use this option to specify that the launching process itself runs in the background. (StreamBase Server is always run in the background.) Checking this box returns control of Studio immediately, without displaying the usual Starting Server dialogs, after you click or use the toolbar Run
button later to launch this configuration.
By default, running or debugging a StreamBase application with a launch configuration automatically switches StreamBase Studio to the SB Test/Debug perspective, after prompting you to confirm. You can specify on the prompt dialog to not ask again.
 |
The option to switch perspectives is not stored in the launch configuration itself, but is a global setting for all StreamBase applications, as specified in Studio Preference Settings.