Contents
Arcs are the lines that connect components on the EventFlow Editor canvas. Arcs indicate that the output tuples of one component flow to the input port of the next downstream component, and thus indicate the flow of tuples between and through operators as they pass from left to right through your application. Arcs also indicate the associations between operators and data constructs or modules.
There are two types of arcs:
-
Connection arcs—solid lines between operators with arrowheads indicating the direction of data flow.
-
Association arcs—gray dotted lines that associate operators with data constructs or with modules that contain shared data constructs, also called data arcs.
To draw an arc between two operators or between an operator and a stream:
-
Select the black output port on the right side of one component, and hold down the mouse button.
-
Drag the mouse pointer to an input port on the left side of another component.
-
Release the mouse button.
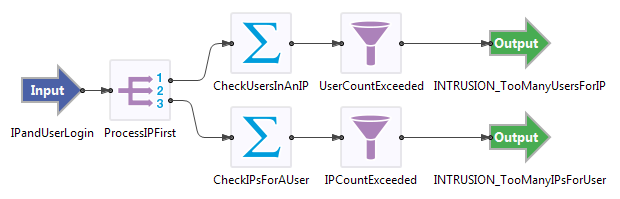
When you have successfully created the arc, a solid black line is shown between the components, and components downstream may change color to indicate their new typecheck status. The figure below shows eight connected components: an input stream, a Split operator, two Map operators, two Filter operators, and two output streams.
To create an arc between a data construct and an operator that uses it:
-
Select the gray port on the bottom of the operator, and hold the mouse button.
-
Drag the mouse pointer to the gray port at the top of its associated data construct.
-
Release the mouse button.
When you have successfully created the arc, a styled gray line is shown between the components. The following figure shows Query operators connected to a Query Table data construct.
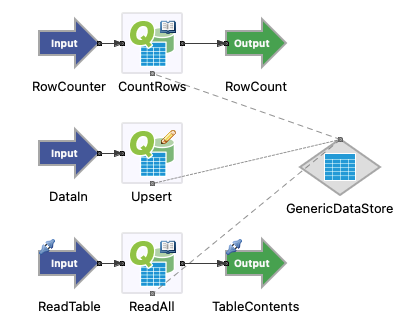
More than one operator can be connected to the same data construct. The data arc from each operator has a line style that indicates how the operator uses the query table. See the styles displayed in Using the Query Operator and in the example in Using the Query Table Data Construct that shows six Query operators connected to the same Query Table.
As an alternative, you can use Studio's X X keyboard shortcut to automatically draw connection arcs between two or more selected components. The X X command can also draw automatic association arcs, if the number of Query operator and data construct components in the selection allows Studio to determine the associations without ambiguity.
See EventFlow Editor Keyboard Shortcuts for detailed instructions on using Studio's keyboard shortcuts.
Arcs have two states, selected and activated. Click an arc to select it, and hover the mouse over an arc to activate it. The following figure shows what arc states look like.
| Arc State | Depiction |
|---|---|
| Normal arc | |
| Selected arc | |
| Activated arc | |
| Selected and activated arc |
Curved arcs display intermediate handles (the black squares) when selected, allowing you to manually reroute them. See Changing the Shapes of Arcs below.
StreamBase Studio provides functions to automatically rearrange all or a selection of the arcs on an EventFlow module's Editor canvas. The functions are:
-
The Rearrange components and arcs function (
 button or Ctrl+L) rearranges all components and arcs on the current canvas for the best and clearest left-to-right layout, then runs the Reroute Arcs function.
-
The Reroute Arcs function (
 button or Ctrl+Alt+L) routes arcs around components, placing curves and bends in the arcs as
needed. Only connection arcs (solid lines) are affected. Dotted line association arcs are
not affected.
button or Ctrl+Alt+L) routes arcs around components, placing curves and bends in the arcs as
needed. Only connection arcs (solid lines) are affected. Dotted line association arcs are
not affected.
See Component and Arc Layout Controls for further details on these functions.
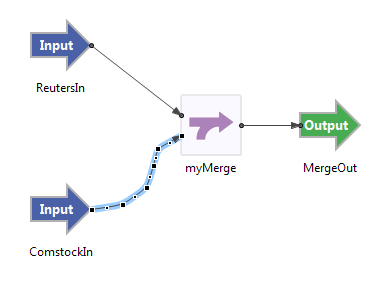
If the auto-layout tools do not rearrange arcs to your satisfaction, you can manually configure individual arcs. To route or curve a stream arc, you can add shape points to it by selecting it and dragging a black square handle that appears at the arc's midpoint. Displacing that point away from the line adds an inflection point and also two new handles on either side of it, which you can drag to further refine the arc's shape. Add shape points to avoid passing arcs across objects or to approximate curved lines, as the following picture illustrates.
To remove an inflection point, click and drag it back to a straight-line position. Moving either object that a curved arc connects removes all inflection points. Note that association (data) arcs are always straight and cannot be shaped.
To move an arc's endpoint from one component to another, select the arc, then click and hold the cursor over any part of the arc on the side of the endpoint you want to move. Drag the arc's endpoint to the target port on another component.
While the arc is in motion, the cursor changes shape to indicate where it cannot be connected.
 |
If you release the mouse button before reconnecting the endpoint, the arc automatically snaps back to its last connected port.
You can drag a component from the Palette view and insert it directly into an arc, with automatic arc connections made on each side. To do this:
-
Drag a component and hover it over the arc of interest.
-
When the arc turns bold to show it is activated, drop the component onto the arc.
-
The component is automatically inserted into the stream at the drop point, with arcs automatically connected on either side.
This feature also works for adapters. In this case, the sequence is:
-
Drag the Input Adapter or Output Adapter icon from the Palette view, and hover over the arc of interest.
-
When the arc turns bold to show it is activated, release the mouse button to drop the icon.
-
This opens the usual Insert Input Adapter or Insert Output Adapter dialog.
-
Select the adapter of interest, click , and the selected adapter is inserted into the selected arc with connections on both sides.
This feature works for components and adapters that have at least one input and at least one output port in their default configurations. If an adapter has more than one input or output port by default, the arc is connected to the first input port or first output port (or both). Components with one default port such as the Metronome operator and most adapters are dropped onto the canvas at the arc's location instead of inserting into the arc.
The keyboard shortcut commands to add a component or adapter to the canvas can also insert a component into an existing arc. To do this:
-
Select an arc to activate it.
-
Invoke the keyboard shortcut to insert an operator, such as O M to insert a Map operator.
You can also activate an arc before invoking a command from the menu.
This feature works for the same set of components that you can drag and drop into an arc, as described in the previous section.
There is an alternative for the steps in the previous section if the component you want to insert between two others is a Filter, Map, Split, or Union operator. In this case:
-
Select the arc between the two connected components.
-
Right-click and select Insert Operator from the context menu.
-
From the secondary menu, select Filter, Map, Split, or Union.
-
The selected component is automatically connected with arcs to the components on either side.
 |
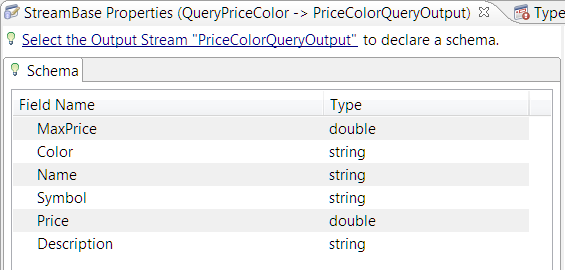
Select an arc to display its properties in the Properties view. Selecting an arc between two operators or between an operator and a stream causes StreamBase Studio to display a schema grid in the Schema tab, as shown below. By default, the fields shown in the grid represent the schema produced by typechecking the previous operator or stream and the input to the next operator or stream. By clicking the radio button, you may explicitly declare the arc’s schema. The most common reasons to declare an arc’s schema are breaking loops and reordering fields.
The following picture illustrates the property view of a selected arc between a Query operator and an Output stream from the StreamBase sample query.sbapp. The displayed schema is read-only in this example. The text is a hyperlink that selects that stream when you click it, enabling you to change its output schema.
Under certain conditions within loops, StreamBase Studio cannot determine which schema to use, and you may need resolve the ambiguity, described below in Arcs in Loops.
Selecting an arc between an operator and a data construct causes StreamBase Studio to display a read-only Association tab (shown below), that tells you about the association.
 |
The underlined links in this view are live: clicking them takes you to the referenced component in the canvas.
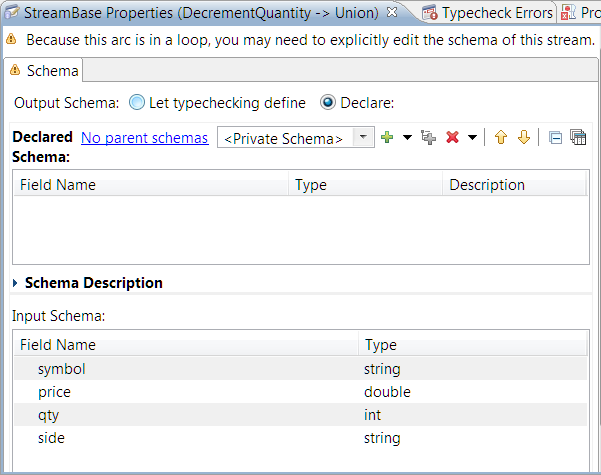
The Schema tab in an arc's Properties view is normally read-only, and shows the schema inherited from the upstream operator. But your application may need to create a loop between components.
If Studio detects an EventFlow loop, it displays a typecheck error in the Typecheck Errors view, and marks the downstream components gray. The typecheck error message is like the following example:
You have a loop involving Union, Filter. Click on any arc within the loop to explicitly edit the schema.
In this case, Studio allows you to edit the schema of an arc to enforce its expected schema. Click an arc involved in the loop and the Field grid in the arc's Properties view is now editable. You can explicitly add fields, copy a schema from another component, or use a named schema.
For arcs that are part of a loop involving a Union operator, their schema can be ambiguous. In such cases, the arc properties view explains what you need to do with the prompt Because this arc is in a loop, you may need to explicitly edit the schema of this stream. Click to use Studio's suggested fix. Click to modify the schema.
For an example of configuring arcs in loops, see the Loop sample.