Contents
This topic describes how to configure your LiveView projects in StreamBase Studio to support using TIBCO LiveView Web clients.
TIBCO LiveView Web is a browser-based application that allows you to create a rich display of cards that visualize data from queries and to create actions against a running LiveView server. It displays data in a variety of real-time charting formats, and supports extensions such as custom visuals using JavaScript. Cards are created and laid out in pages, with each card presenting the results of a continuous query against the LiveView server in a variety of visualizations and data displays.
LiveView Web is implemented by adding a WAR file, lvweb.war, to your LiveView project:
-
You can specify adding the WAR file at project creation time, when you create your LiveView project in StreamBase Studio.
-
You can add the WAR file to an existing project.
-
You can upgrade the version of the LiveView Web WAR file to a licensed version newer than the one included with the TIBCO LiveView Web Standard Edition bundled with LiveView.
By default, the lvweb.war file is added to all new LiveView Fragment project types at project creation.
When you run the >> wizard and select the LiveView Fragment project type, a property of that project creation type specifies adding the lvweb.war file to the project.
To control this, click twice in the wizard to get to the Archetype Properties panel. As shown in the following example, the default setting of the lvweb property is true.
 |
If you are certain that you do not want LiveView Web client functionality in your new LiveView project, you can change the
value of lvweb to false.
With this setting set to true, Maven retrieves the lvweb.war file from the repository delivered with LiveView, and places it into the src/main/liveview/lv-user-webapps folder of the newly created project. You may have to refresh the project folder to see the file in place.
You can add the lvweb.war file to an existing LiveView project.
Follow these steps:
-
First, check whether the project is already LiveView Web-enabled. Do this by opening the StreamBase Studio project folder
src/main/liveview/lv-user-webappsfor your project, and looking for the filelvweb.war.Note
You may have to right-click and select Refresh to get the folder and file to appear.
-
If the
lvweb.warfile or thelv-user-webappssubfolder is not present, then select the folder name for your LiveView project in the Project Explorer view. Right-click and select > from the context menu. This opens the dialog.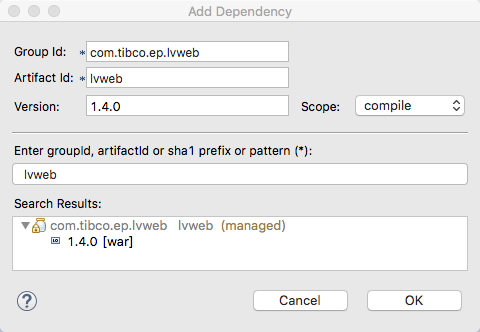
-
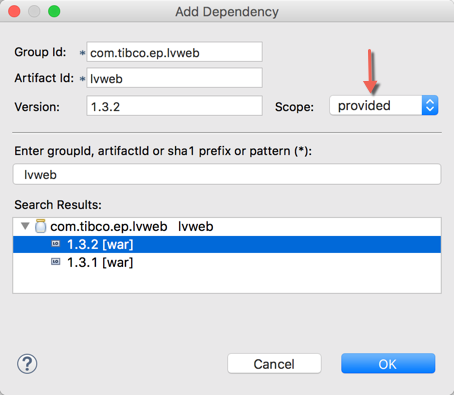
Type
lvwebin the Enter groupId search field. This should locate thelvweb.warfile in the local on-disk repository installed with StreamBase. -
Open the com.tibco.ep.lvweb folder. Select the [war] file listed there.
(If you see more than one version listed, select the latest version you are licensed to use. Do not select any version listed as "lastUpdated".)
-
If the Version field is empty after making the [war] selection, fill in the field with the version number shown in the line you selected in the Search Results.
-
In the Scope drop-down, select
provided. -
Click . If the project's
pom.xmlfile is open in the POM Editor, make sure it is saved. -
This causes Studio to configure the project and to retrieve the WAR file from the repository delivered with LiveView, placing it in the
src/main/liveview/lv-user-webappsfolder of this LiveView project. Watch the status bar in the lower right of the Studio window for progress messages. -
When the progress messages end, select the project's name in the Project Explorer view. Right-click and select Refresh.
-
Confirm that
lvweb.waris now in thesrc/main/liveview/lv-user-webappsfolder. -
Now when you run this project in Studio as a LiveView Fragment, you can point your browser to a URL such as http://localhost:11080/lvweb to see the LiveView Web client view of the server. What you see depends on the security features enabled in your LiveView fragment project:
-
If your LiveView project is security-enabled (as Studio's LiveView Web sample is), then you see a login page. If you have not yet configured user names and passwords for your project, you can log in with admin/admin or guest/guest.
-
If your LiveView project is not security-enabled, and you have not yet configured a dashboard and cards, then you see an initially blank dashboard.
-
You can specify the StreamBase and LiveView ports used by the project by editing its Run Configuration or by providing a configuration file.
The version of TIBCO LiveView Web Standard Edition bundled with the current release of TIBCO LiveView is shown in the LiveView Web Version row of the Supported Configurations page of the StreamBase Installation Guide.
LiveView Web is released on a different schedule than TIBCO LiveView. You may wish to use
the lvweb.war file from a newer or older release of LiveView Web than the
one bundled with LiveView. Of course, use only the versions you are licensed to use.
Note
If you hope to bypass this procedure by manually copying a different release's
lvweb.war file into your project's
lv-user-webapps folder without the other steps below, you will find
that Maven restores the file version included in StreamBase in the next > command, or on reopening Studio. This entire procedure is designed to
prevent that action.
Follow these steps:
-
Install the different release of LiveView Web using the instructions included with its download package.
Tip
On Windows, make a note of the installation location of LiveView Web, which by default is in a hidden folder. When the installer prompts you to confirm the location during installation, you can copy the proposed installation folder to the system clipboard, then paste that path name to a text editor page for reference in the next step.
-
You must install the
lvweb.warfile into your local Maven repository, which is usually the~/.m2folder of your system home directory. There are two ways to do this:-
Use a Maven Install launch configuration.
-
Use a mvn install command, if you have the command-line version of Maven installed.
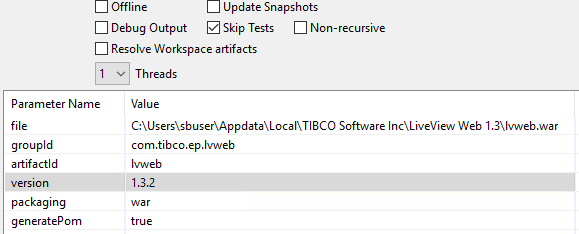
In either case, the fields to specify are described in the following table:
Parameter Name Value file [Absolute path to the replacement lvweb.waron your system. Example for Windows:]"C:\Users\sbuser\AppData\Local\TIBCO Software Inc\LiveView Web 1.4\lvweb.war"[Example for macOS using command-line mvn (must escape the spaces with backslashes)]
/Users/sbuser/Applications/TIBCO\ LiveView\ Web\ 1.4.1/lvweb.war[Example for macOS using a launch configuration (do NOT escape the spaces)]
/Users/sbuser/Applications/TIBCO LiveView Web 1.4.1/lvweb.wargroupId com.tibco.ep.lvwebartifactId lvwebversion [version of the replacement LiveView Web, such as 1.4.1]packaging wargeneratePom trueFor reference on macOS, the following shows a mvn install:install-file command to install the WAR file for LiveView Web 1.4.1. The example is shown on multiple lines for clarity, but must be entered as one long command.
mvn install:install-file
  -Dfile=/Users/sbuser/Applications/TIBCO\ LiveView\ Web\ 1.4.1/lvweb.war
  -DgroupId=com.tibco.ep.lvweb
  -DartifactId=lvweb
  -Dversion=1.4.1
  -Dpackaging=war
  -DgeneratePom=true
For reference on Windows, the next example shows the mvn install:install-file command:
mvn install:install-file
  -Dfile="C:\Users\bwright\Appdata\Local\TIBCO Software Inc\LiveView Web 1.4\lvweb.war"
  -DgroupId=com.tibco.ep.lvweb
  -DartifactId=lvweb
  -Dversion=1.4.1
  -Dpackaging=war
  -DgeneratePom=true
If you are using the launch configuration method to Maven-install the replacement WAR file, fill in the Goals field as shown here. To fill in the Base directory field, click , which shows you a list of the projects in your current Studio workspace. Select the project you are updating with this procedure.
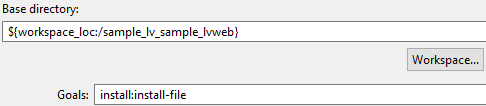
Fill in the middle section of the launch configuration dialog like this example:
-
-
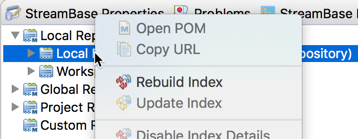
Rebuild the index for your local repository. Follow these steps:
-
Select the Maven Repositories view. (If this view is not already in your current Studio perspective, open it with >>, then >.)
-
Open the Local Repositories folder.
-
Select the Local Repository entry.
-
Right-click and select Rebuild Index from the context menu.
-
Watch for status messages in Studio's status bar in the lower right. This command sometimes does not start a rebuild on first invocation. If the command returns very quickly with no status messages, re-run the Rebuild Index command.
-
Watch for Studio status bar messages. The command should take 5 to 15 seconds with dozens of status messages and possibly a dialog box or two.
-
-
Disable the existing Maven dependency for this project on the
lvweb.warversion included in StreamBase:-
Double-click to edit the
pom.xmlfile for your project. -
Open the Dependencies tab.
-
Select the
lvweb : warline. -
Click .
-
Save the
pom.xmlfile.
-
-
Remove the existing
lvweb.warfile that ships with StreamBase from this project. Open thesrc/main/liveview/lv-user-webappsfolder, select the existinglvweb.warfile, right-click and select Delete from the context menu. -
Select the folder for your LiveView project in the Project Explorer view. Right-click and select > from the context menu. This opens the dialog.
-
Type
lvwebin the Enter groupId search field. This should locate projects withlvwebin their classnames in the local on-disk repository installed with StreamBase. -
Open the com.tibco.ep.lvweb folder. Select the newly installed [war] file listed there. The image above shows a selection of the WAR file for LiveView Web 1.3.2.
(If you see more than one version listed, select the latest version you are licensed to use. Do not select any version listed as "lastUpdated".)
Important
On macOS, the newly added JAR file should now appear in the list of versions, as shown in the image above.
On Windows, the newly added JAR file may still not appear in the > dialog even after a successful index rebuild. In this case, if you saw a BUILD SUCCESS message when you installed the file, then it is safely installed. You can select an existing [war] file in the list to get it to fill in the Group Id and Artifact Id fields for you. Then type or overwrite manually the number of the version you successfully installed into the Version field.
-
If the Version field is empty after making the [war] selection, fill in the field with the version number shown in the line you selected in the Search Results tree view.
-
In the Scope drop-down, select
provided. -
Click . If the project's
pom.xmlfile is open in the POM Editor, make sure it is saved. -
Right-click your project in the Project Explorer view and from the context menu, select >. If you do not see status messages in Studio's status bar and a dialog from Studio, run the command again until you do.
-
Select the project's name in the Project Explorer view. Right-click and select Refresh.
-
Confirm that an
lvweb.warfile has returned to thesrc/main/liveview/lv-user-webappsfolder. However, this does not show the version number. -
Close any browser tabs that may be currently showing LiveView Web pages from this project. You may also have to clear your browser's file and data cache.
-
Run this project in Studio as a LiveView Fragment. The version of LiveView Web in use shows up as a message in the Console view.
-
To confirm that the new LiveView Web version is in place, point your browser to a URL such as http://localhost:11080/lvweb to see the LiveView Web client view of the server. (The port may differ for your project, depending on the ports you have specified to use.) What you see depends on the security features enabled in your LiveView fragment project:
-
If your LiveView project is security-enabled (as Studio's LiveView Web sample is), then you see a login page that includes the LiveView Web version number. If you have not yet configured user names and passwords for your project, you can log in with admin/admin or guest/guest.
-
If your LiveView project is not security-enabled, and you have not yet configured a dashboard and cards, then you see an initially blank dashboard. The LiveView Web version number in use shows in the lower right corner.
-
You must perform these steps for every LiveView fragment project in which you want to use a LiveView Web version different from the one included in StreamBase.