Contents
There are two ways to create a new application file in StreamBase Studio:
-
Create a new project that includes a new, empty EventFlow or StreamSQL application. See Creating a New StreamBase Project.
-
Create a new application file in an existing project.
To create a new, empty application in an existing project:
-
Open the New EventFlow Application wizard (or the New StreamSQL Application wizard) using one of the following methods:
-
Select → → (or → → ).
-
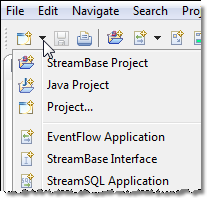
Click the drop-down arrow next to the New toolbar button (
 ), and select (or ) from the drop-down menu:

-
Right-click anywhere in the Package Explorer, and select → (or → ) from the context menu.
-
With the cursor in any Studio view, press Ctrl+N to open the New dialog. Select EventFlow Application (or ) and click .
-
With the cursor in any Studio view, press Alt+Shift+N to open the → menu at the cursor location. Select EventFlow Application (or ) and press Enter.
-
-
In the New StreamBase EventFlow Application wizard (or its StreamSQL equivalent), select the top-level project folder in which you want to add the application.
-
Type a name for the application file, including the
.sbapp(or.ssql) extension. -
Click .
To create a new EventFlow or StreamSQL application that extends an existing StreamBase Interface:
-
Follow the steps in Create a New, Empty Application File.
-
After step 3, select the Implement interfaces check box and click .
-
This opens the Choose Interfaces dialog. Click to see all the StreamBase interfaces (
.sbintfiles) in the selected project's module search path. -
Select one or more interface files and click .
-
Click .
To create a new EventFlow or StreamSQL application that extends an existing StreamBase Extension Point:
-
Follow the steps in Create a New, Empty Application File.
-
After step 3, select the Extend extension point check box and click .
-
In the Select Extension Point wizard panel, click to see a list of extension points in the current workspace. Select an extension point and click .
-
Type an identifier for the new module.
-
Click .
Studio performs the following actions:
-
Creates a new EventFlow module populated with the components defined in the Extension Point's interface.
-
Adds the new module as a locally defined module instance in the Modules tab of the selected Extension Point.
The newly created module only contains the streams, Query Tables, constants, and schemas specified in the interface. You must complete the module to add the business logic for the module.
Advanced. For advanced use cases, it is possible to create a new StreamBase application file in the selected project in your Studio workspace by linking to an existing file anywhere in the file system.
Note
Do not use this linked file mechanism if your only goal is to share an application module between projects. Studio provides a much simpler way to share and reuse modules, as described in Project References and Importing Resources from One Module to Another. It is always better to import an external file into Studio than to link to an external file.
This feature establishes a true link, not a copy, of the specified application file. When you link to a file that is outside the Studio workspace, any edits to the file in Studio affect the external file. Similarly, if you edit the original file outside of Studio, you are also editing the linked copy in the Studio workspace, possibly rendering the Interface invalid.
For the rare, advanced cases where it is appropriate to create a StreamBase application by linking to an existing file, proceed as follows:
-
Follow the steps in Create a New, Empty Application File.
-
Before you click , click . This opens a new line in the dialog.
-
Select the Link to file in the file system check box, and use the button to navigate to and select the existing StreamBase application file of interest.
Click to insert path variables in the path to the linked file to avoid hard-coding an absolute path name. The path variables feature is provided by Eclipse, and is not part of StreamBase Studio. For guidance, see the Help topic Path Variables in the Eclipse Workbench User Guide.
-
Click .
Caution
In very advanced cases, it is possible to use both the Implement interfaces and Link to file options at the same time. In this case, the linked-to application file must have already been implemented using the same Interface you select in the Choose Interfaces dialog. On creation of such a linked file, Studio typechecking reports any failures to conform to the selected Interfaces.
