Contents
Certain adapters and operators require access to implementing JAR files provided by vendors of software external to StreamBase® and TIBCO LiveView. Examples of external JAR files include the JARs that implement TIBCO Enterprise Message Service™ or a third-party JAR file from a database vendor that implements JDBC access to that vendor's database system.
External JAR files may include proprietary technology from their vendors and are made available only to valid license holders of those products. Other external JAR files are made publicly available, either from a vendor's download site or from a public Maven repository such as Maven Central.
You can also use the instructions on this page to install a WAR file, such as the one that implements TIBCO LiveView Web functionality, or other file types similar to JARs.
Whatever their source, external JAR files must be obtained from their vendor and integrated into a Maven repository accessible to your EventFlow or LiveView fragment project. Projects generally do not pass StreamBase typechecking until all required external JAR files are identified as accessible to the Maven build system.
Maven repositories can be located in several layers:
-
A public repository, such as Maven Central. EventFlow and LiveView projects have access to Maven Central by default.
-
A vendor-provided public repository specific to that vendor's products. For example, Oracle Corporation provides an Oracle-specific repository that requires login access.
-
A site-specific network repository for your organization or department. In general, a site-specific central repository offers the most flexibility for the installation of required external JAR files and for the deployment of Maven artifacts. Most organizations choose to use Repository Manager software to provide a site repository that proxies Maven Central. See this Best Practice page in the Apache Maven documentation for a list of Repository Manager software providers, both commercial and open source.
-
A read-only on-disk repository installed by a software package. Before release 10.3.0, StreamBase® and TIBCO LiveView installed a read-only on-disk Maven repository as part of its installation directory structure. If you are using StreamBase 10.2.1 or earlier, projects can pull StreamBase-provided artifacts from this disk repository, but you cannot add external JAR files to it. This feature is not used in releases 10.3.0 and later.
-
A user-specific local repository. This is usually the
~/.m2/repositoryfolder of the current user's home directory on your local machine. Using the local machine's repository provides convenience, but any JAR file installed locally for one machine must be installed locally again for every developer and for any QA and deployment machines.(See this page for a discussion of specifying a different location for the local repository.)
Install the required external JAR files to the Maven system for your EventFlow or LiveView fragment project in one of several ways.
- Publicly Available Artifacts
-
If your JAR file is made available by its vendor in a public repository such as Maven Central, then you only need to specify the artifact's name and the version you wish to include, using the > dialog. The JDBC driver for the MySQL database is an example of a JAR file in this category.
- Downloaded Artifacts
-
If your JAR file is not available from a public repository, but is downloadable under license from its vendor, you can add such downloaded JAR files to a local Maven repository, or to a site-specific network repository. In Maven terminology, this is known as installing a file.
You can run a Maven Install operation with a Studio Run Configuration, or with command-line mvn install command.
The Maven Install options are described in the next sections. To use either method, you must obtain the external JAR file from its vendor, and obtain, as far as possible, its exact groupId, artifactId, and version number.
- Not Recommended: Maven Install to Local Path
-
It is possible for you to run a Maven Install that specifies a JAR dependency based on a local system path. In this case, you specify an absolute path to the JAR file on your local system, or a path relative to your project folder. This method is not recommended because it is not portable. Your system path on a development system is likely not the same as the path to the same JAR file on a QA or deployment system. This method is not described on this page.
- Not Recommended: JAR File in Project
-
For short-term testing ONLY, you can place an implementing JAR file in your project's
src/main/resourcesfolder. However, you must remove such JAR files before creating the archive for your EventFlow or LiveView fragment project. Otherwise, you could end up distributing another company's proprietary JAR files as part of your fragment, possibly without a license to do so. This is especially important to remember for JAR files that implement proprietary interfaces.
Third-Party Software
When you obtain third-party software or services, it is your responsibility to ensure that you understand the license terms associated with such third-party software or services and comply with such terms.
Use a Run Configuration in StreamBase Studio to run Maven Install operations if you prefer not to use the command line.
The Run Configuration method of Maven-installing a file is described on Editing Maven Install Configurations.
To add a third-party JAR file to your local Maven repository, you can use a mvn install command at the StreamBase Command Prompt (Windows) or in a StreamBase-configured terminal window (macOS and Linux).
Command-line mvn is included with StreamBase release 10.3.0 and later. If you are using an earlier release, look for a mvn command installed with your operating system, or you may have to install Maven separately.
You can install the JAR file to the local Maven repository, which is specific to the current user on the current machine.
By default, this is the .m2 directory of the current user's home directory. Use command syntax like the following. (This command is shown on multiple
lines, but must be entered as one long command.)
mvn install:install-file -Dfile=path-to-file-DgroupId=group-id-DartifactId=artifact-id-Dversion=version-Dpackaging=jar -DgeneratePom=true
Fill in the groupId, artifactId, and version information as obtained from the vendor when you downloaded the JAR file. If unavailable, use reasonable values that honor
the vendor origin of the file, as described in the next section.
The following example shows the command to install the JAR file that implements the JDBC driver for access to the Microsoft
SQL Server database. This example presumes that the downloaded JDBC JAR file, sqljdbc4.jar, is in the current directory. (Again, this command is shown on multiple lines, but must be entered as one long command.)
mvn install:install-file
  -Dfile=sqljdbc4.jar
  -DgroupId=com.microsoft
  -DartifactId=sqlserver-driver
  -Dversion=4.0
  -Dpackaging=jar
  -DgeneratePom=true
If your site has a central Maven repository, you can also add the -DlocalRepositoryPath= parameter to install the JAR file in your site's shared repository. Consult your local Maven administrators for the value
to use at your site.
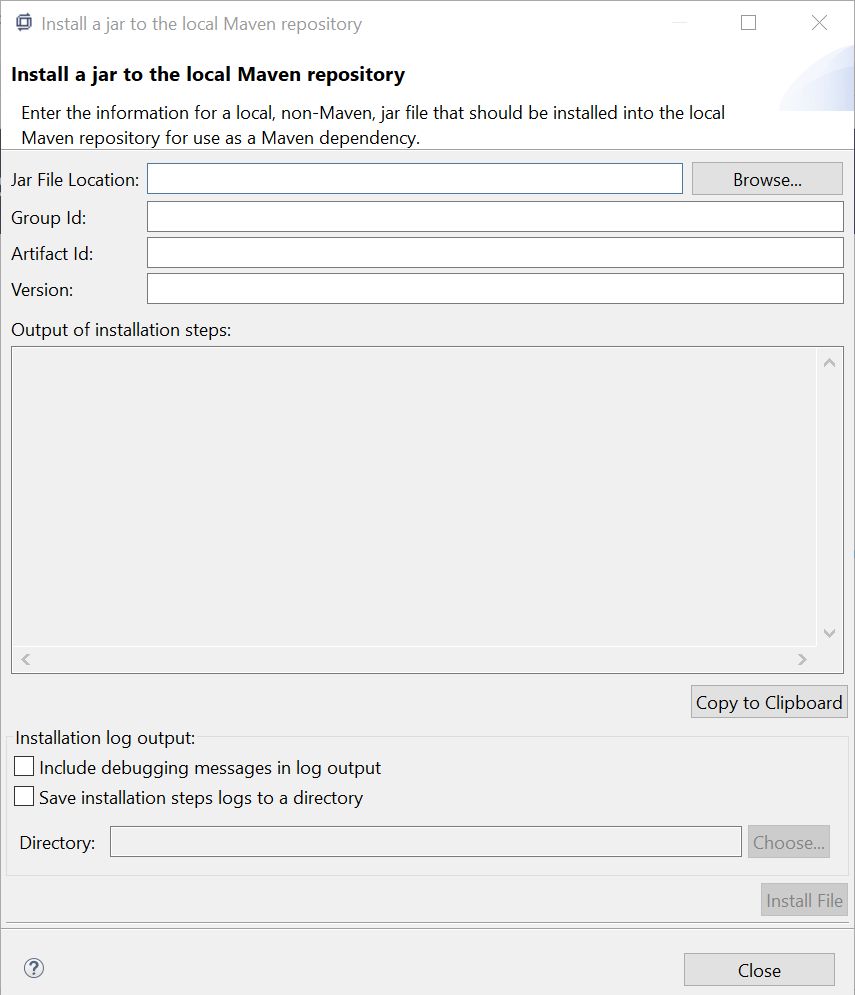
Users can install JAR files using the Install Jar into the Maven repository dialog in Studio.
To use the dialog, do the following:
-
In StreamBase Studio, click File, and select Install Jar into Maven repository.
The Install a jar to the local Maven repository dialog appears.
-
Enter the following details:
-
Jar File Location: Specify the path to the JAR file. You can also use Browse to select the location.
-
Group Id: Specify a reverse-DNS name (for example, com.example.deptname) that uniquely identifies your company and its division.
-
Artifact Id: Specify an ID based on the JAR file's name.
-
Version: Specify a version string. This version number or string is specific to the JAR file that you are installing. It does not need to match the version number of any other Maven component.
-
-
In the Installation log output section, you may do the following:
-
Select Include debugging messages in log output to enable Maven's debug log level.
-
Select Save installation steps logs to a directory to save the installation logs to a file.
-
Directory: Specify or select the directory where you want to save the installation steps logs.
-
-
Click Install File.
The JAR file is installed to the local Maven repository.
It is not always obvious what values to fill in for the groupId,
artifactId, and version fields for a vendor-provided
JAR file. Many vendors assume that their JAR files are used with simple file path references,
and do not provide Maven-compatible information.
Try the following ways to determine the best values to use with Maven Install, whether in a Run Configuration or on the command line.
- Honor the Vendor
-
In all cases, use reasonable values that honor the origin vendor's trade names.
-
Do not invent arbitrary names and version numbers.
-
Do not provide values that match the StreamBase artifact you are building instead of matching the vendor of origin.
-
- Artifacts from Maven Central Have All Parameters
-
If you obtain a JAR file from a public repository such as Maven Central, then by definition, the JAR file contains Maven-compatible information. This loads automatically as Maven adds the dependency for the file from the public repository.
- Exact Version Number Usually Known
-
At a minimum, you can almost always obtain the exact version number for an external JAR file. The vendor's website from which you download the external JAR file generally allows you to choose among several versions. You thus know the version number of the file that you chose to download.
- Look inside the JAR File
-
If you have a Java JRE or JDK on your search PATH, then you also have the jar command. You can use the jar command to look inside a downloaded JAR file for the values to use. Use a command like the following to view the JAR file's table of contents:
jar tf
filename.jarJAR files are archived with a Zip-compatible compression method, so you can also use an unzip utility or app, if your system has one.
-
First, look for the presence of a
META-INF/mavenfolder in the JAR. If that is present, and contains apom.xmlfile, then you do not need to look farther. In your Maven Install Run Configuration, you only need to specify thefileparameter, and the other values are filled in at install time from the JAR's internalpom.xmlfile. -
However, if you are using command line Maven, you must still specify all values as arguments on the mvn install:install-file command line. In this case, you can extract the JAR file's
pom.xmlto see what values to enter. For example:jar xf jms-2.0.jar META-INF/maven/javax.jms/jms/pom.xml
-
If there is no
mavenfolder in your JAR file, then extract theMETA-INF/MANIFEST.MFfile. For example, use the following command on thetibjms.jarfile included TIBCO Enterprise Message Service™ 8.4:jar xf tibjms.jar META-INF/MANIFEST.MF
Opening the
MANIFEST.MFfile shows the following contents:Manifest-Version: 1.0 Implementation-Title: com/tibco/tibjms Implementation-Version: 8.4.0 Specification-Vendor: TIBCO Software Inc. Specification-Title: TIBCO Enterprise Message Service Specification-Version: 8.4.0 Created-By: 1.8.0_74 (Oracle Corporation) Implementation-Vendor: TIBCO Software Inc. Main-Class: com.tibco.tibjms.version
-
- Fill In All Parameters Determined
-
From the
MANIFEST.MFinformation, you can provide accurate parameter values for your Maven Install run configuration or your mvn install:install-file command. For example, use the following values based on theMANIFEST.MFfor thetibjms.jarfile shown above.Parameter Name Value file /path/on/your/system/to/tibjms.jargroupId com.tibco.tibjms artifactId tibjms version 8.4.0 packaging jargeneratePom true - Fill In Reasonable Values When Not Determined
-
The JAR file's
MANIFEST.MFfile may not contain as much Maven-compatible information as the previous example. It provides you with at least a version number.In this case, provide a reasonable groupId value that is the reverse URL for the vendor, and an artifactId that reflects the intended use for the file. You can use the basename of the JAR file as the artifactId. For example:
Parameter Name Value file /path/on/your/system/to/silent_4.5.6.jargroupId com.example artifactId silent version 4.5.6 packaging jargeneratePom true
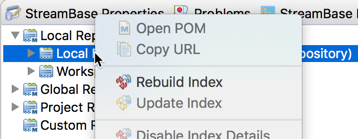
When you install a JAR file into a local machine repository or a site-specific network repository, the installed file may not immediately appear in response to a search in the > dialog.
To get the file to appear, you must rebuild Studio's index of the files contained in that repository. Use the following method
for the local machine's .m2 repository. (Ask your site's Maven administrators for the version of this procedure that applies to a site-specific network
repository.)
-
In Studio, open the Maven Repositories view:
-
Invoke >>.
-
In the search field, enter
maven. This restricts the list of views to those with Maven in their names. -
Select Maven Repositories.
-
-
In the Maven Repositories view:
-
Open Local Repositories.
-
Select Local Repository.
-
Right-click and select Rebuild Index from the context menu.
-
Click .
-
-
Watch for status messages in the Studio's status bar in the lower right. This command sometimes does not start a rebuild on the first invocation. If the command returns very quickly with no status messages, rerun the Rebuild Index command.
Watch for Studio status bar messages. The command should take 5-15 seconds with many status messages and possibly a dialog or two.
-
On macOS, the newly added JAR file should now appear in response to a search in the > dialog, and should now be selectable from the results view of that dialog.
On Windows, the newly added JAR file may still not appear in the > dialog even after a successful index rebuild. In this case, if you saw a BUILD SUCCESS message when you installed the file, then it is safely installed. You can fill in the Group Id, Artifact Id, and Version fields manually in the Add Dependency dialog.