Contents
The Properties view lets you examine and modify settings for individual components in an EventFlow module. The Properties view is not available for StreamSQL applications. To display the properties for a component or arc, select its icon on the EventFlow Editor canvas.
Properties are organized in a series of tabs. By default, the Properties view is located in the bottom center pane of the SB Authoring perspective.
Every Properties view has a General tab, where you can change the default name given to the component by StreamBase, and optionally
add a description to document the component's intended use. For example, when you drag the first Input Stream icon from the
palette to an EventFlow canvas, StreamBase names it InputStream1. You can change the default name to better reflect the type of data it processes, such as StockIn.
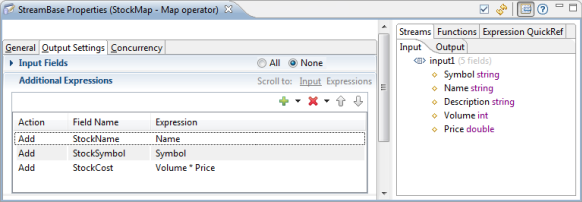
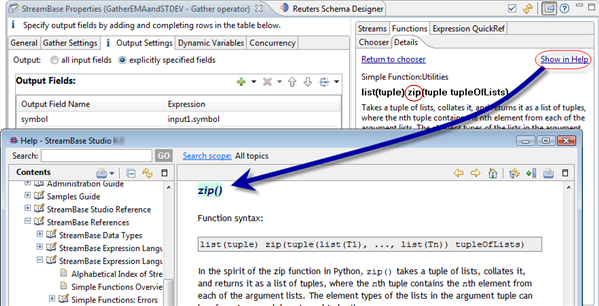
The other tabs and functions available in a Properties view vary for each component, and are discussed in the Authoring Guide page for each component. This topic discusses features that are available in most components. The sample figure below shows the Properties view for a Map operator called StockMap, with the Output Settings tab selected.
 |
When you edit values for fields in one tab and then move to another tab (such as the Output Settings tab), the values you entered on the first tab persist during the session. To save the changes in the application for future sessions, you must save the application.
The Properties view has the following buttons on the top right side of the view:
| Button | Name | Description |
|---|---|---|
| Apply and Typecheck | Apply any changes made in the Properties view tabs for the currently selected component. Does not save the application. | |
| Revert | Undo changes for the currently selected component, reverting to the last-saved version. | |
| Show Assistance Panel | Show or hide the Assistance panel. | |
| Help on Current Tab | Invoke the Help page for the active Properties view tab for the currently selected component in the EventFlow Editor. |
Look for messages at the top of any Properties view. Some messages are informational, as indicated by the ![]() icon.
icon.
Problems are indicated by either a yellow ![]() warning or red
warning or red ![]() error icon. As you work on properties, StreamBase Studio continually validates your changes. If the resulting properties
are incomplete or incorrect, a warning or error icon is displayed with a brief problem description.
error icon. As you work on properties, StreamBase Studio continually validates your changes. If the resulting properties
are incomplete or incorrect, a warning or error icon is displayed with a brief problem description.
In the example below, a new Input Stream has been created. The error indicates that the component is not valid (does not typecheck) because you have not yet created any fields.
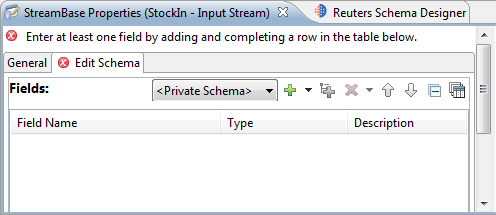 |
In most cases, StreamBase automatically applies your changes as you work, such as when you press Return after entering a grid row, or when you click anywhere in Studio outside the Properties view. To force typechecking, click the button near the top right area of the Properties view, or press Ctrl+Shift+T. The error icon and message disappear as soon as typechecking is successful. Note that applying changes validates the application, but does not save it.
Note
Problems indicated in the Properties view are also listed in the Typecheck Errors view, which provides another way to navigate to the components where the problems occur.
If your application contains Java operators or adapters, you may see error messages like the following example:
 |
Failures to load classes can occur if you change the Java Build Path, or you update the code for a custom Java operator or adapter. For example, your Java source might specify a dependency whose resource you forgot to add to the build path. When there is a problem with the build path, the operator or adapter may not appear in the palette.
When a Java problem occurs, a message like the following includes a link to display the stack trace:
Could not create a new instance of
class. Click for Java error details.
Remember that you can also use the Error Log view to see stack traces, as described on Error Log View.
As always, after modifying sources to fix a build path problem, refresh your project's typecheck environment by selecting the EventFlow Editor canvas and pressing Ctrl+F5.
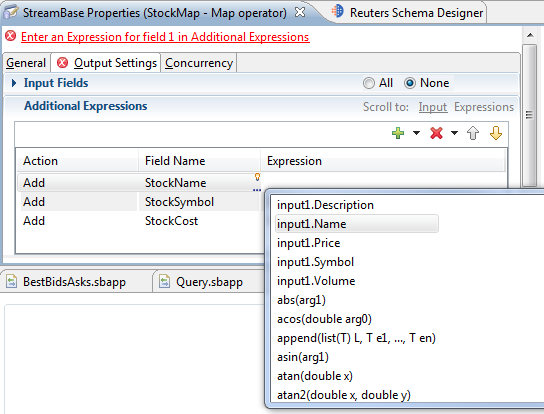
In the Properties view, when editing a field that accepts a StreamBase expression, a light bulb icon appears on the left or right side of a field if content assistance is available for the current field.
Type Ctrl+Space to initiate expression auto-completion. If the field is empty when you type Ctrl+Space, the auto-completion list shows the names of stream fields you can enter, as well as a list of all available functions and
operators. If you type a few letters, then type Ctrl+Space, auto-completion shows you the expression language functions that match those letters. The following example shows the functions
that match the letter a:
 |
When you select a function in the auto-completion list, a second pane shows the syntax and description for that function:
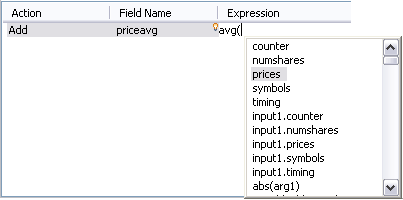
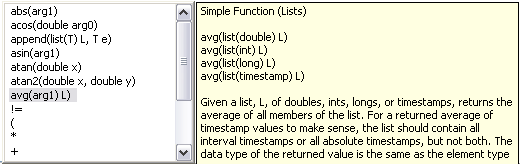 |
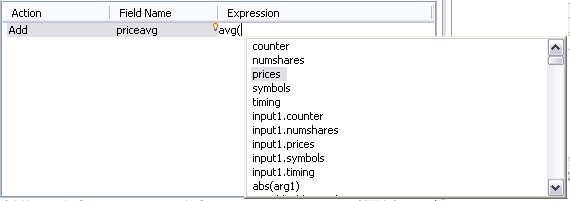
Once you select a function (avg() in this example) and type the opening parenthesis, Ctrl+Space shows a list of available fields in incoming streams. Select the field of interest, press Enter, then type the closing parenthesis.
 |
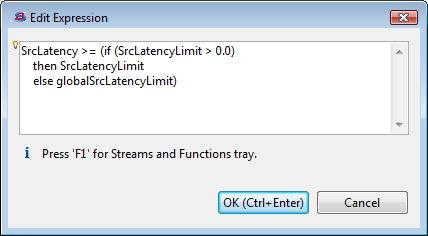
Studio provides an optional edit window for editing long expressions in operator and adapter Properties views. To open the edit window, click to select the expression field of interest, then click the ellipsis (three dots) on the left side of the field, or press F2. For some expression edit cells, the ellipsis is on the right side of the field.
 |
This opens a resizable edit window for the field, which allows you to insert returns, spaces, and comments to style the expression for readability. Spaces and returns in the expression are preserved in the EventFlow file and persist between editing sessions. The auto-completion feature described above operates as expected in the edit window. Press F1 to open the Streams and Functions tabs of the Properties view alongside the edit window.
 |
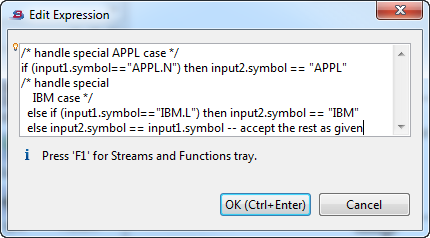
You can add comments to your expressions using either C-style comments or StreamSQL-style comments:
-
StreamSQL comments begin with two hyphens and extend to the end of the same line.
-
C-style comments being with slash-asterisk and end with asterisk-slash. You can insert C-style comments anywhere in the expression, including the middle of a line, and they can extend over multiple lines.
 |
When done, click or press Ctrl+Enter to save your edits and return to the Properties view.
You can customize behavior of of Java operators and adapters by enabling some of their properties to vary on a per-module basis. Any property that you normally set with a check box, radio button, or drop-down menu can be a module parameter or StreamBase expression that you specify directly in a property view. Values of parameterized properties are resolved and instantiated one time, when the containing module initializes, and do not change during the operation of that module or its containing application.
A StreamBase Studio preference toggles access to this feature, which is enabled by default starting with release 7.5.0. To disable it, navigate to → → → , find the item , and then select its check box.
When the feature is enabled, the label for each property you can parameterize has a small T icon ( ) on its right side. Clicking the converts the control to a text field. In that field, type the name of a parameter in
 ${param} format, or enter a StreamBase expression preceded by an equals sign (=expr). Whether enabled or not, you can access the feature at any time by typing the keyboard shortcut Alt+F2 (Option+F2 on Mac) when a suitable control has focus.
Clicking the T icon or typing Alt+F2 a second time toggles the control back to its previous state and removes any parameter or expression you may have entered. Thus, leave the text box in place if you want to use this feature.
The following illustration shows entering a reference to a module parameter for a control that sets enumerated values for an adapter's logging verbosity.
| 1. Click the T Decoration or type Alt/Option+F2 | 2. Enter a Module Parameter or Expression | ||
|
|
|
In this example, the adapter's LogLevel parameter is set to the module parameter ${myLogLevel}, so that instead of
<param name="LogLevel" value="INFO"/>
its XML source now contains:
<param name="LogLevel" value="${myLogLevel}"/>To avoid a typecheck error, the module parameter ${myLogLevel} must exist and must be defined as one of the valid enumerated values that LogLevel can have, which are the exact strings OFF, ERROR, WARN, INFO, DEBUG, TRACE, ALL.
Note
-
Only Java operators and adapters have this option. Standard StreamBase data constructs and operators, such as Aggregate, Filter, Query, do not allow their properties to be set in this way.
-
The option is available whenever an applicable control has focus. You can toggle the option off and on at any time by typing Alt+F2 (Option+F2 on Mac).
-
Toggling a control from a text field to its original appearance removes any parameterization entered in that field.
-
Only check box, radio button, and drop-down menu values can be defined with parameters.
-
The text field only accepts module parameters or expressions that evaluate to strings. For a check box, the string must be
trueorfalse, or must be an expression that resolves totrueorfalse. For radio buttons, the string must match one of the defined labels for that radio button. For a drop-down menu, the string must match one of its choices in the menu. -
When entering a parameter or expression, do not surround it with quotes.
-
The expression or parameter you specify is applied when the module initializes and does not change during execution of the containing module and application.
The Assistance pane is the three-tabbed subwindow on the right side of the Properties view. You can hide or display the Assistance
pane by clicking the ![]() button.
button.
The Assistance pane show the schemas of currently selected components, and provides information to help you write expressions, such as the names and syntax of functions in the StreamBase expression language.
The Assistance pane has three tabs:
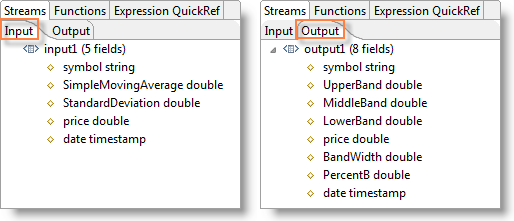
The Streams Tab shows the schema of the stream flowing into the currently selected component in the EventFlow Editor, or out of that component, or both:
-
If the current selection is an input stream, this tab shows the schema of its outgoing stream.
-
If the current selection is an output stream, this tab shows the schema of its incoming stream.
-
For certain components such as Map and Filter operators, this tab shows the schema of both incoming and outgoing streams.
-
For other components, this tab shows the schema of either the incoming or outgoing streams, as appropriate for the component type.
The following example shows both incoming and outgoing streams of the BollingerEMA component of the Bollinger Band sample in the Input and Output sub-panels, respectively.
 |
The top summary line for each stream shows the number of fields in the schema. You can expand or hide each stream to see its fields, data types, and descriptions, if provided. If a schema includes a tuple value, use the plus sign next to the tuple field to expand its sub-fields.
Note
The Streams tab is especially useful in conjunction with Map operators. Use the Input sub-panel to see the schema of the incoming tuple, then switch to the output sub-panel to see the transformations applied by that Map operator.
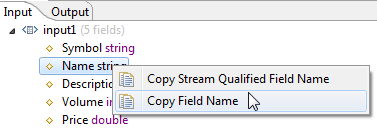
To help you enter expressions that contain field names, right-click a field name in the Input sub-panel of the Streams tab, and copy the selected field name, either by itself or qualified with its stream name. You can then paste the copied field name into an expression field.
 |
The Output tab remains active while you edit the current component. This means the output schema shown in this tab might become out of sync with the edits you are currently making, especially if you have automatic typechecking disabled. In this case, a message warns that this view is stale. As soon as typechecking succeeds, the Output tab is updated.
This tab provides quick access to information about StreamBase functions. The following figure shows an example:
 |
The Functions Tab has two sub-panels of its own:
The Chooser tab lists all the StreamBase functions that you can use in expressions. When you first open the Chooser sub-panel, the list of functions opens only to the category level. Open individual categories to browse for a function, or used the filter text field to search for a function name or pattern.
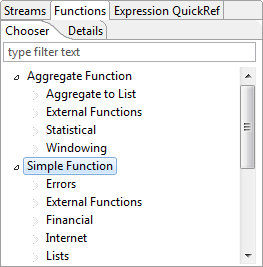 |
Functions are grouped first into Aggregate and Simple functions, and then into categories, such as Statistical and Math functions. Expand and collapse each group by clicking the arrowheads on the left of each node.
You can also navigate with the filter field, which is just under the Chooser tab. Enter a function name, the beginning of a name, or a regular expression in the filter field, which filters the list of functions on any matching names. Use an asterisk wildcard in your search expression to match substrings. Click the Clear button to the right of the search field to return to the unfiltered view of the function list.
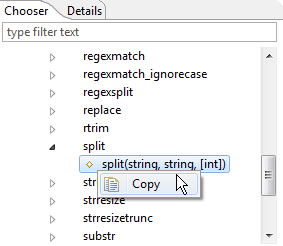
Within category groups, functions are listed alphabetically by name. If you expand a function name, its syntax prototypes are displayed. To help you enter functions in expressions, you can right-click a function syntax prototype, and copy the selected function name and prototype. You can then paste the copied function prototype into an expression field.
 |
To see more detailed usage information for a function, double-click its name or a syntax line. This opens the Details sub-panel, which shows a summary of the summary of the selected function.
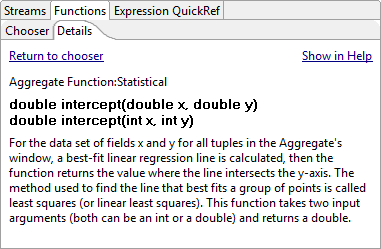
The Expression QuickRef tab provides brief summary information about the StreamBase expression language, including data types, basic syntax, and function types. It also provides a link to further information in the StreamBase Expression Language Features topic.
Many tabs in the Properties view allow you to enter values in a tabular format. You edit such property grids by adding and removing rows, and modifying fields in each row. The following buttons support grid editing:
| Button | Name | Operator | Description | |
|---|---|---|---|---|
|
|
Add | All property grids | Adds a row to the end of the grid. Click the arrow on the button's right to specify whether the row should be added above or below the currently selected row. When you add a row, the newly created row is highlighted. To start entering information, click in the cell you want to edit. (But, some cells are not user-editable.) | |
|
|
Remove | All property grids | Removes the currently selected row. Click the arrow on the button's right to remove all rows in the grid. | |
|
|
Move Up, Move Down | All property grids | selects the previous row in the grid if one exists. selects the next row. | |
|
|
Select Fields | Map and Query operators | Click to open the Select Fields to Replace dialog that shows available fields for the Input Fields or Table Fields grids. Click the down arrow to select the alternate actions Include or Remove, which open the Select Fields to Include and Select Fields to Remove dialogs, respectively. | |
|
|
Smart Fill | Query operator with write operation | Replaces any values in the Expression column of a Field Table with values that match the operator's input fields, adding the
input. qualifier to avoid field name conflicts.
|
|
|
|
Pass All | Gather and Join operators | Fills the grid with all output fields passed in from the downstream component. Selected fields are passed through unchanged. If you click the arrow on the button's right, you can load specific input fields. | |
|
|
Copy Schema | Operators with Edit Schema grids | Pre-fills the grid with a schema that exists in another component. The component can be selected from any module or interface in any project in your workspace. | |
|
|
Assign All | Module References only | Automatically assigns input streams from the referenced application to the Module Reference input or output ports. The streams are assigned to ports in sorted order. Also creates any missing ports needed for the assignment. |
For information about keyboard shortcuts for grid editing operations, see Studio Keyboard Shortcuts.